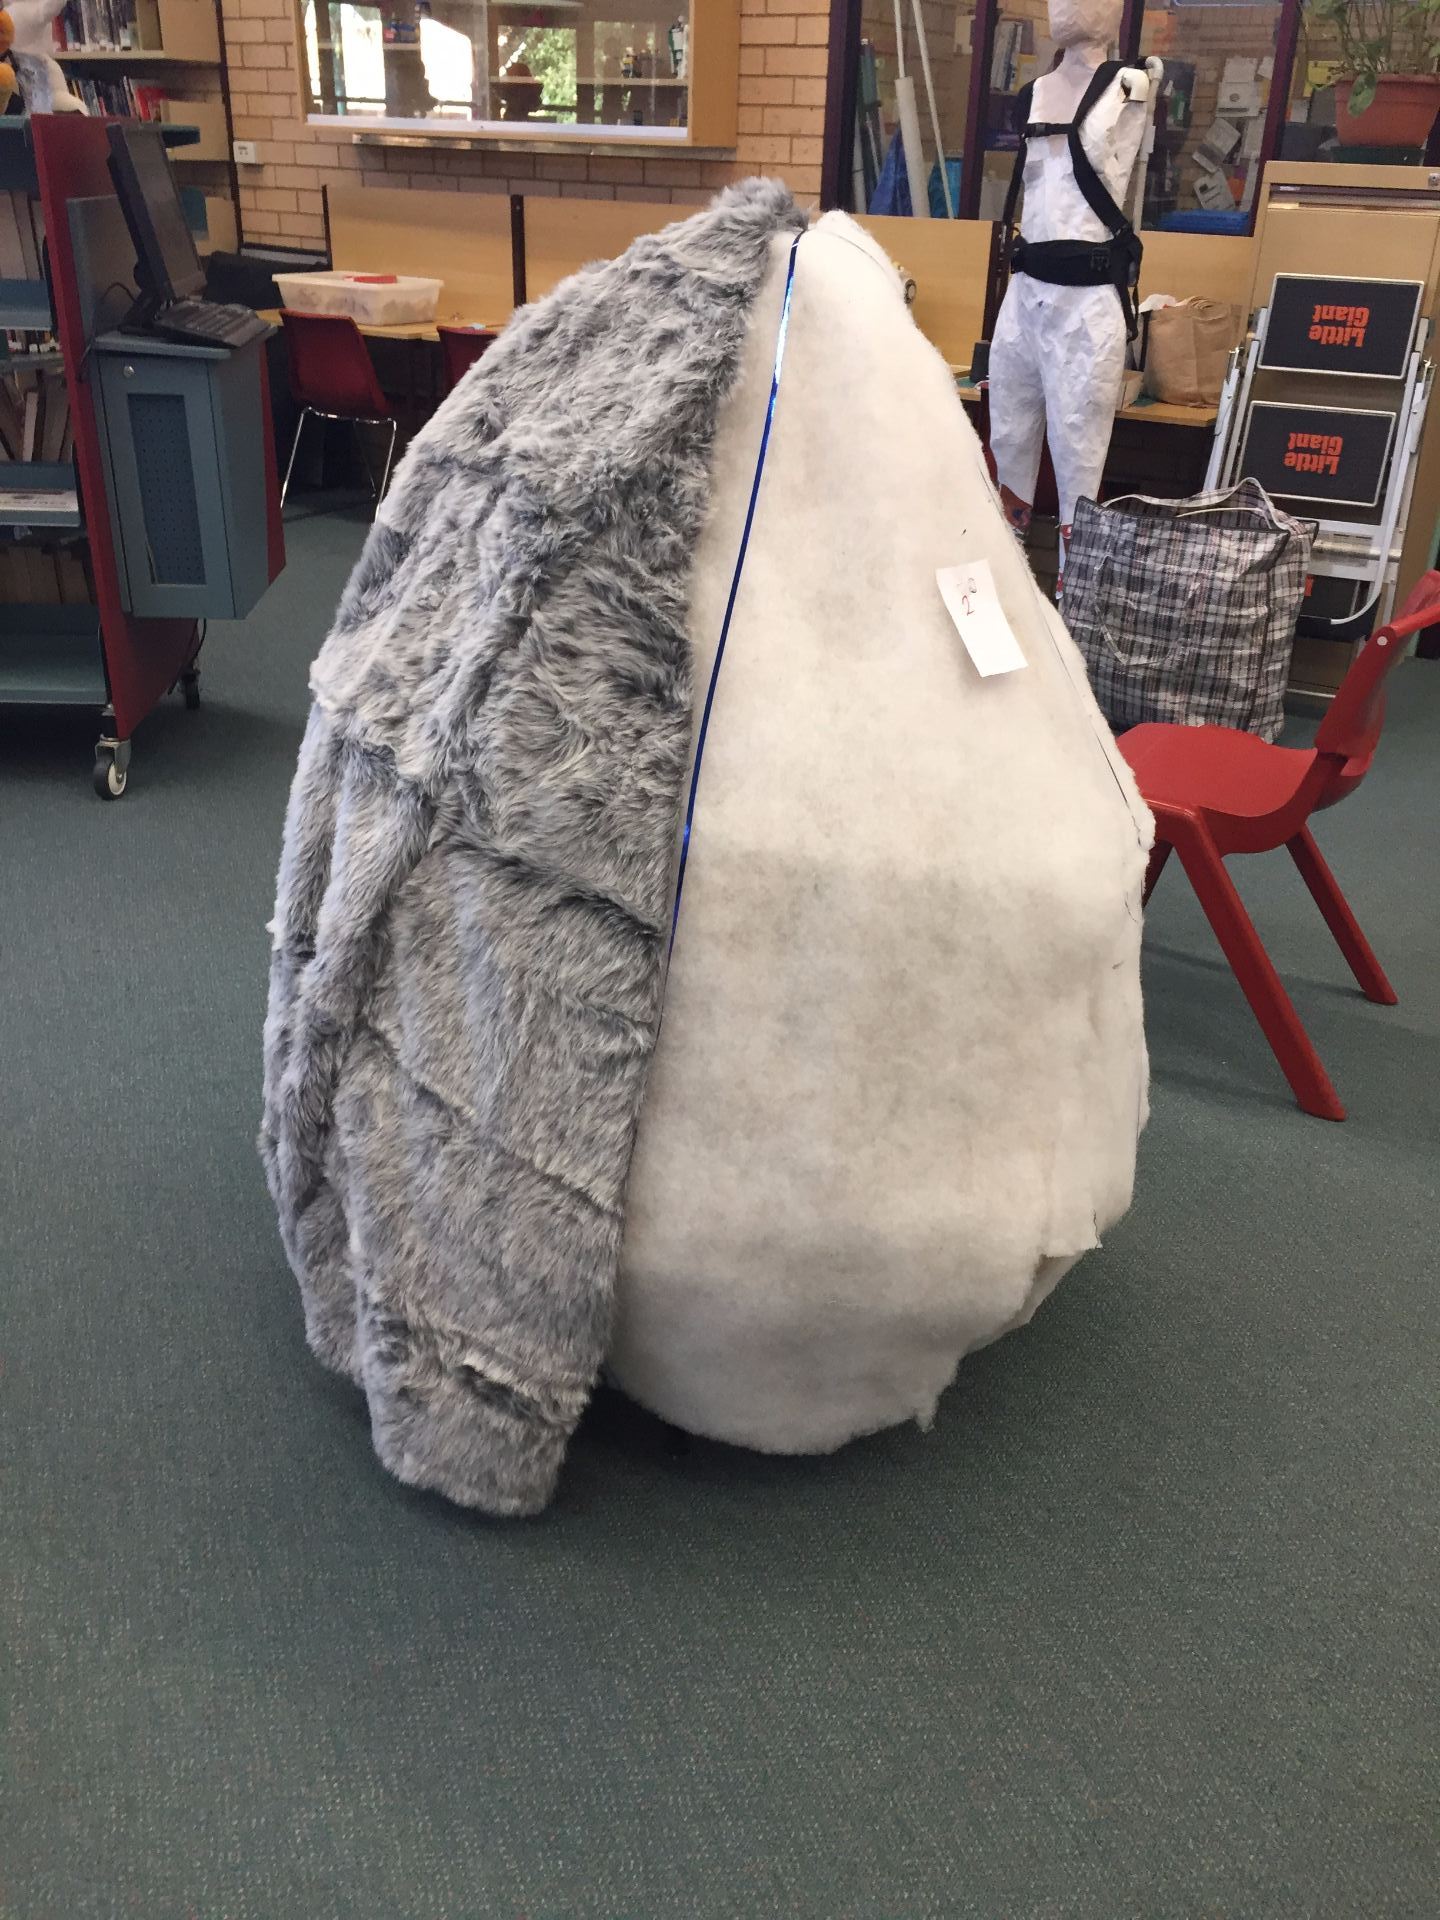
Now that the skeleton is covered with fabric, I used spray adhesive to attach a layer of cotton batting. The purpose of the batting is to disguise the ribs of the skeleton. I then started to cover the batting with the very reasonably priced fur I got from Kmart!
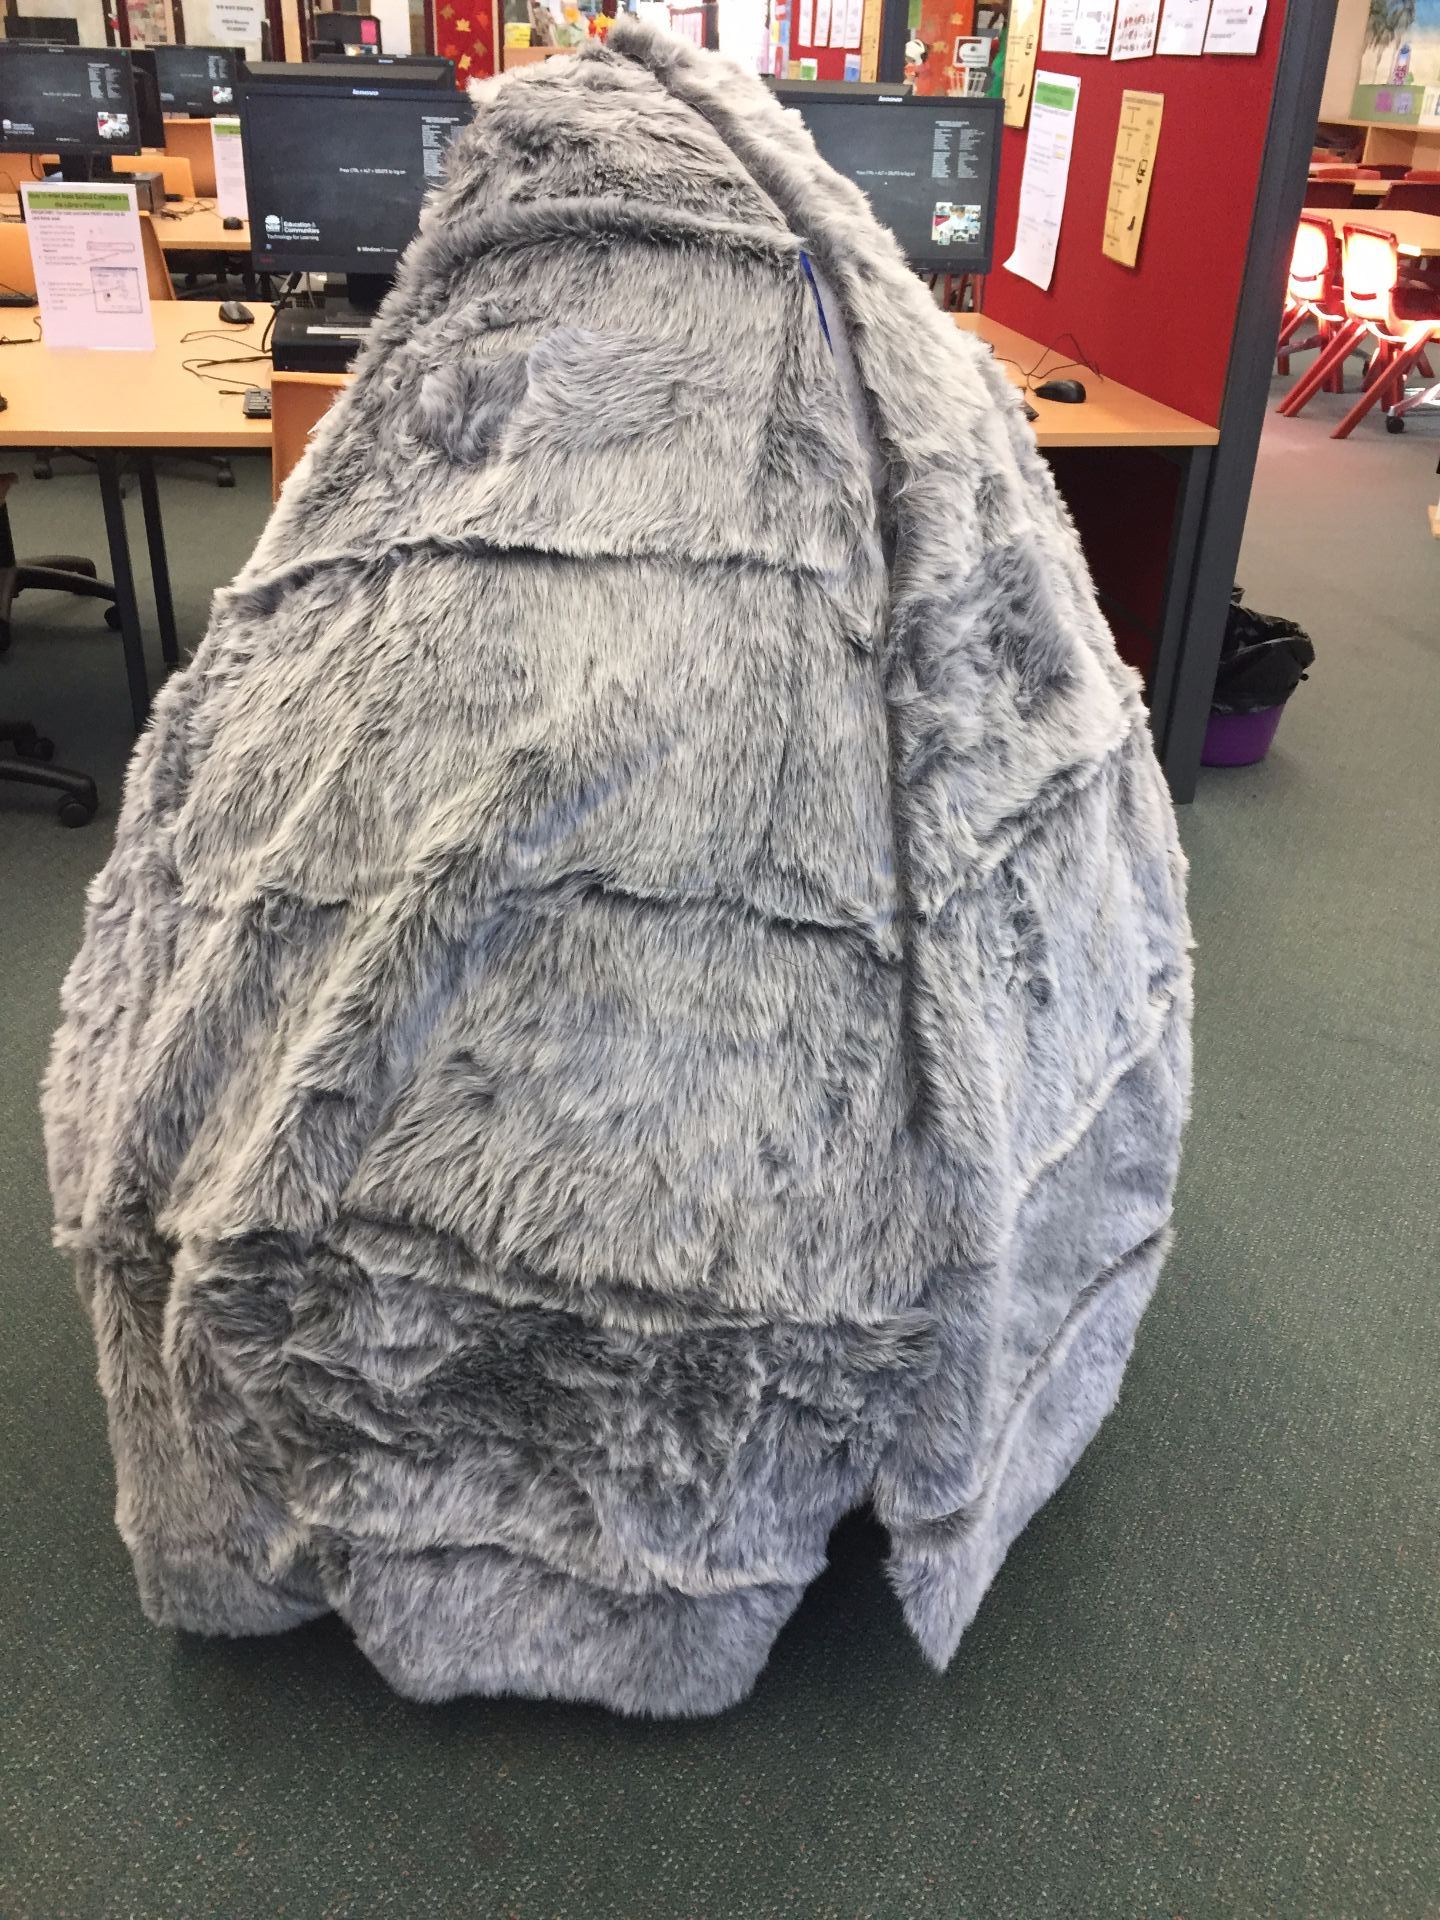
I purchased 14 rolls of fur and had to remove the faux suede backing on each one. Each one was then sewn together using the sewing machine. 4 Blankets sewn together gave me enough fur to make two of the four panels required to make the outer skin of Totoro.
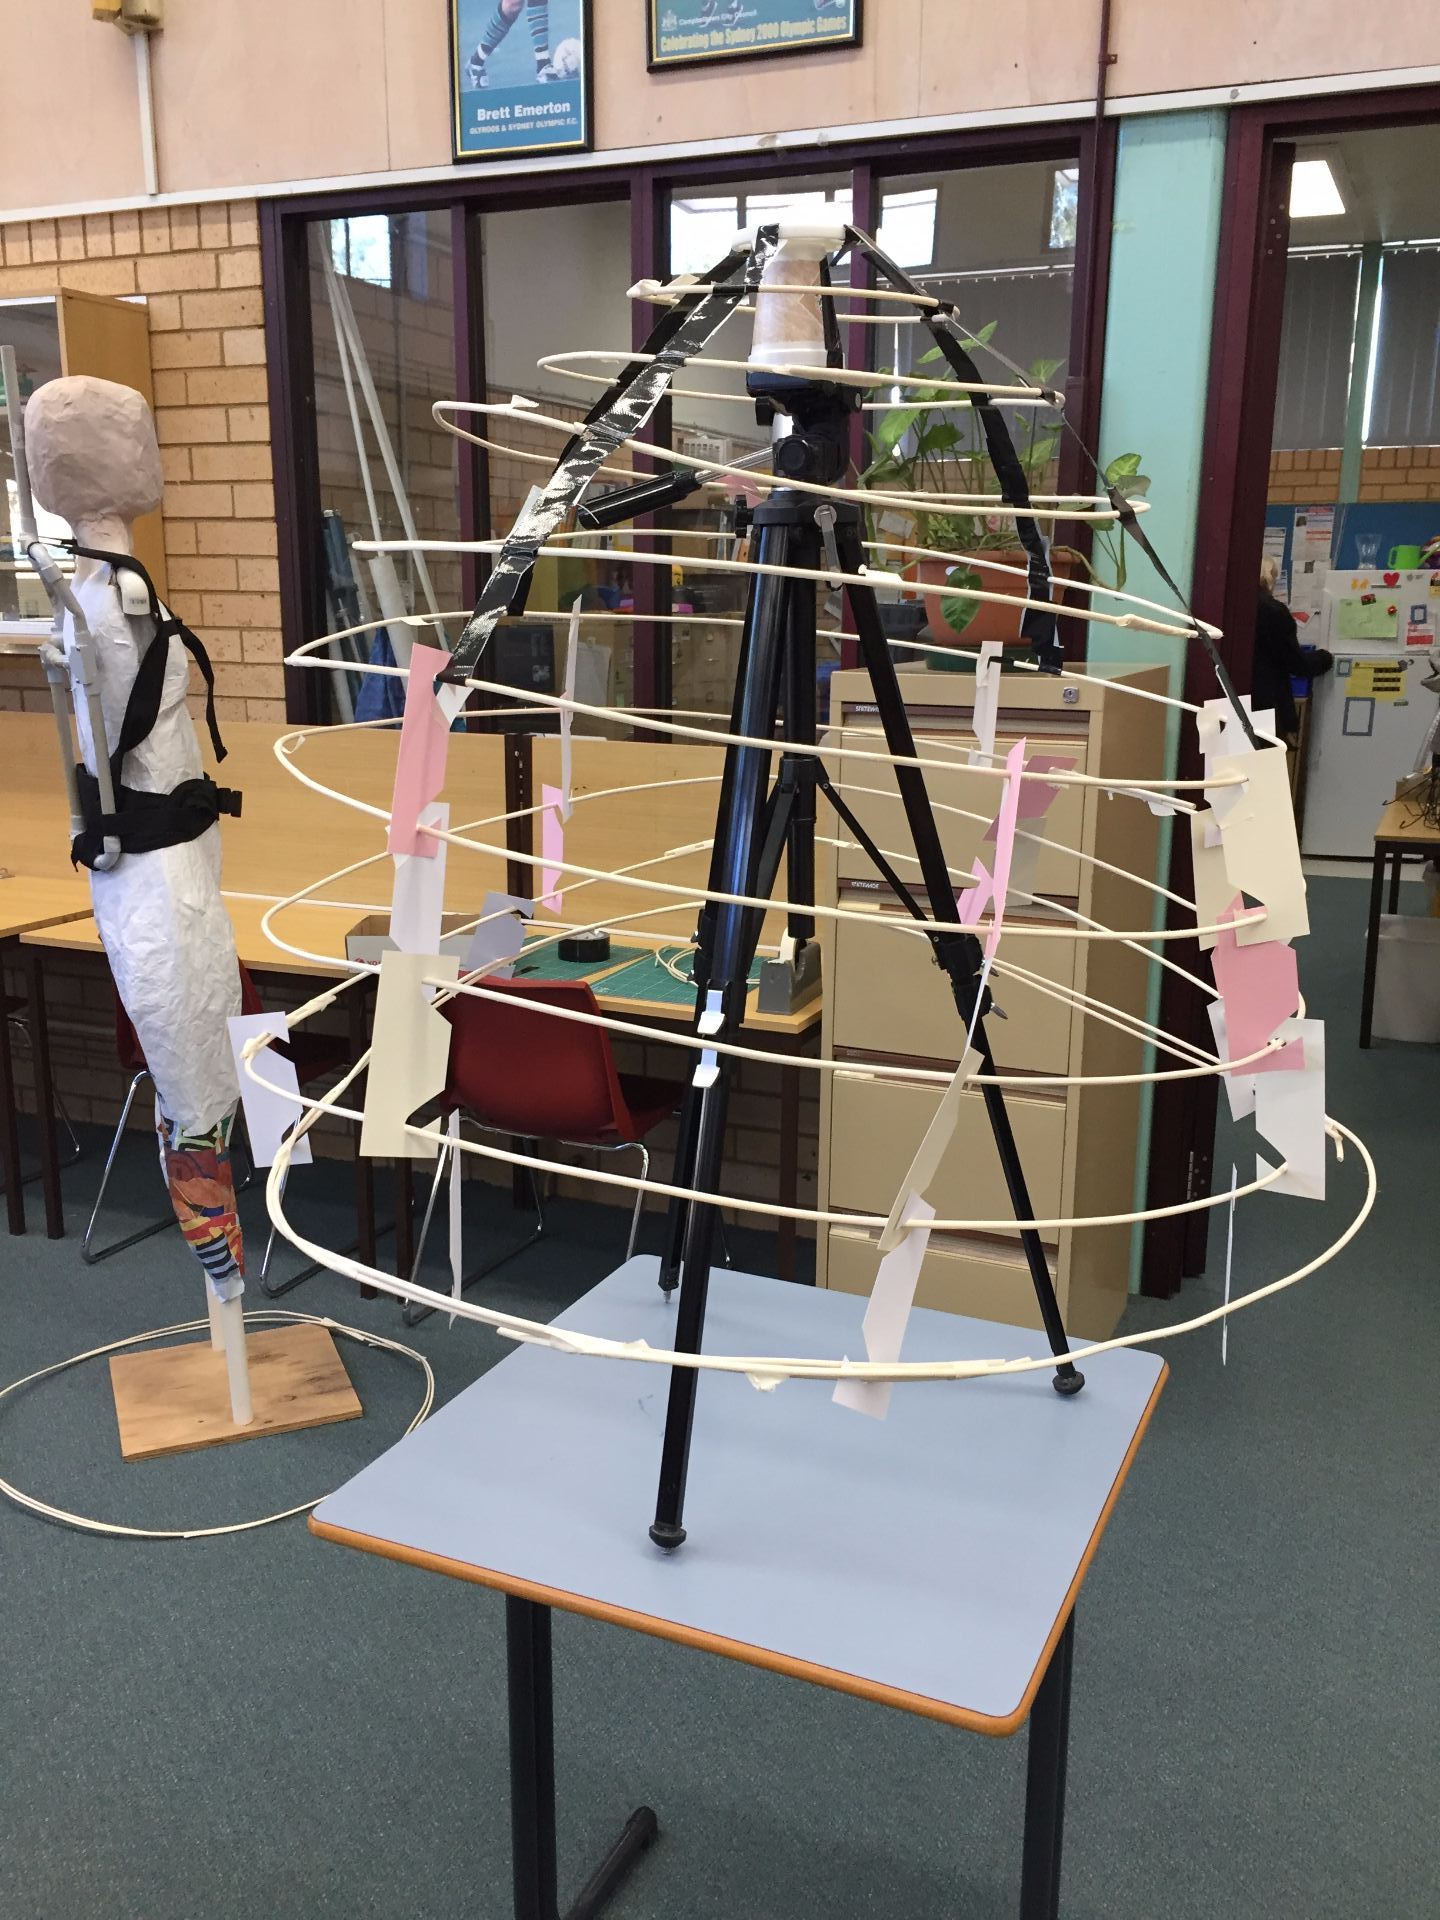
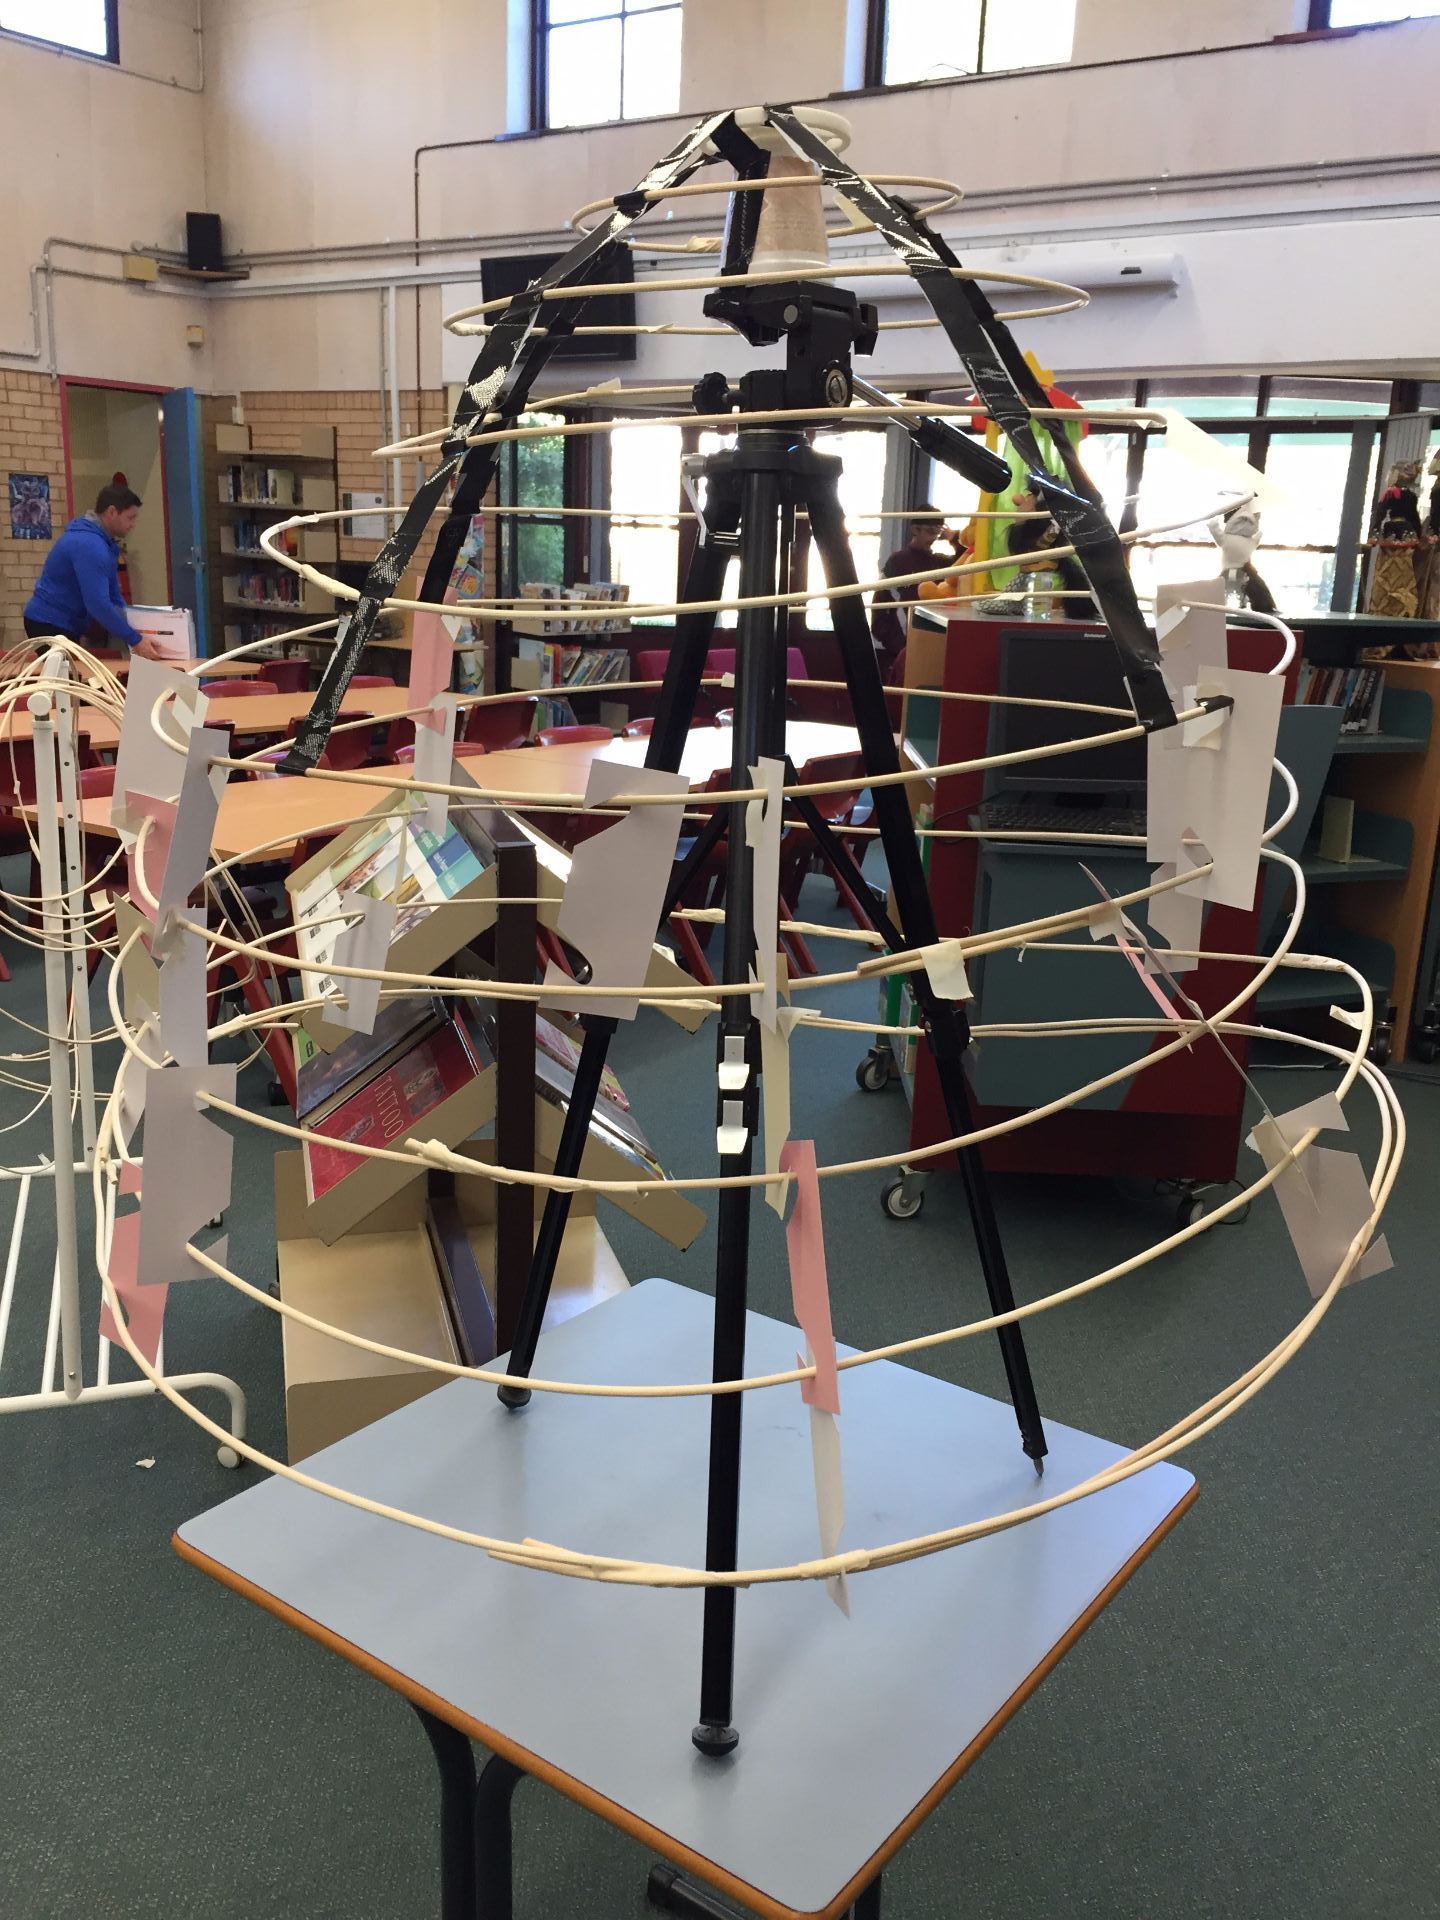
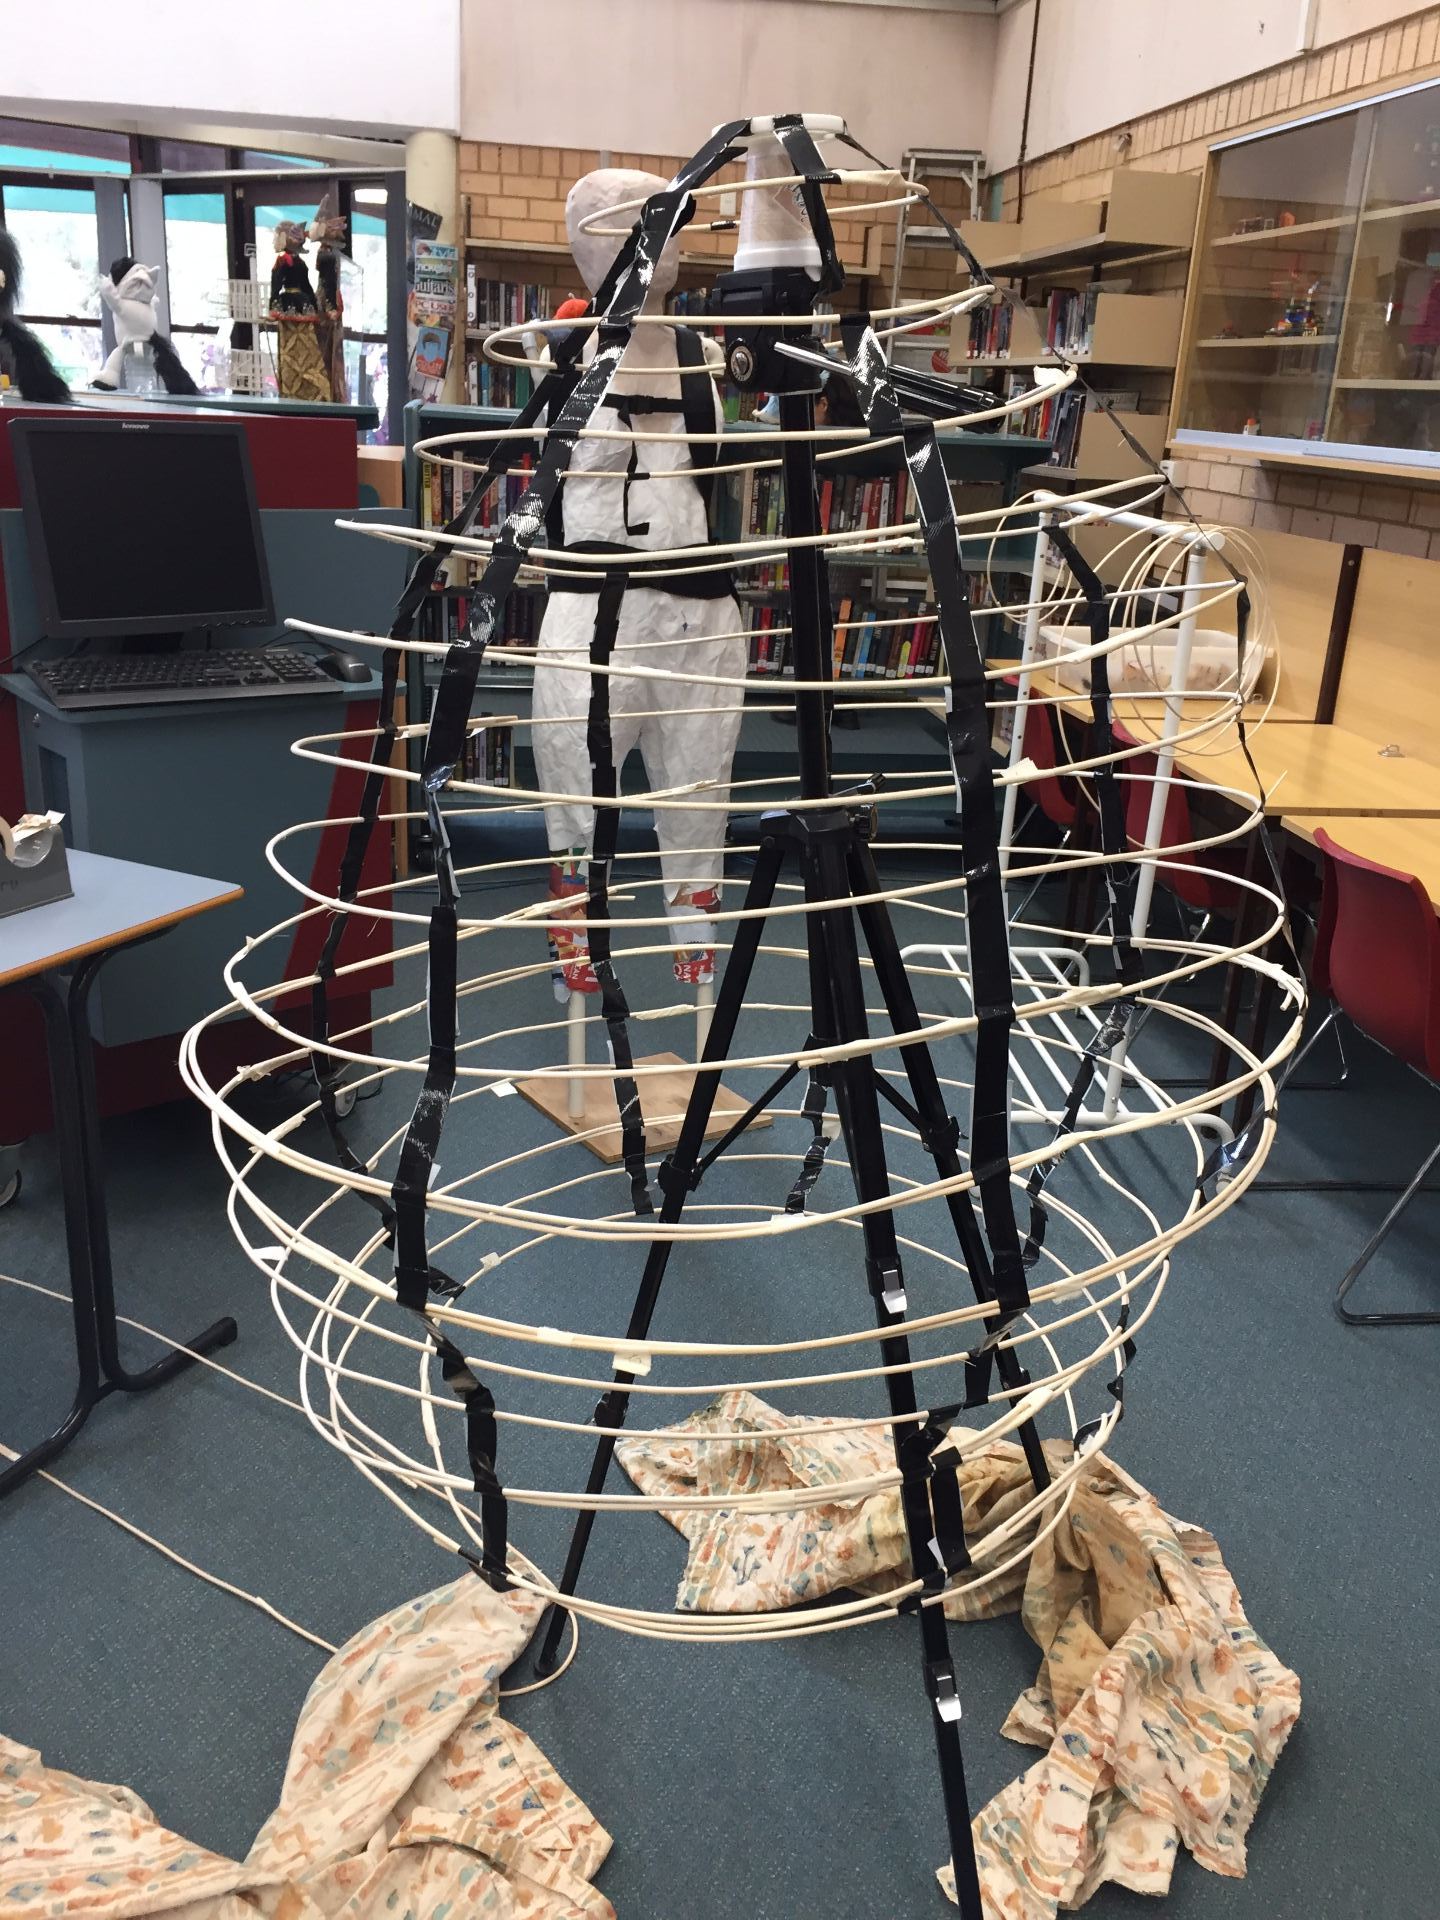
Once the skeleton of Totoro was complete, I noticed that his shape was not symmetrical, and some of the rings were far too large. Fortunately, I had secured the rings with masking tape, which was very easy to remove. It was then a simple matter of pulling each of the problem rings in and wrapping with fresh tape. I also had issues with the gaffer tape supports between the rings giving way, causing the rings to drop and become lopsided. Where tape had given way, I ended up applying a new piece of tape that wrapped around the ring onto itself at both ends.
I did work out a very efficient way to cut the gaffer tape in half to make thin strips. I would tear off the required length and place it sticky side down on a self healing cutting mat. I then used an X-Acto blade to cut down the middle of the tape. It was then very easy to remove the tape from the mat and use the sections of tape on Totoro’s skeleton.
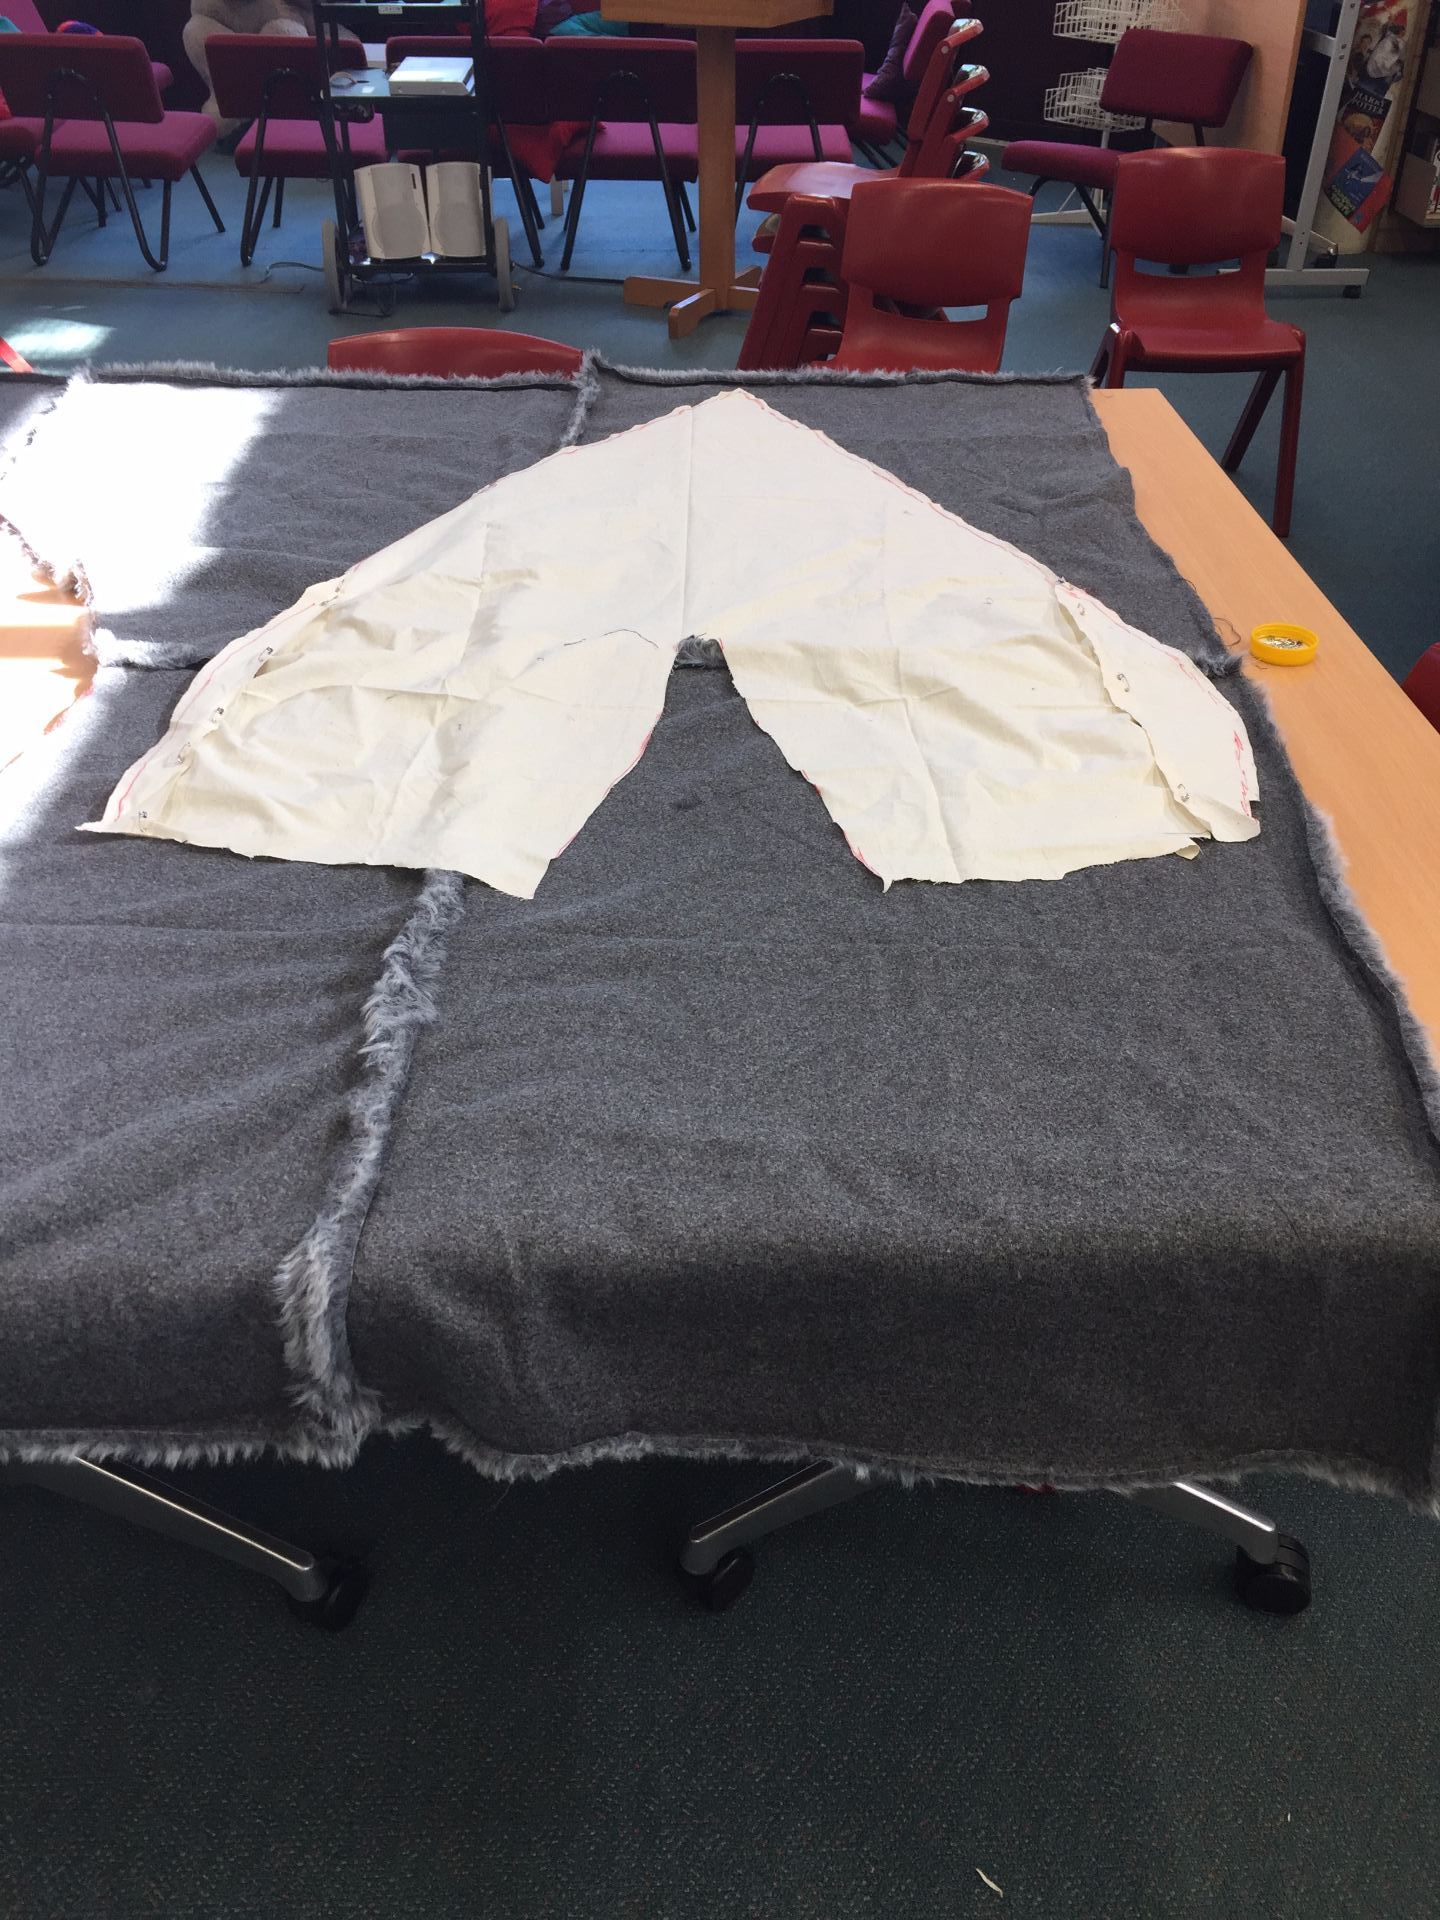
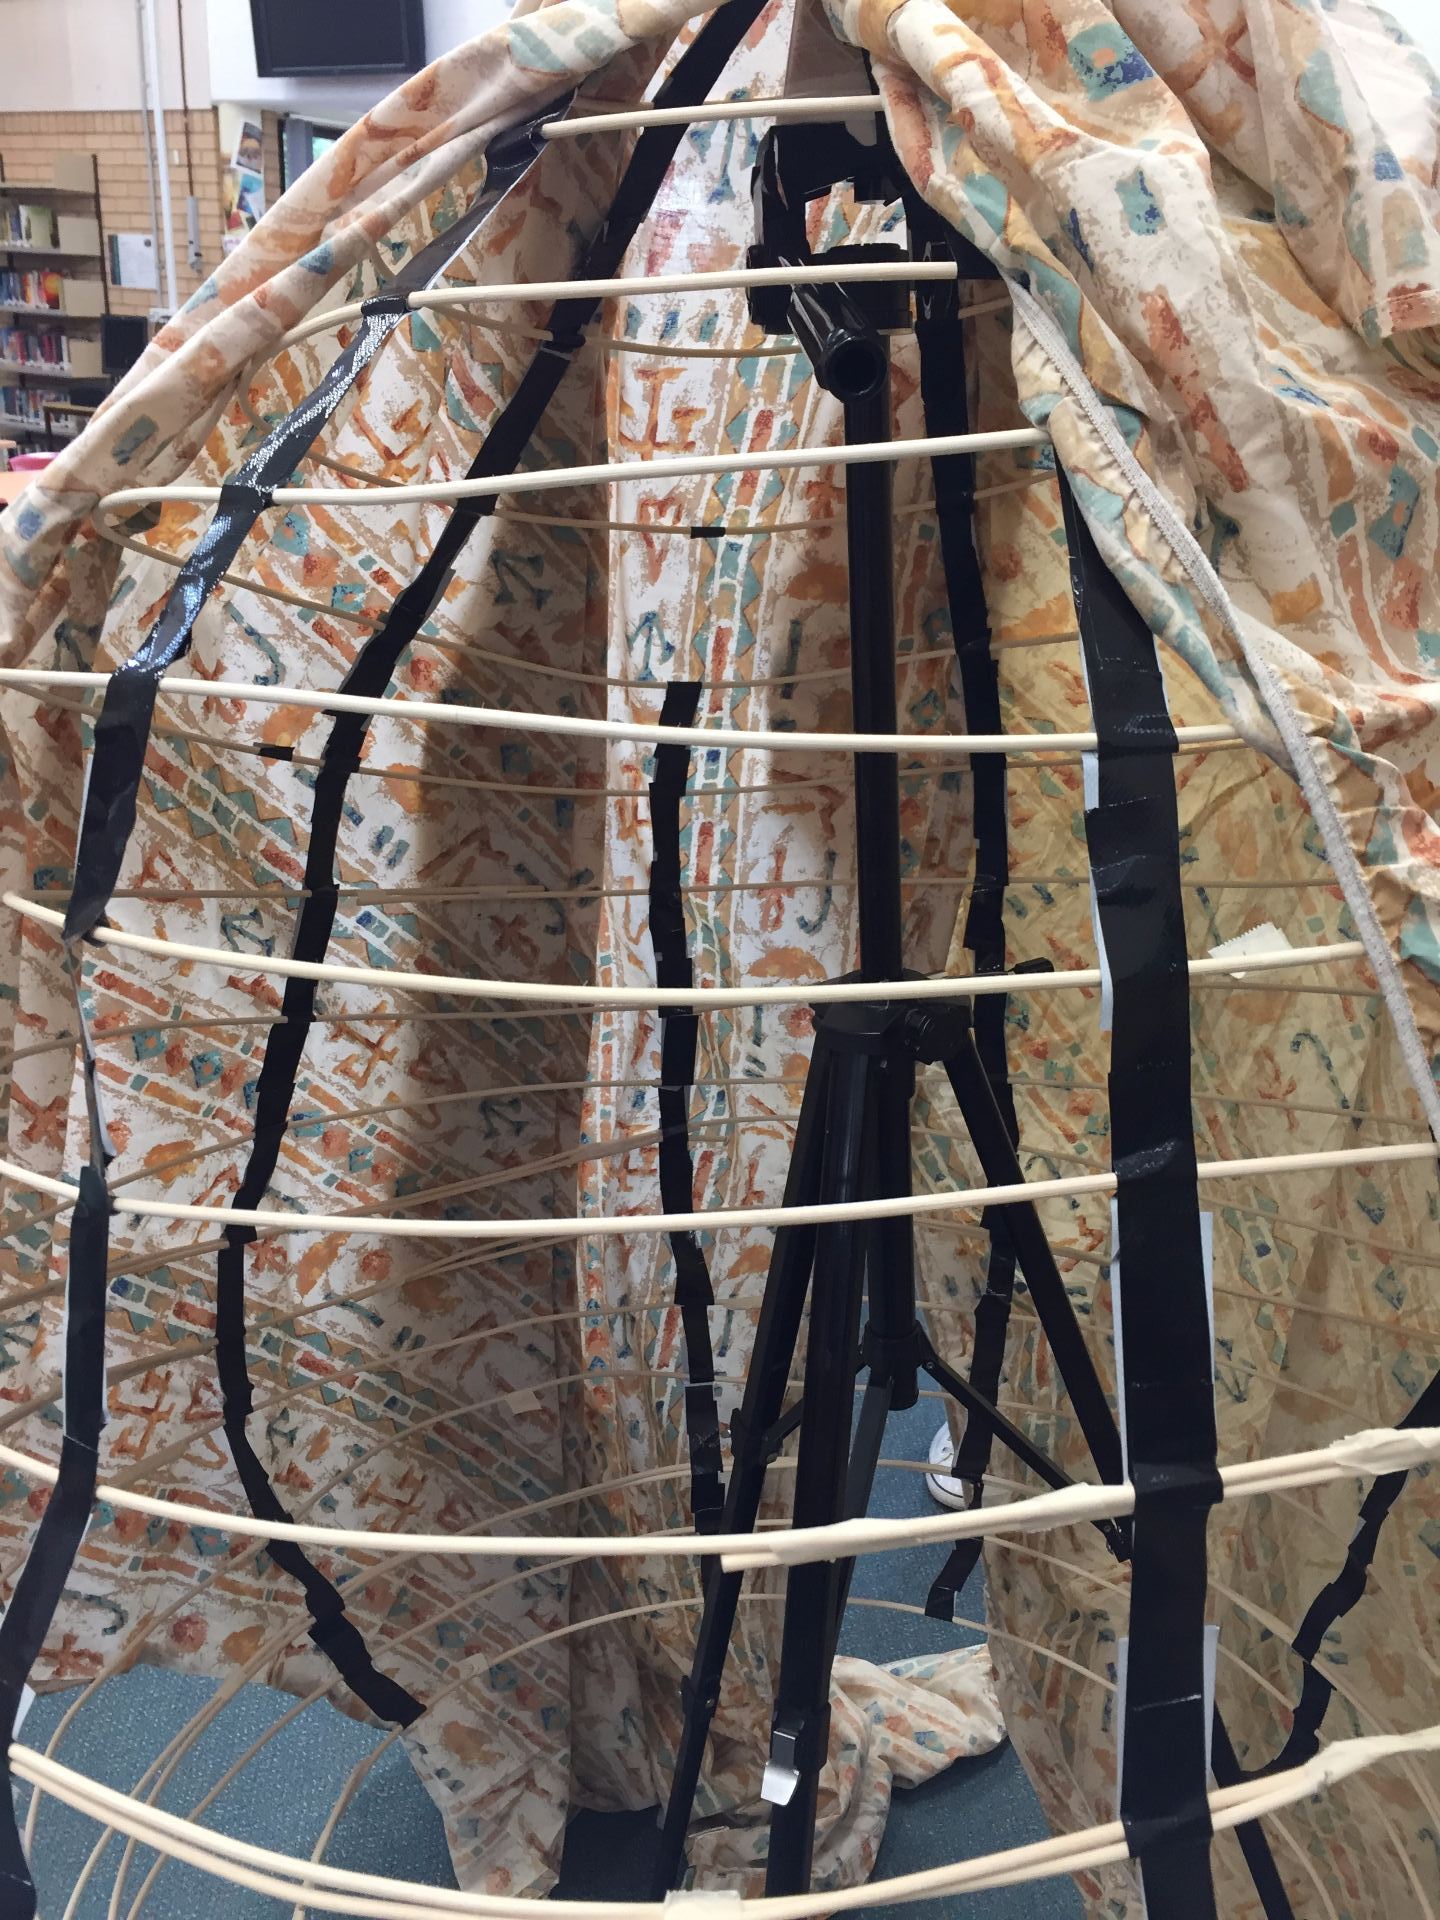
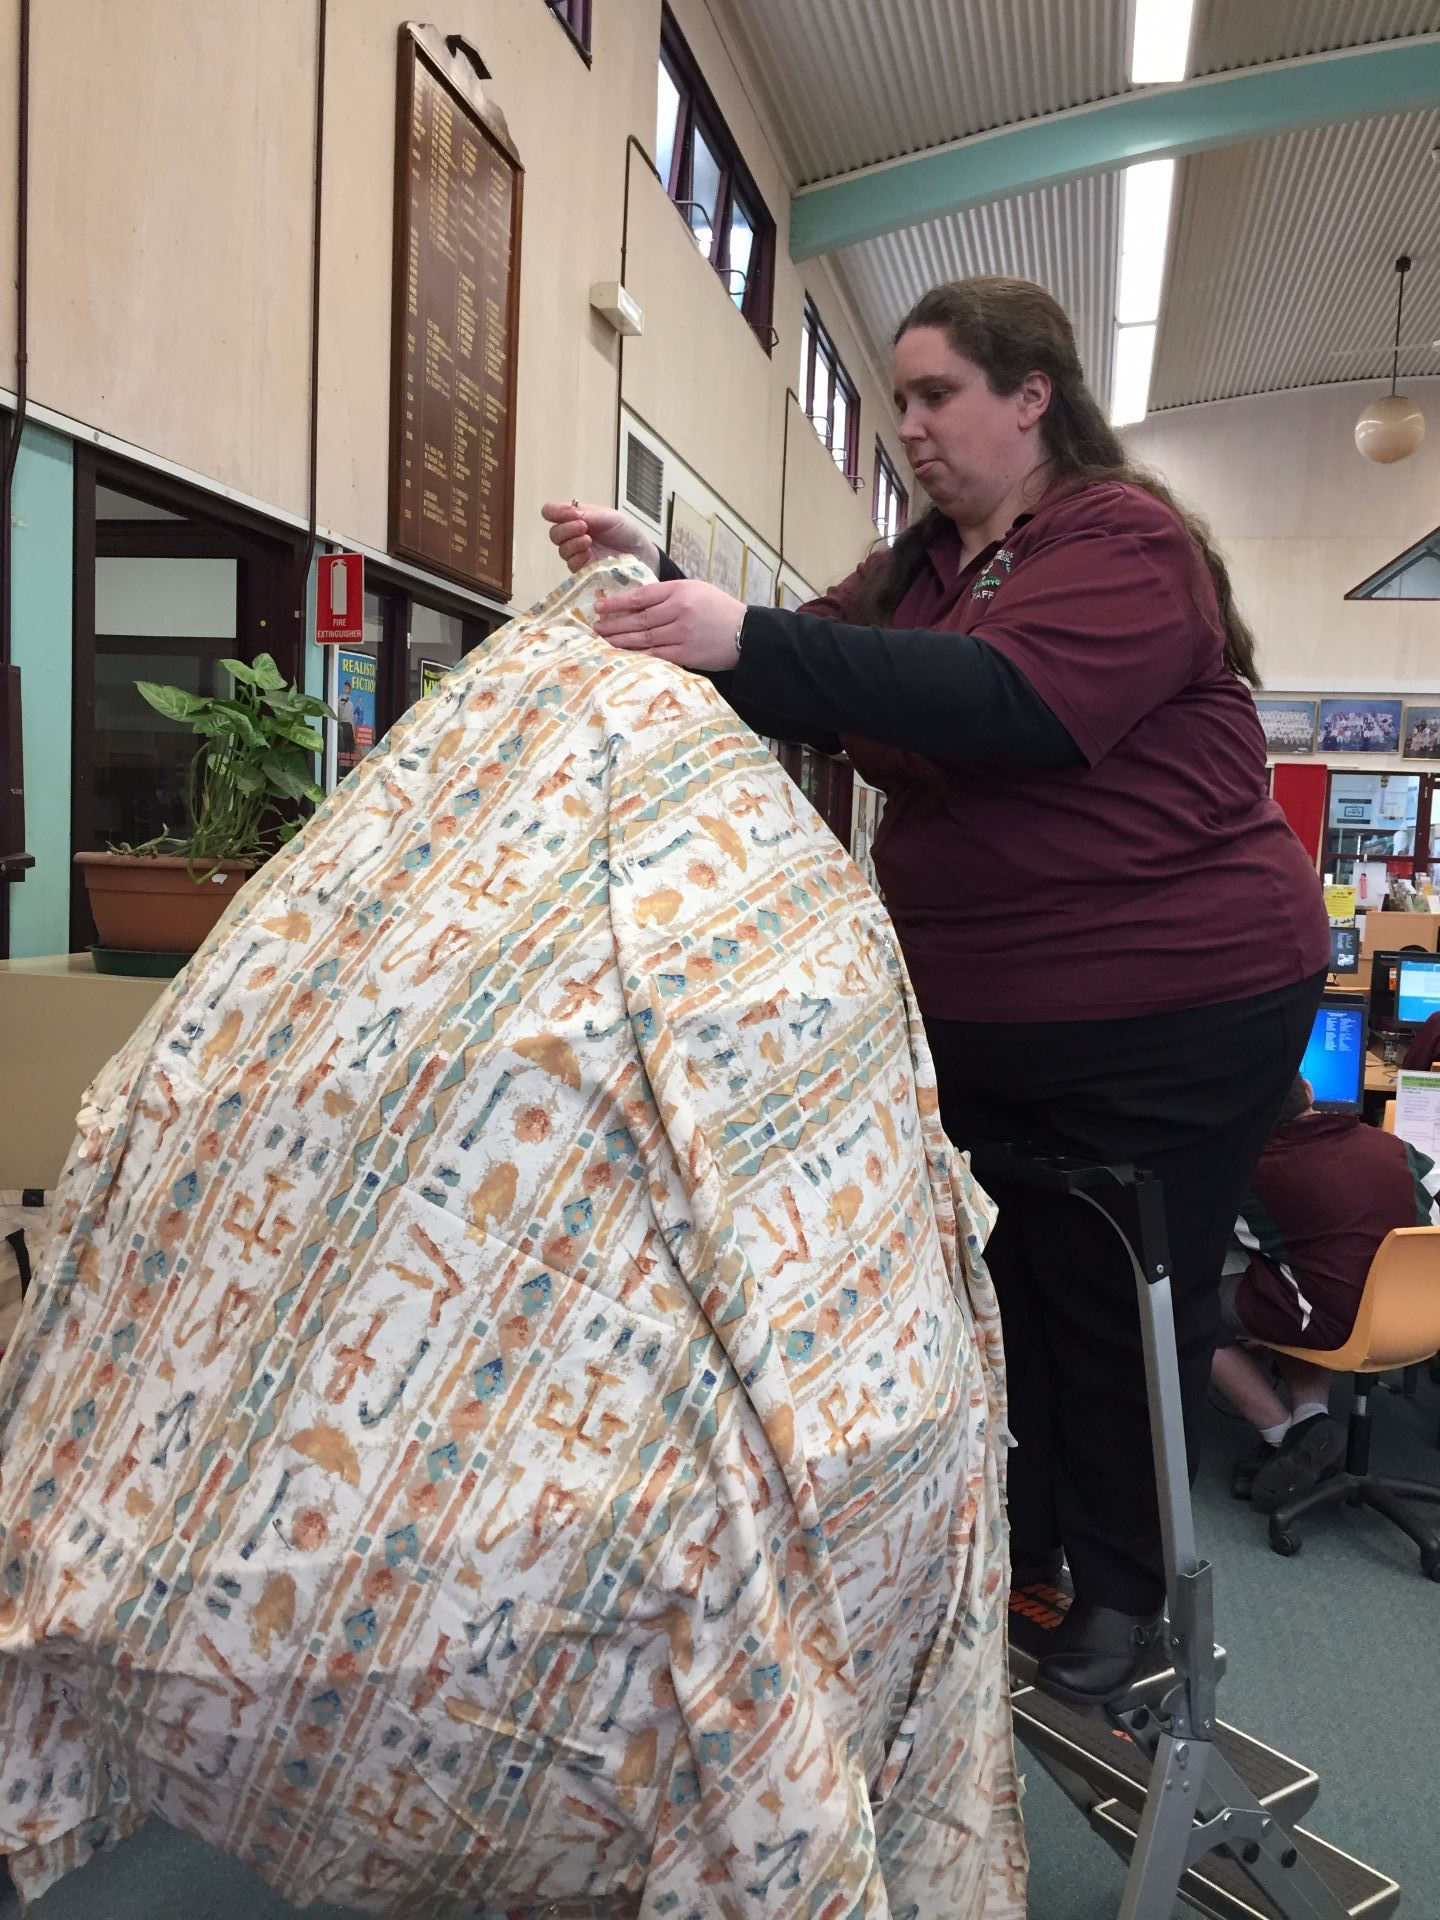
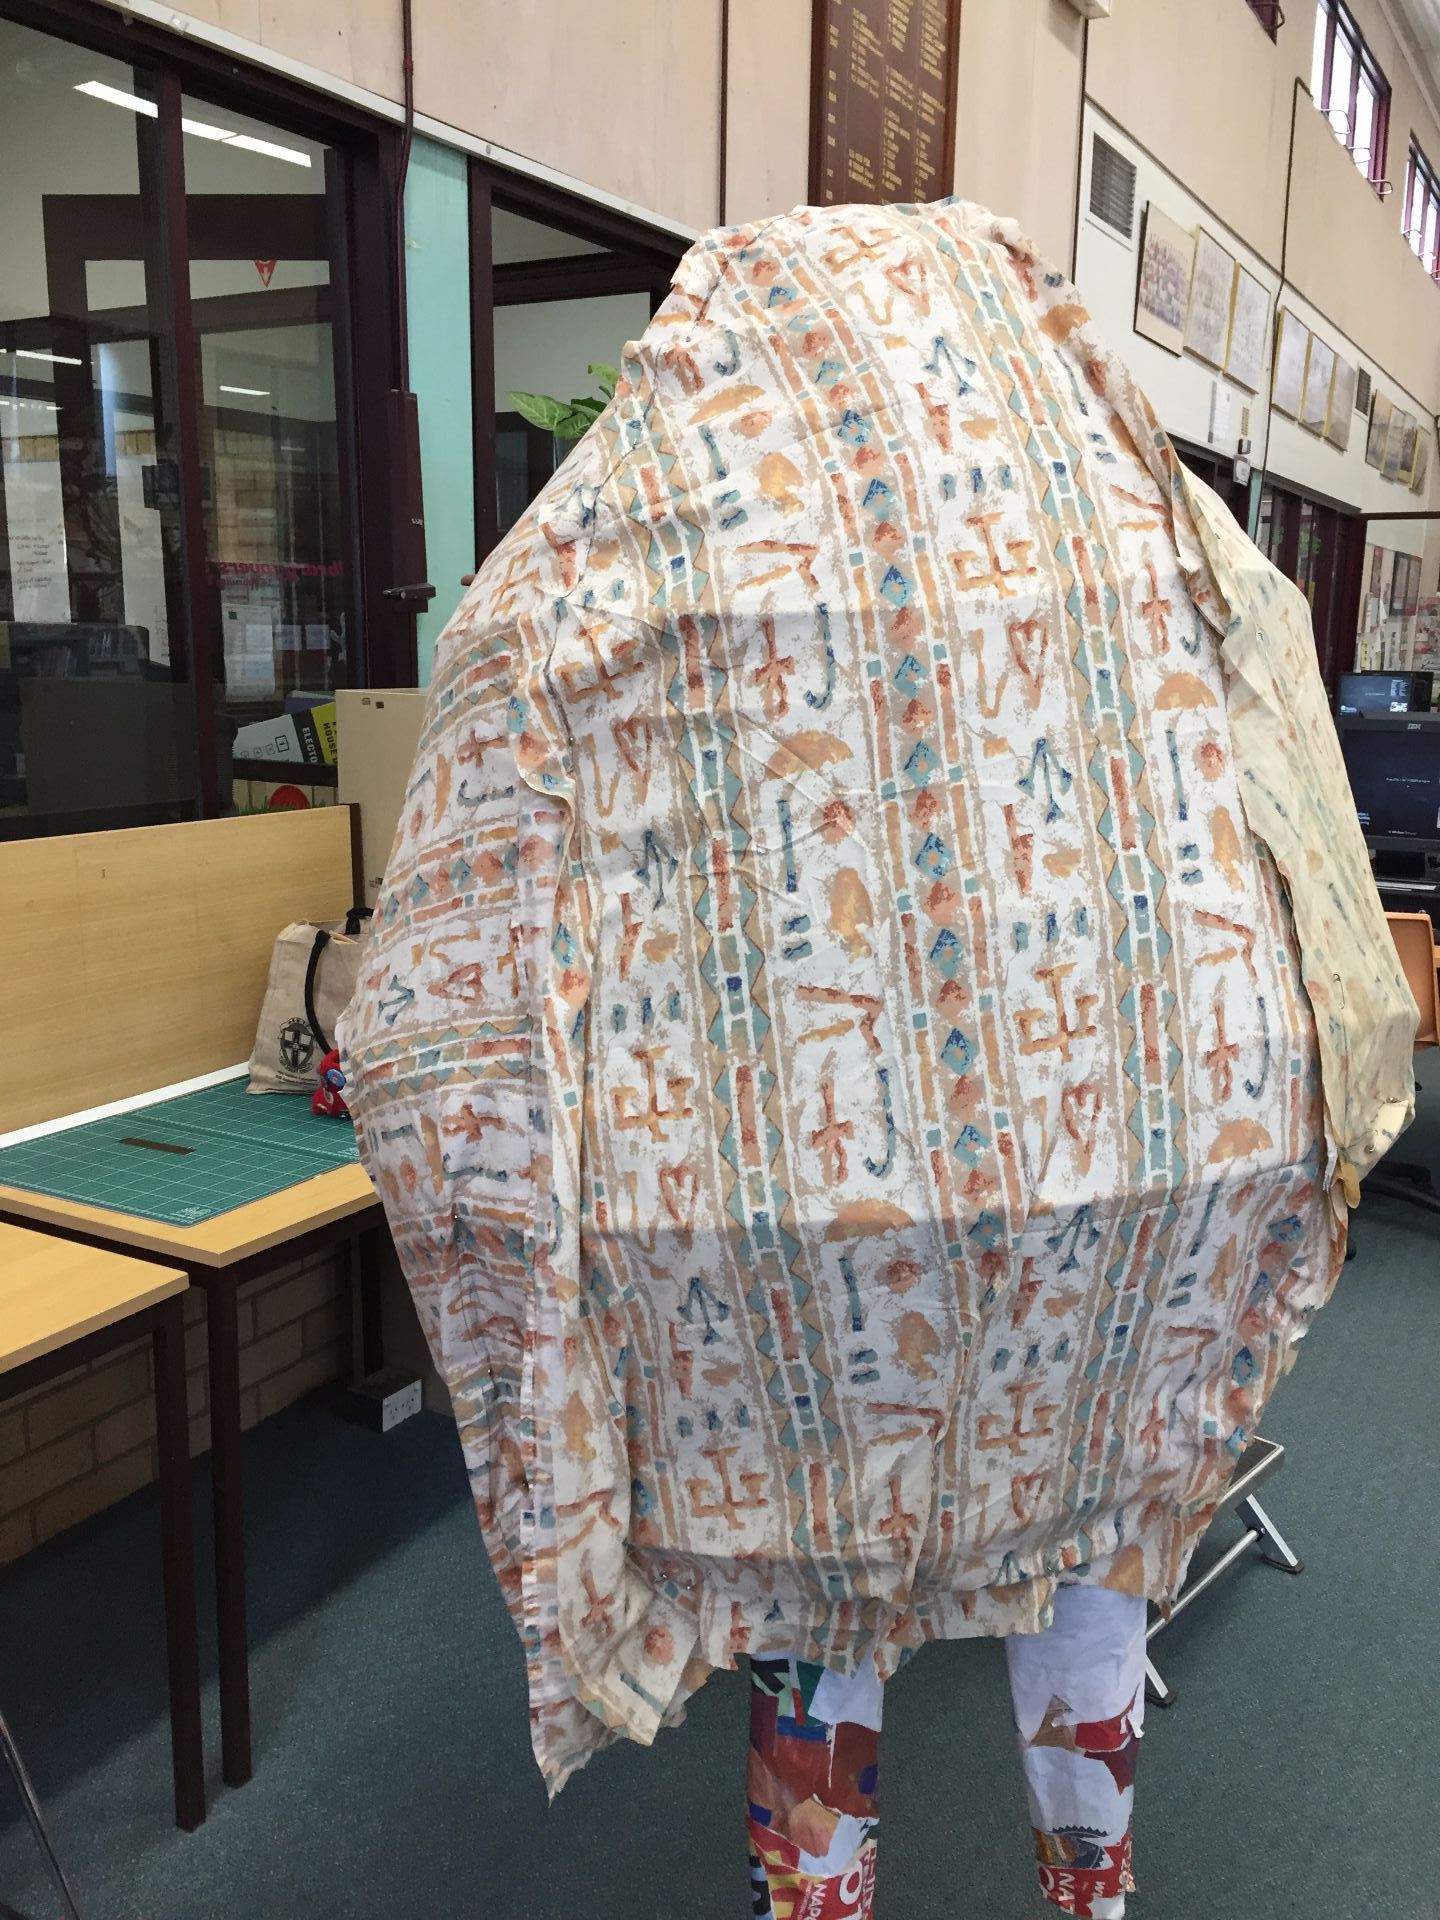
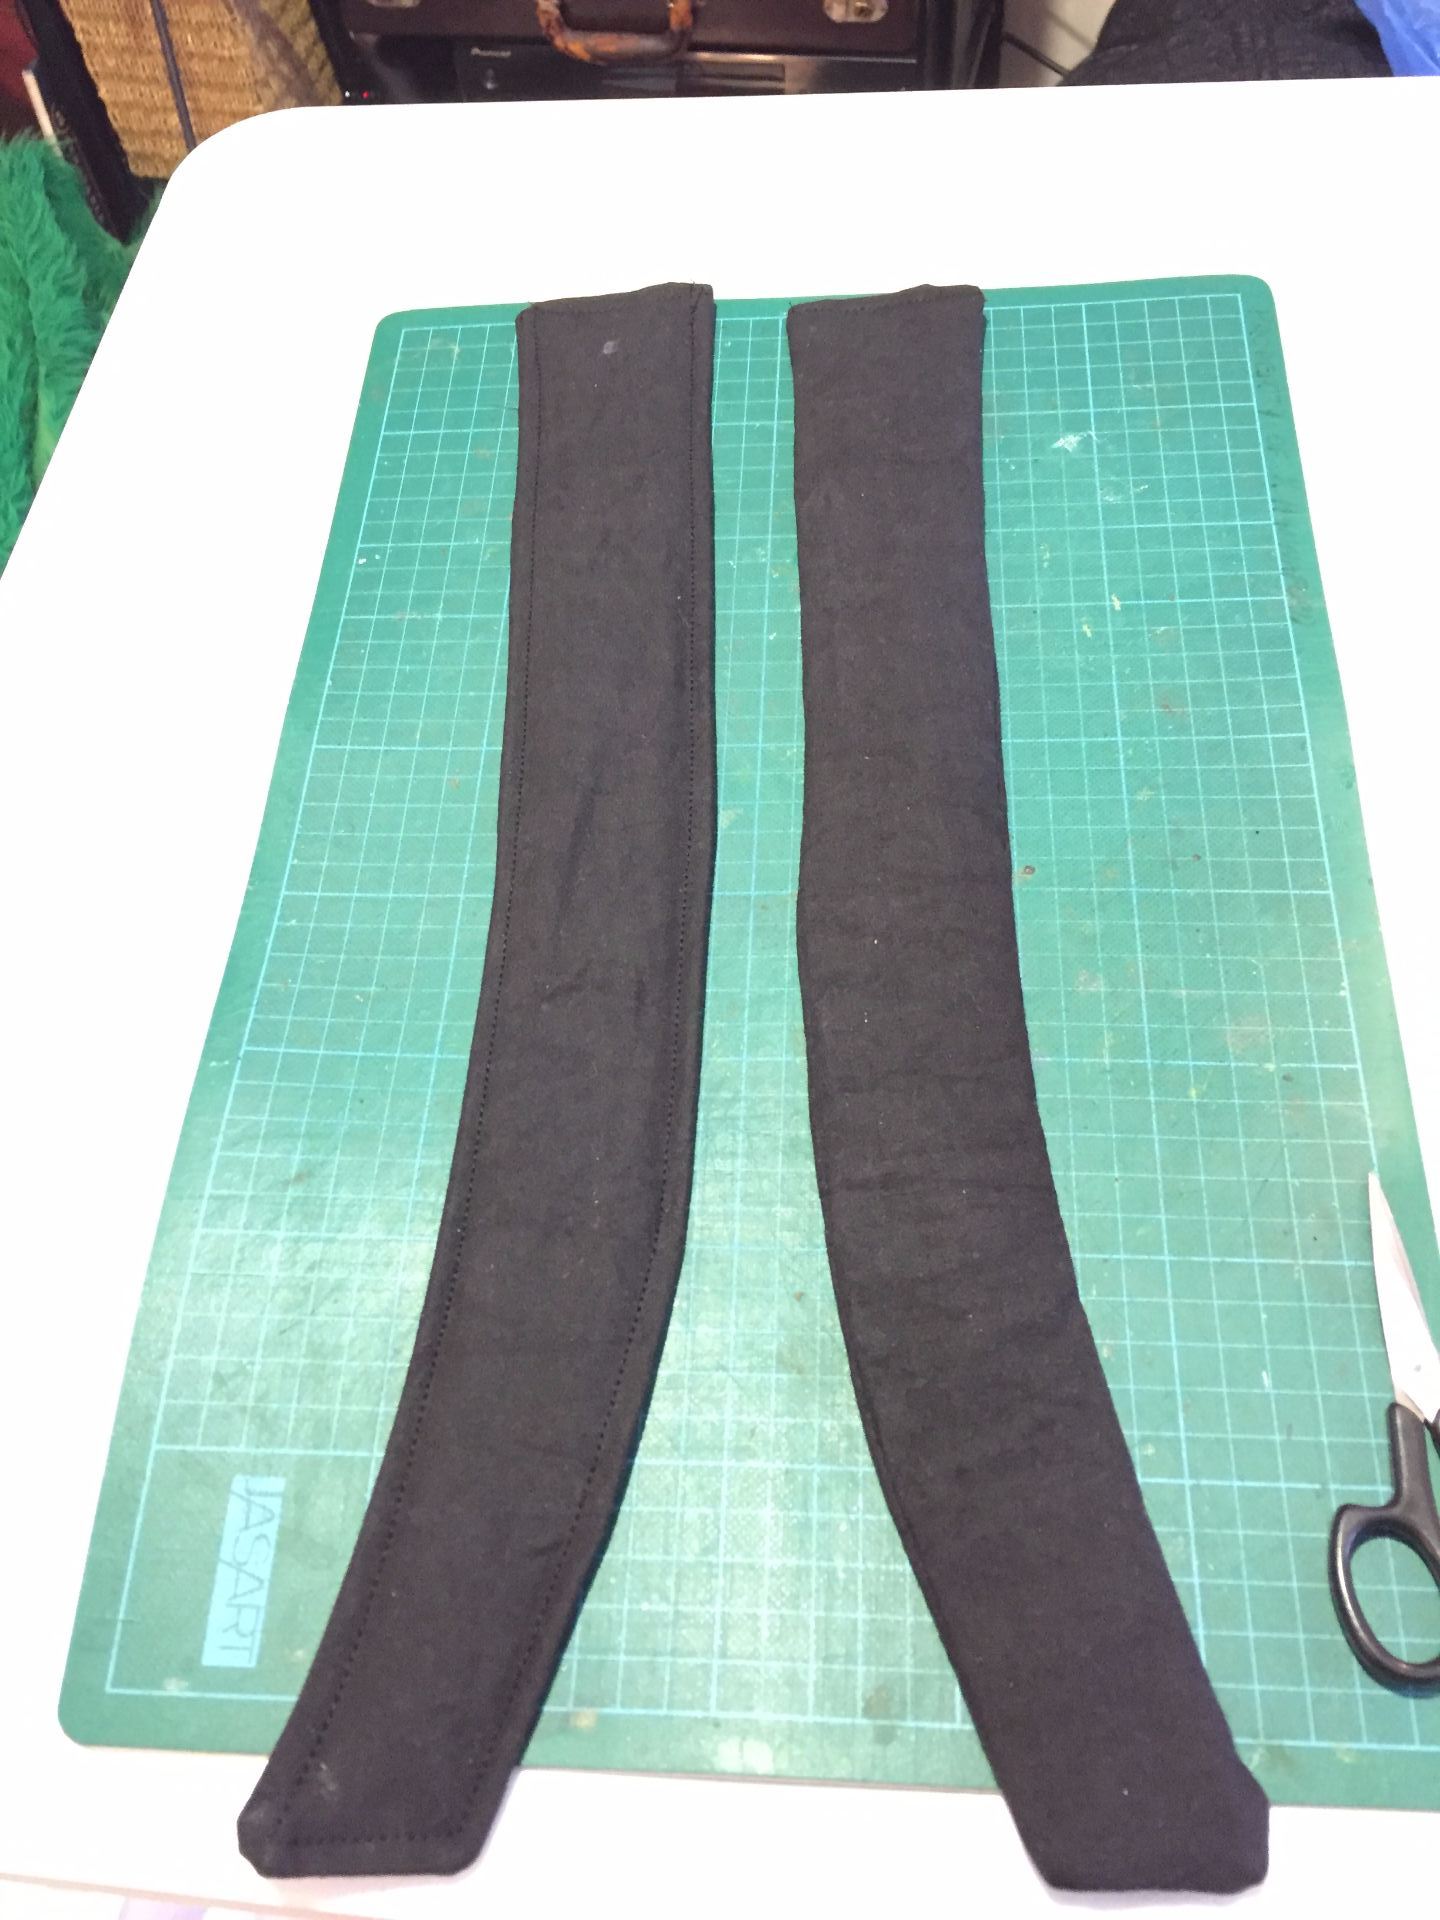
The next step was to start covering the skeleton with thin fabric. I used an old sheet since I am trying to keep costs down, and recycle materials that I already have. All of the darts were sewn using sewing machine, and I hand stitched the final opening closed. So my Totoro has a interior of Ancient Egyptian patterned sheets!
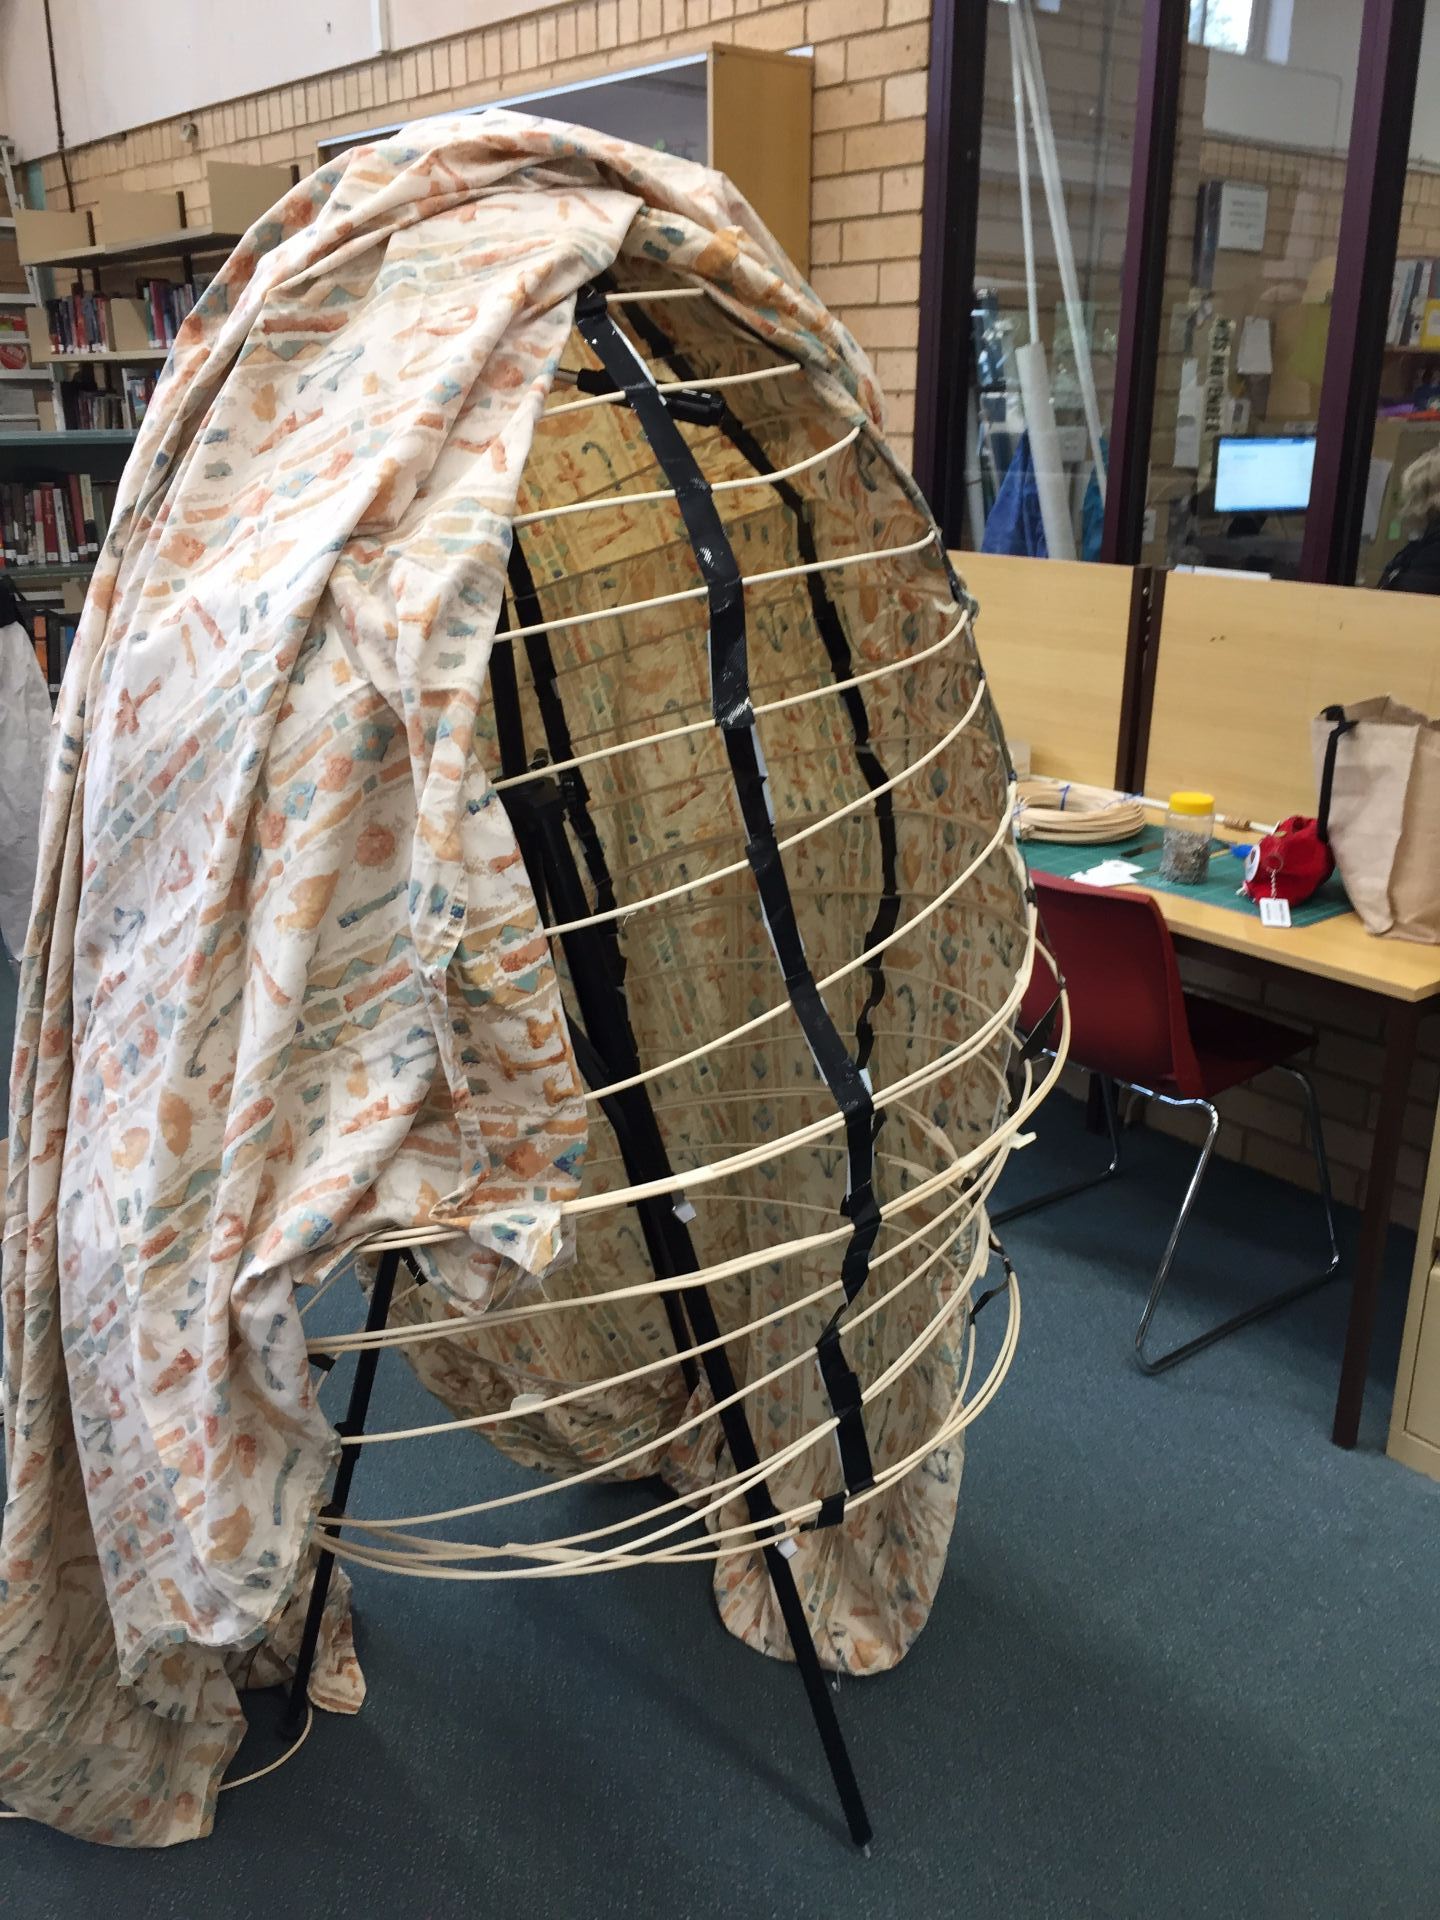
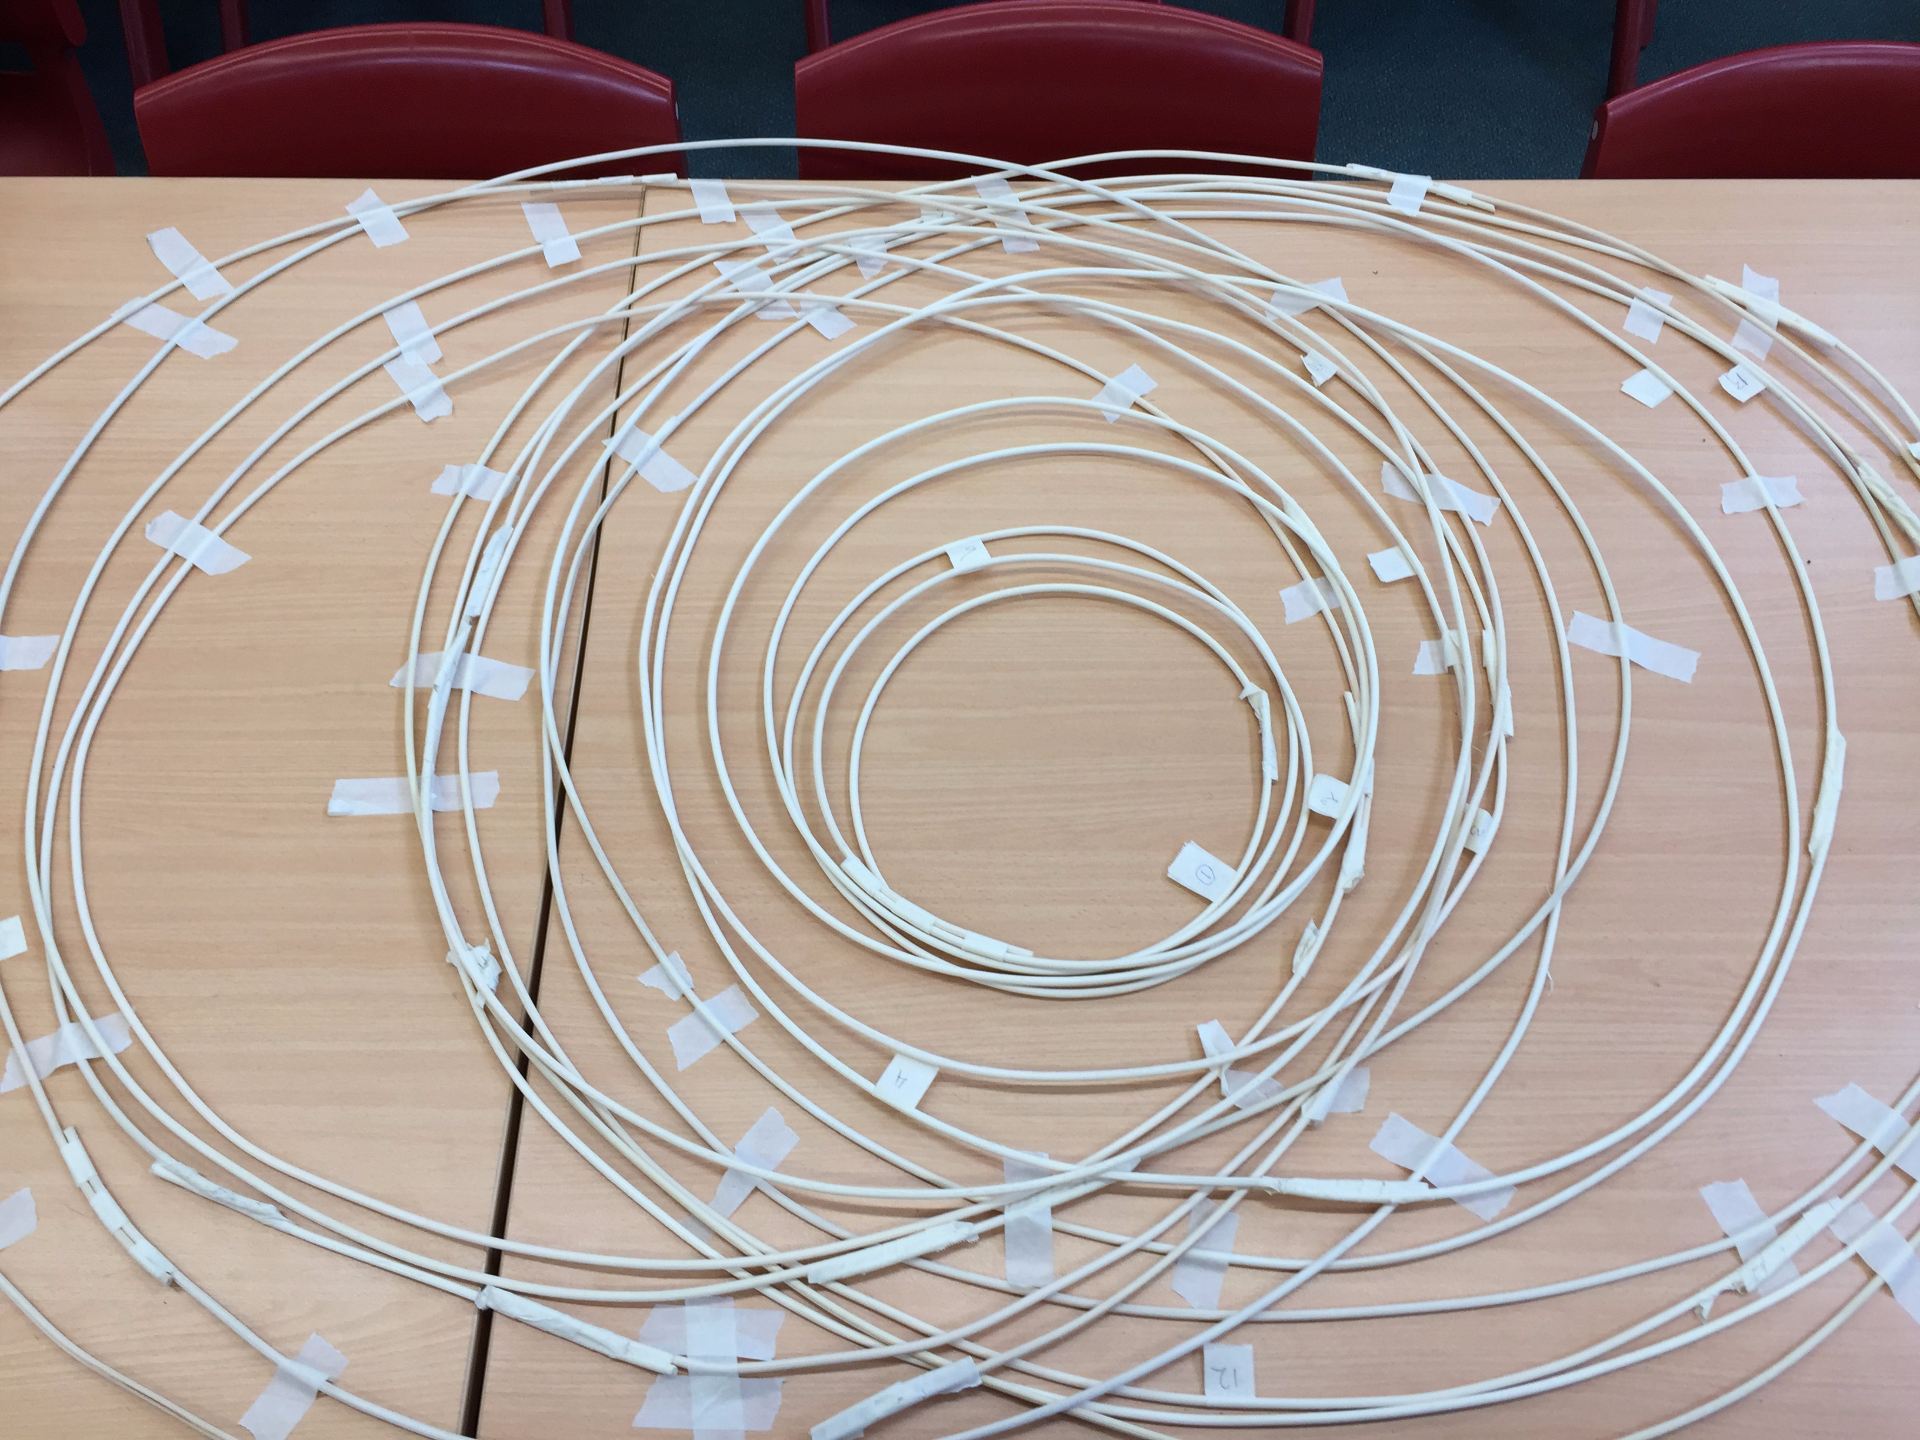
The next phase of the construction was to make the concentric rings that are the skeleton of Totoro. Using the calculations I made with the full size plan, all 16 rings were created by measuring the length of the circumference, adding a palm width of cane for overlap and using masking tape to hold the ring closed.
Trying to flatten the cane rings
I did run into several issues with the cane. When it arrived, the cane was very tightly coiled. When creating the largest rings, the rings would distort and not lie flat. We tried putting the rings under weights overnight, which did help some of the rings to lie flat-ish. Some rings also responded to hand manipulation of forcing the cane to bend in the opposite direction, but we always risked snapping the cane.
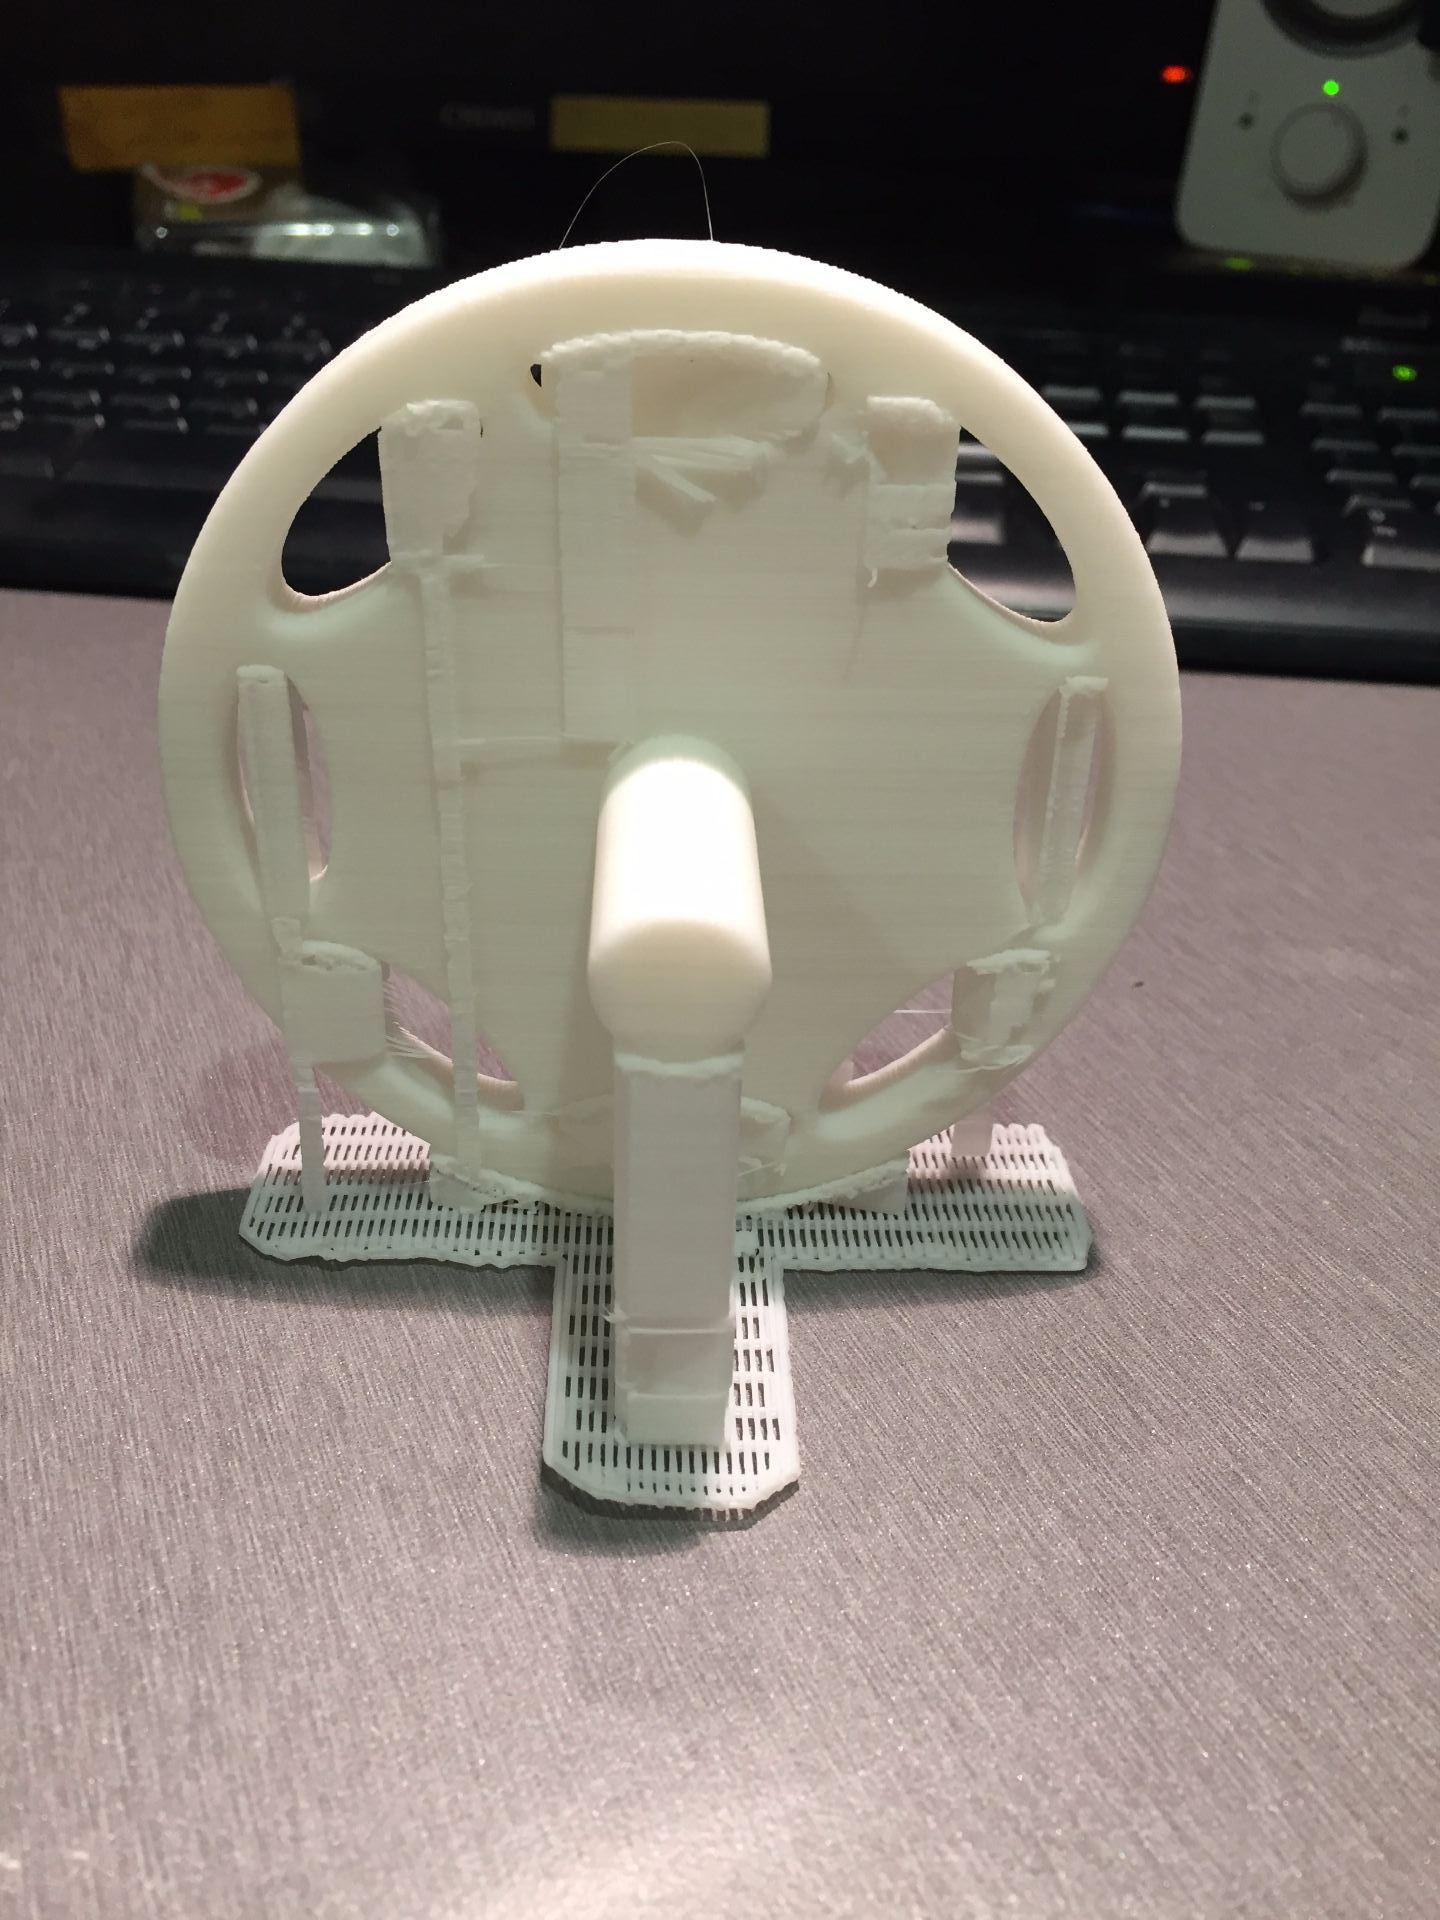
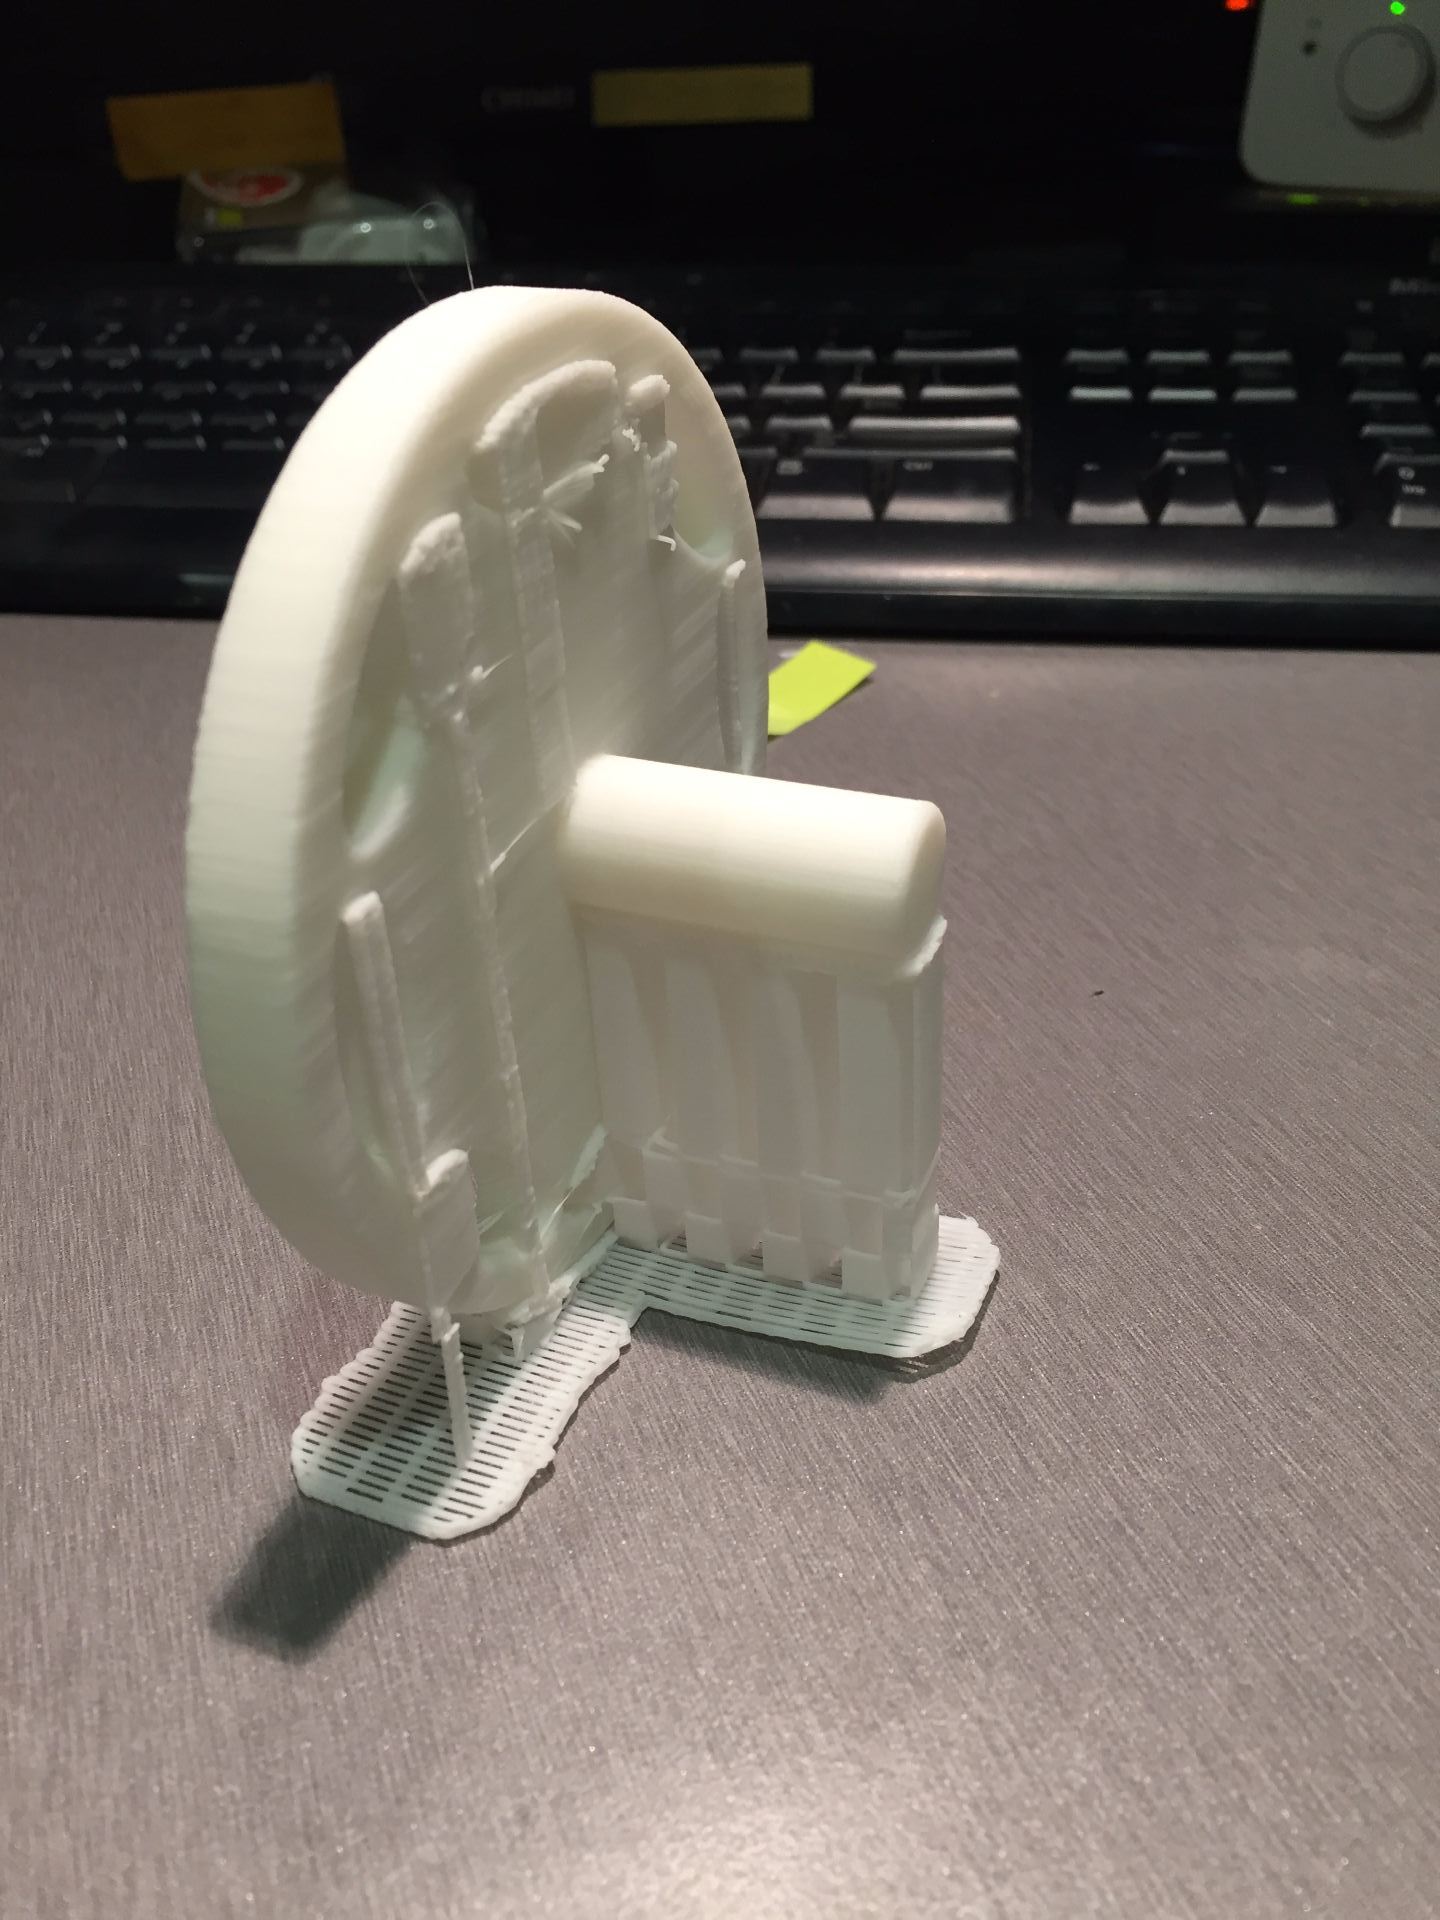
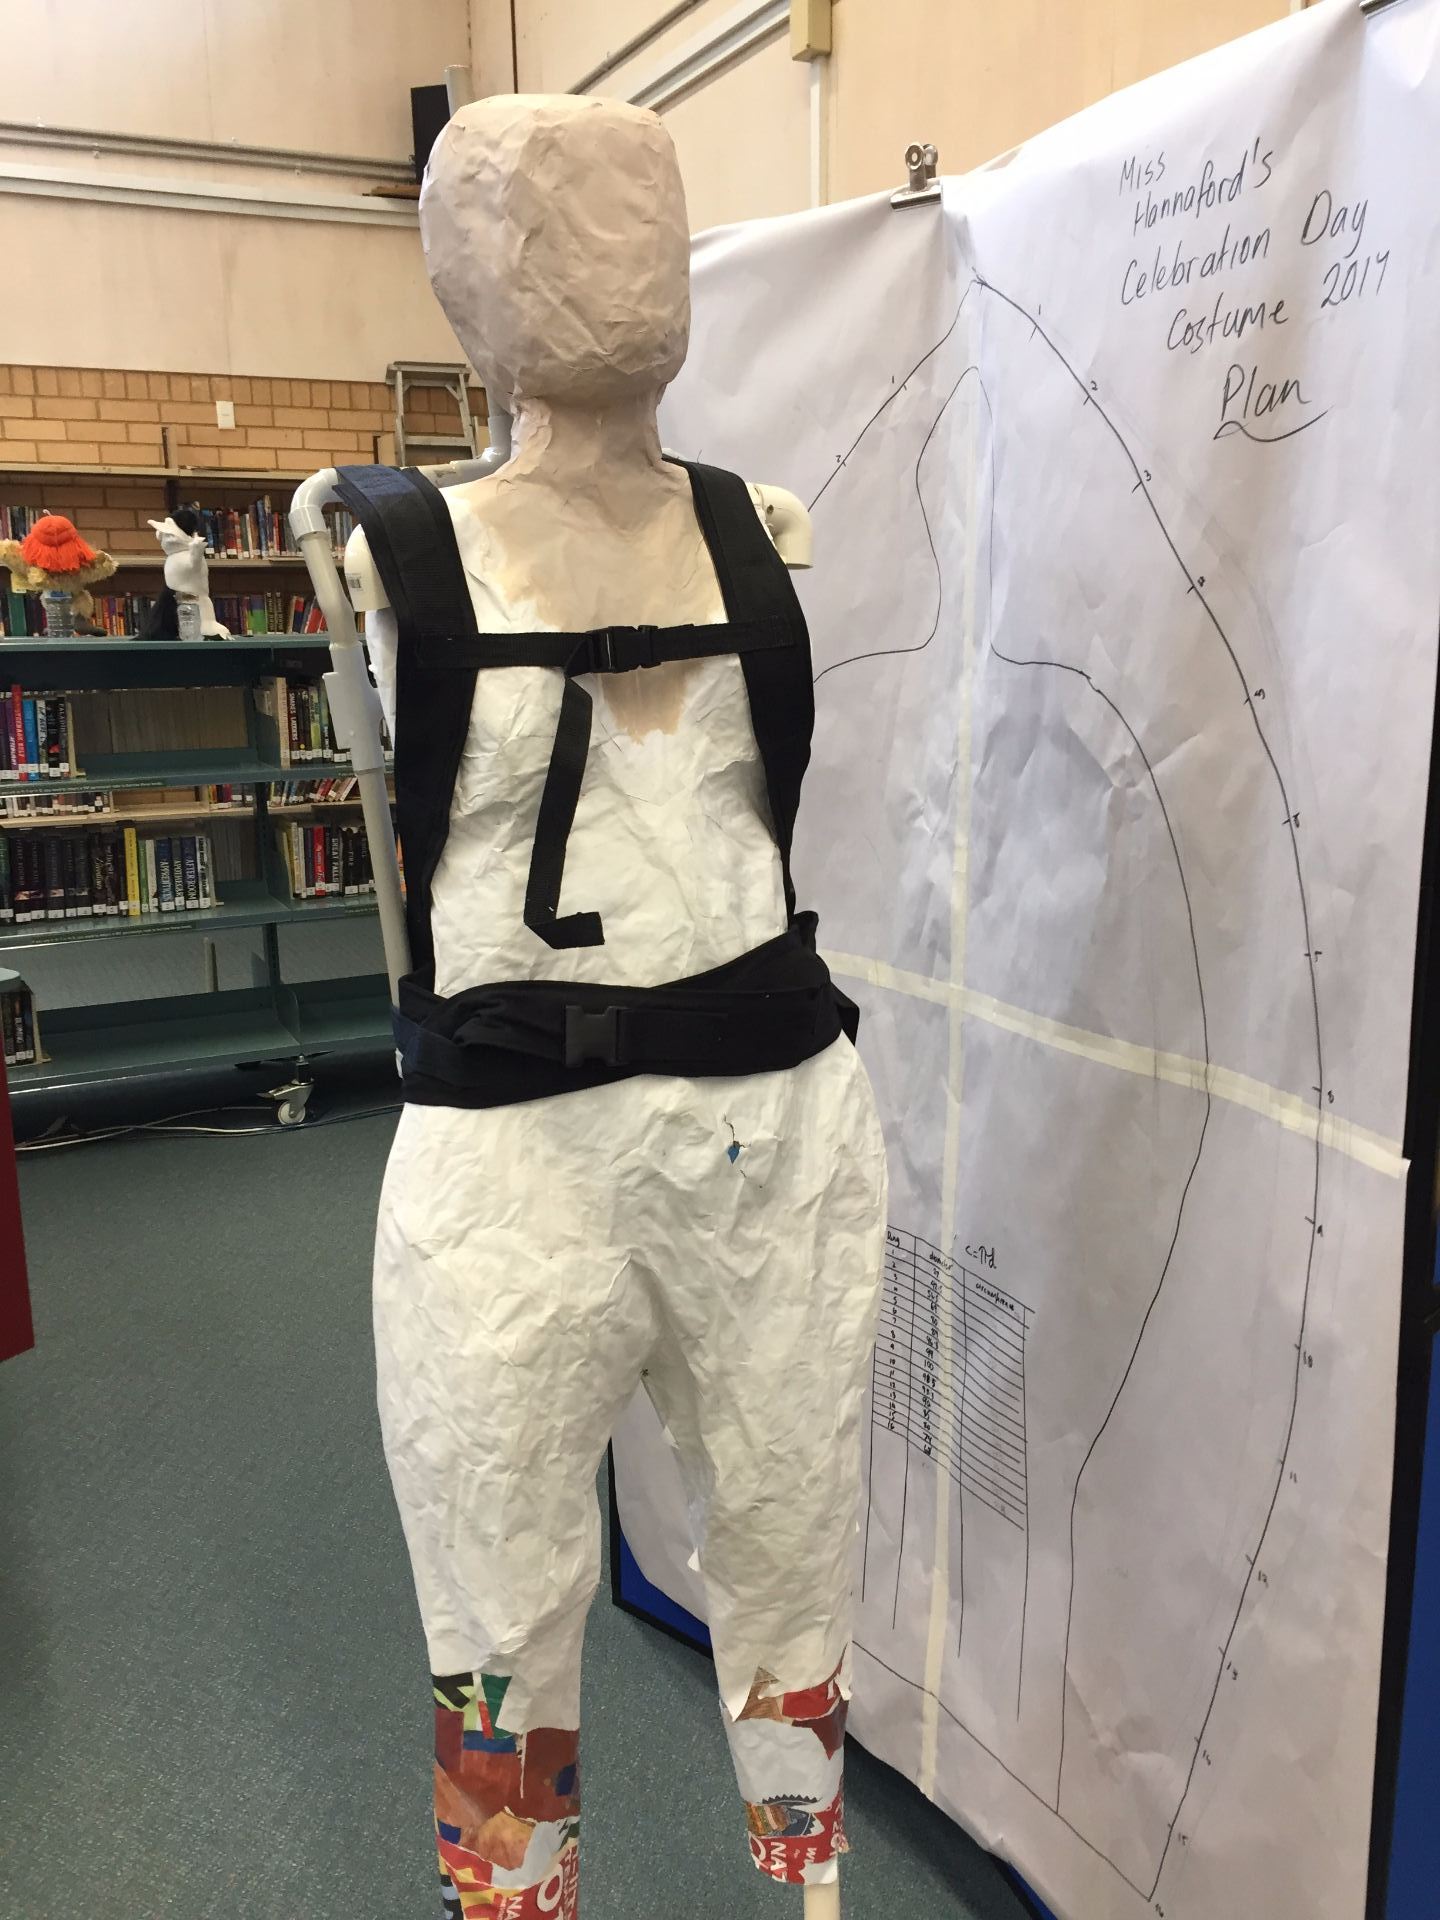
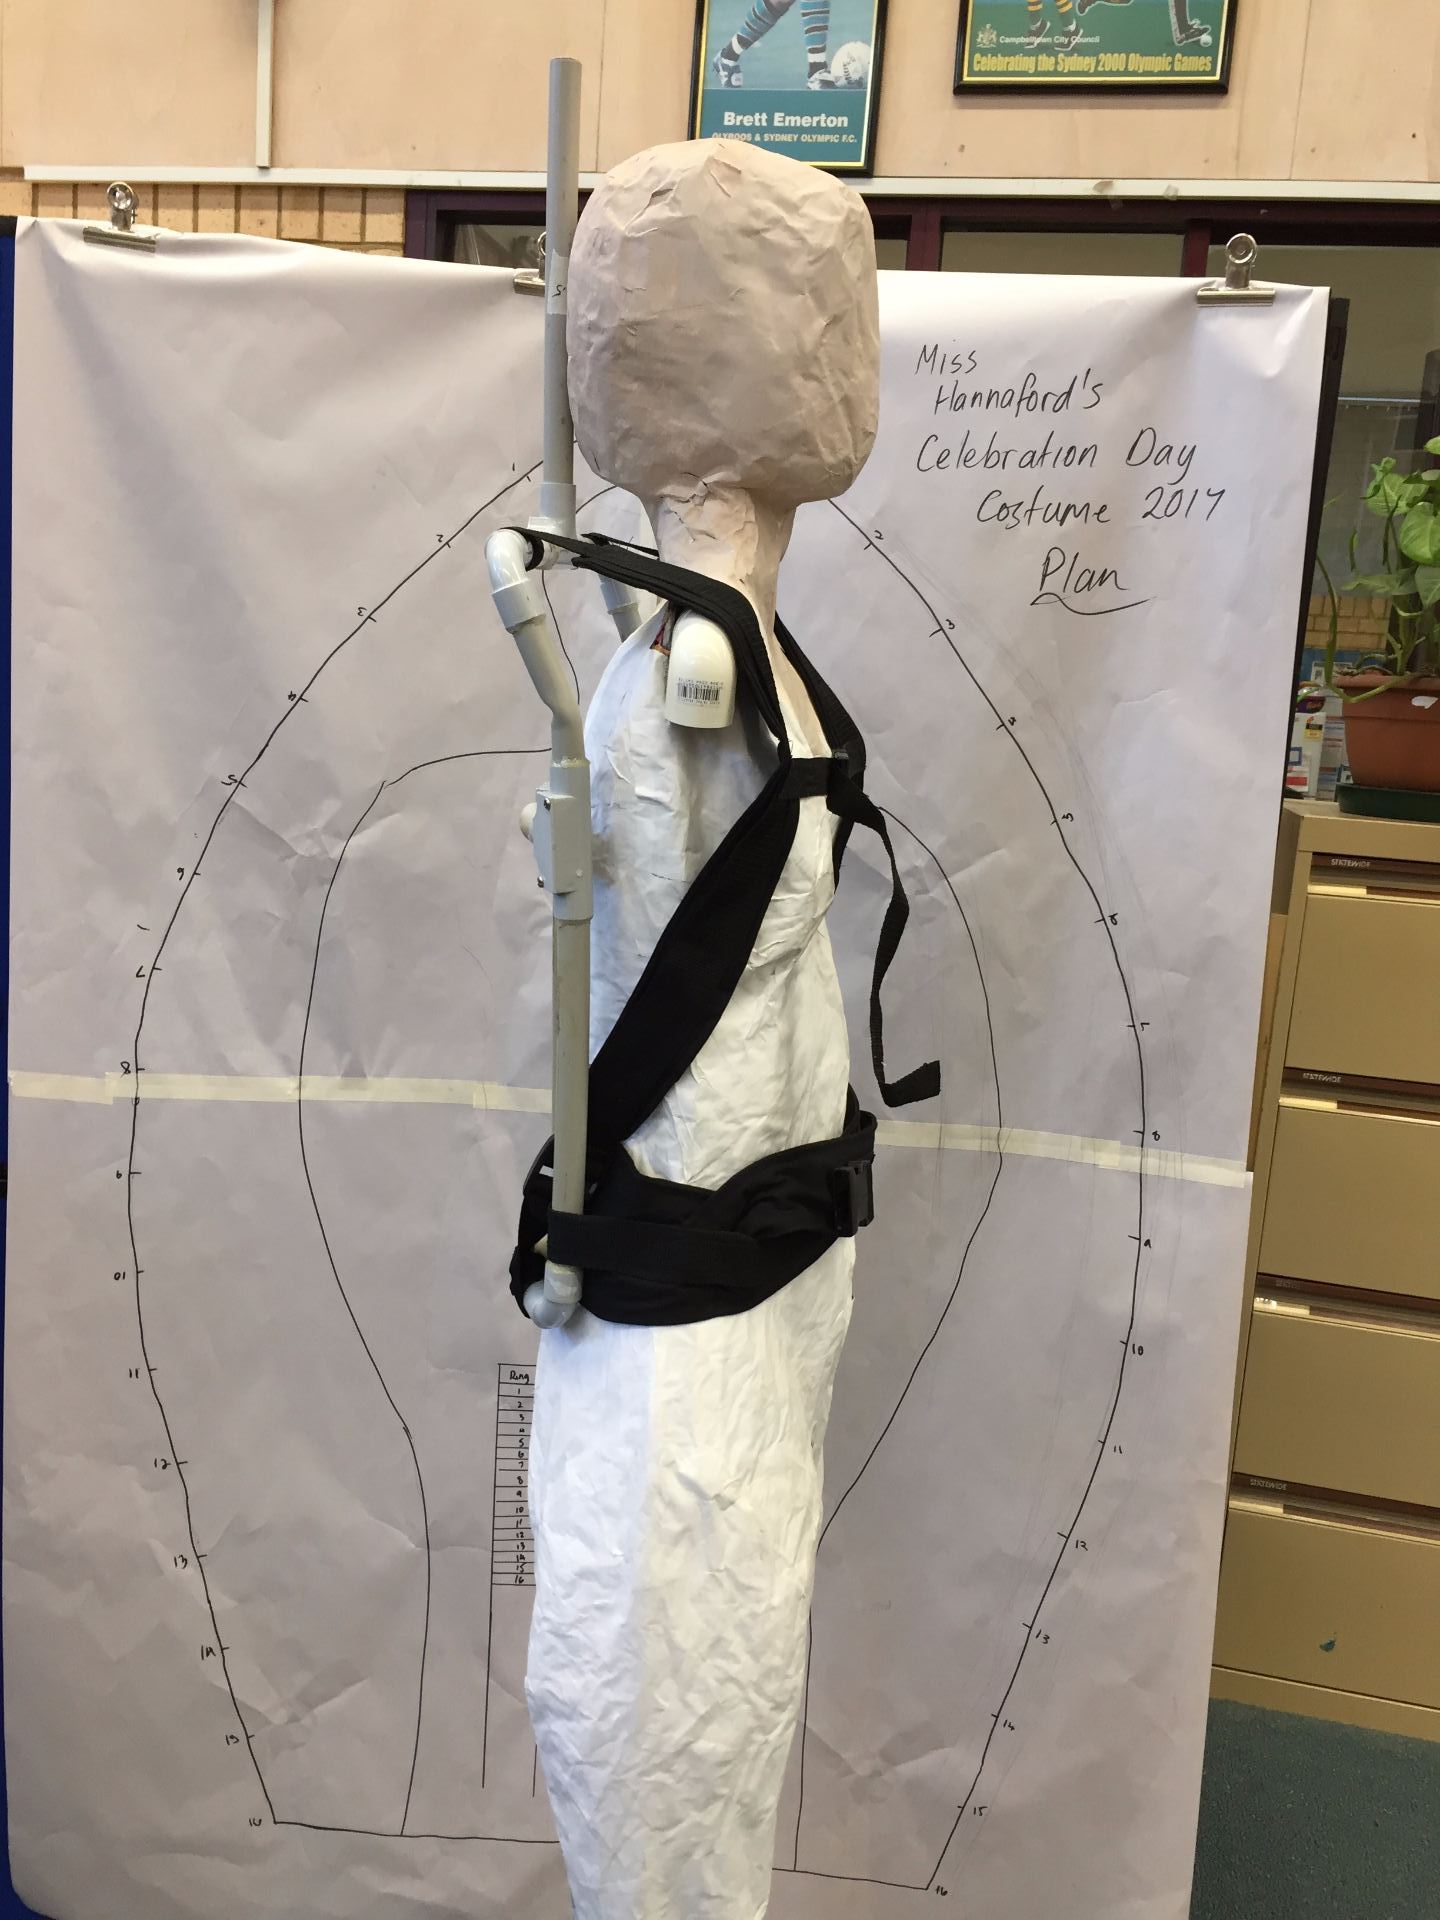
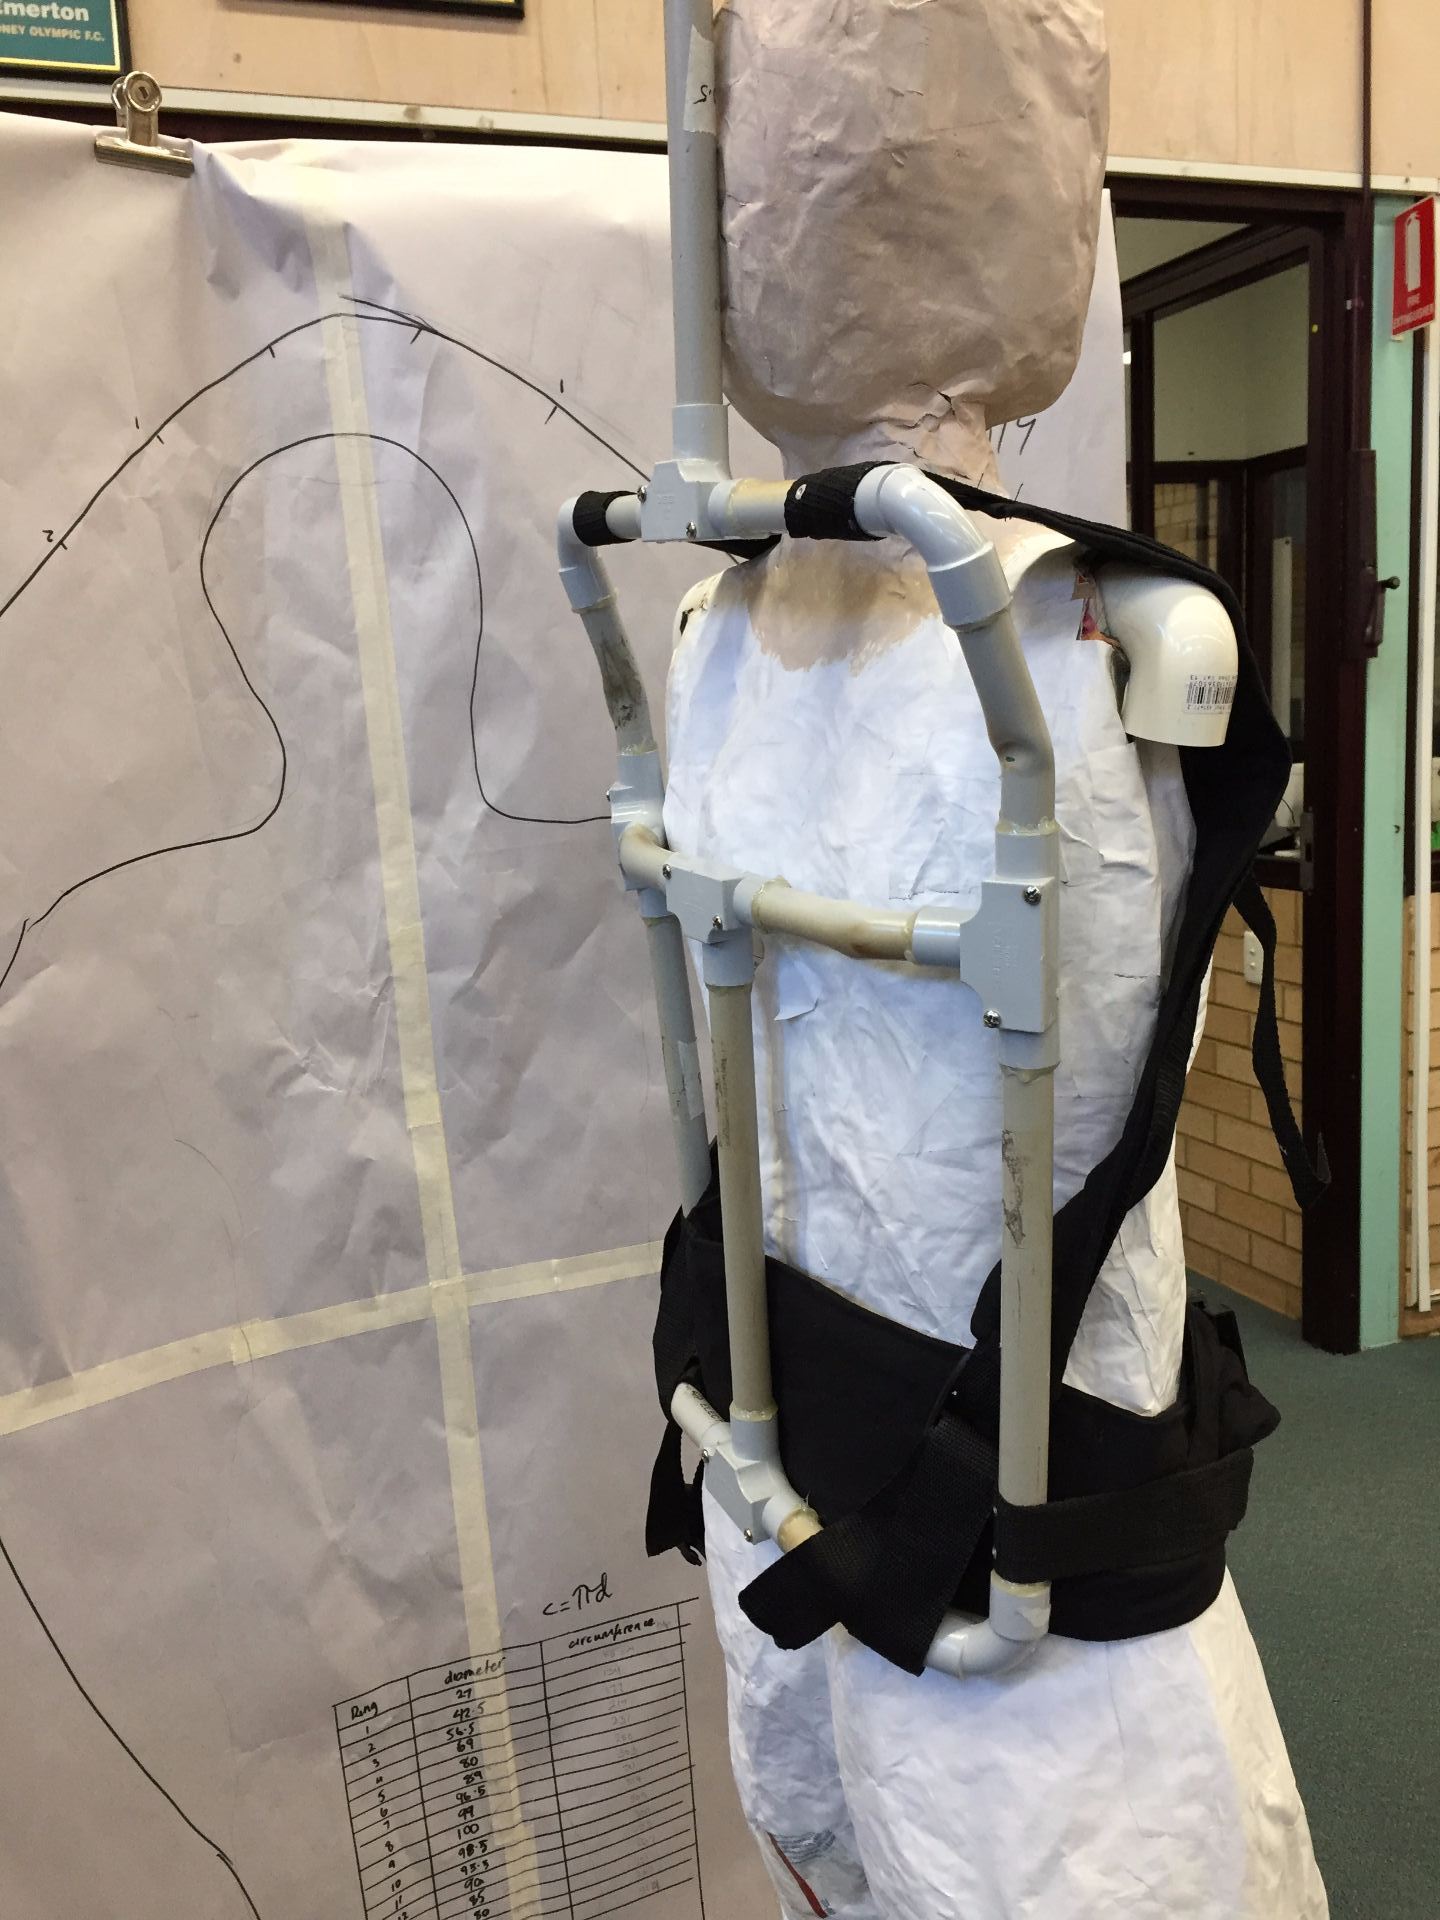
The other challenge I had to address was how to suspend the cane rings from the backpack frame. Adam Savage used a wooden ring bolted to his backpack frame. I don’t have access or expertise in using wood to make a ring, but I do have access to 3D design software and a 3D printer. I designed a circular disc with a section that inserts into the pvc mast. By using gaffer tape, the rings are suspended from the main disc.
While watching Jim Henson’s Creature Shop Challenge, I saw how the contestants used backpack frames to support the creatures/ puppets they made. Most of the time, they used Alice pack frames to which they bolted aluminium flat bar or pvc. Alice pack frames are available on Amazon to buy, but they do not ship to Australia.
Alice pack frame demonstrated on Jim Henson’s Creature Shop Challenge.
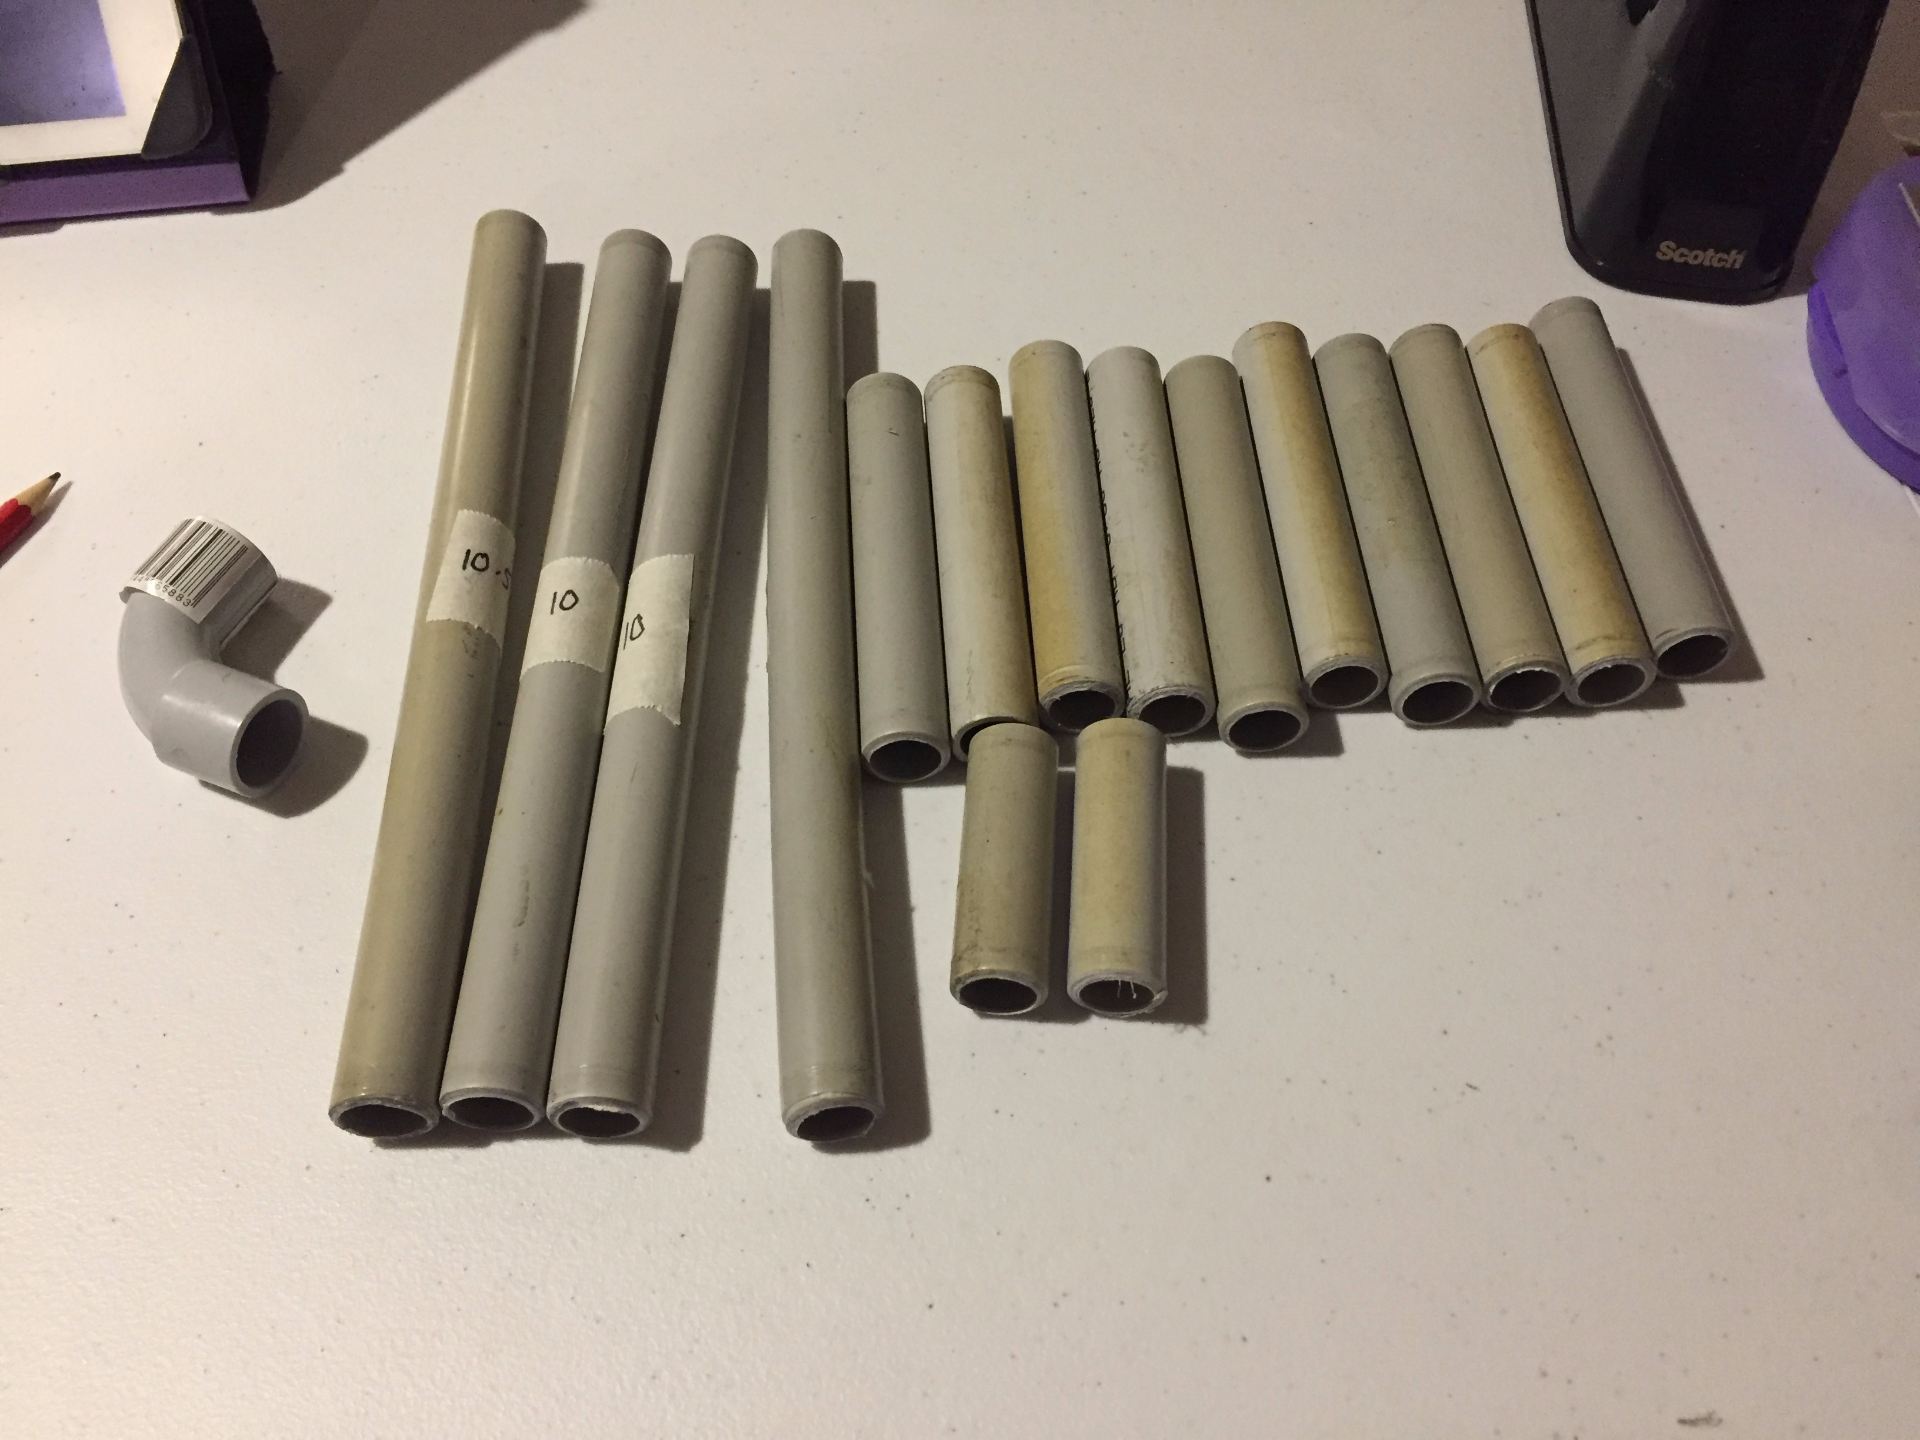
After watching various youtube clips on how to make a backpack frame, I decided to use PVC electrical conduit. When the Library computer area was renovated in 2014, I claimed all of the old electrical conduit so that I could use it for building puppet skeletons, so I have lots of conduit for making the backpack.
Then I started cutting all the pvc parts I needed using a tube cutter that I have had in storage for more than 10 years. It certainly made cutting the pieces less messy.
PVC tubes for the backpack frame.
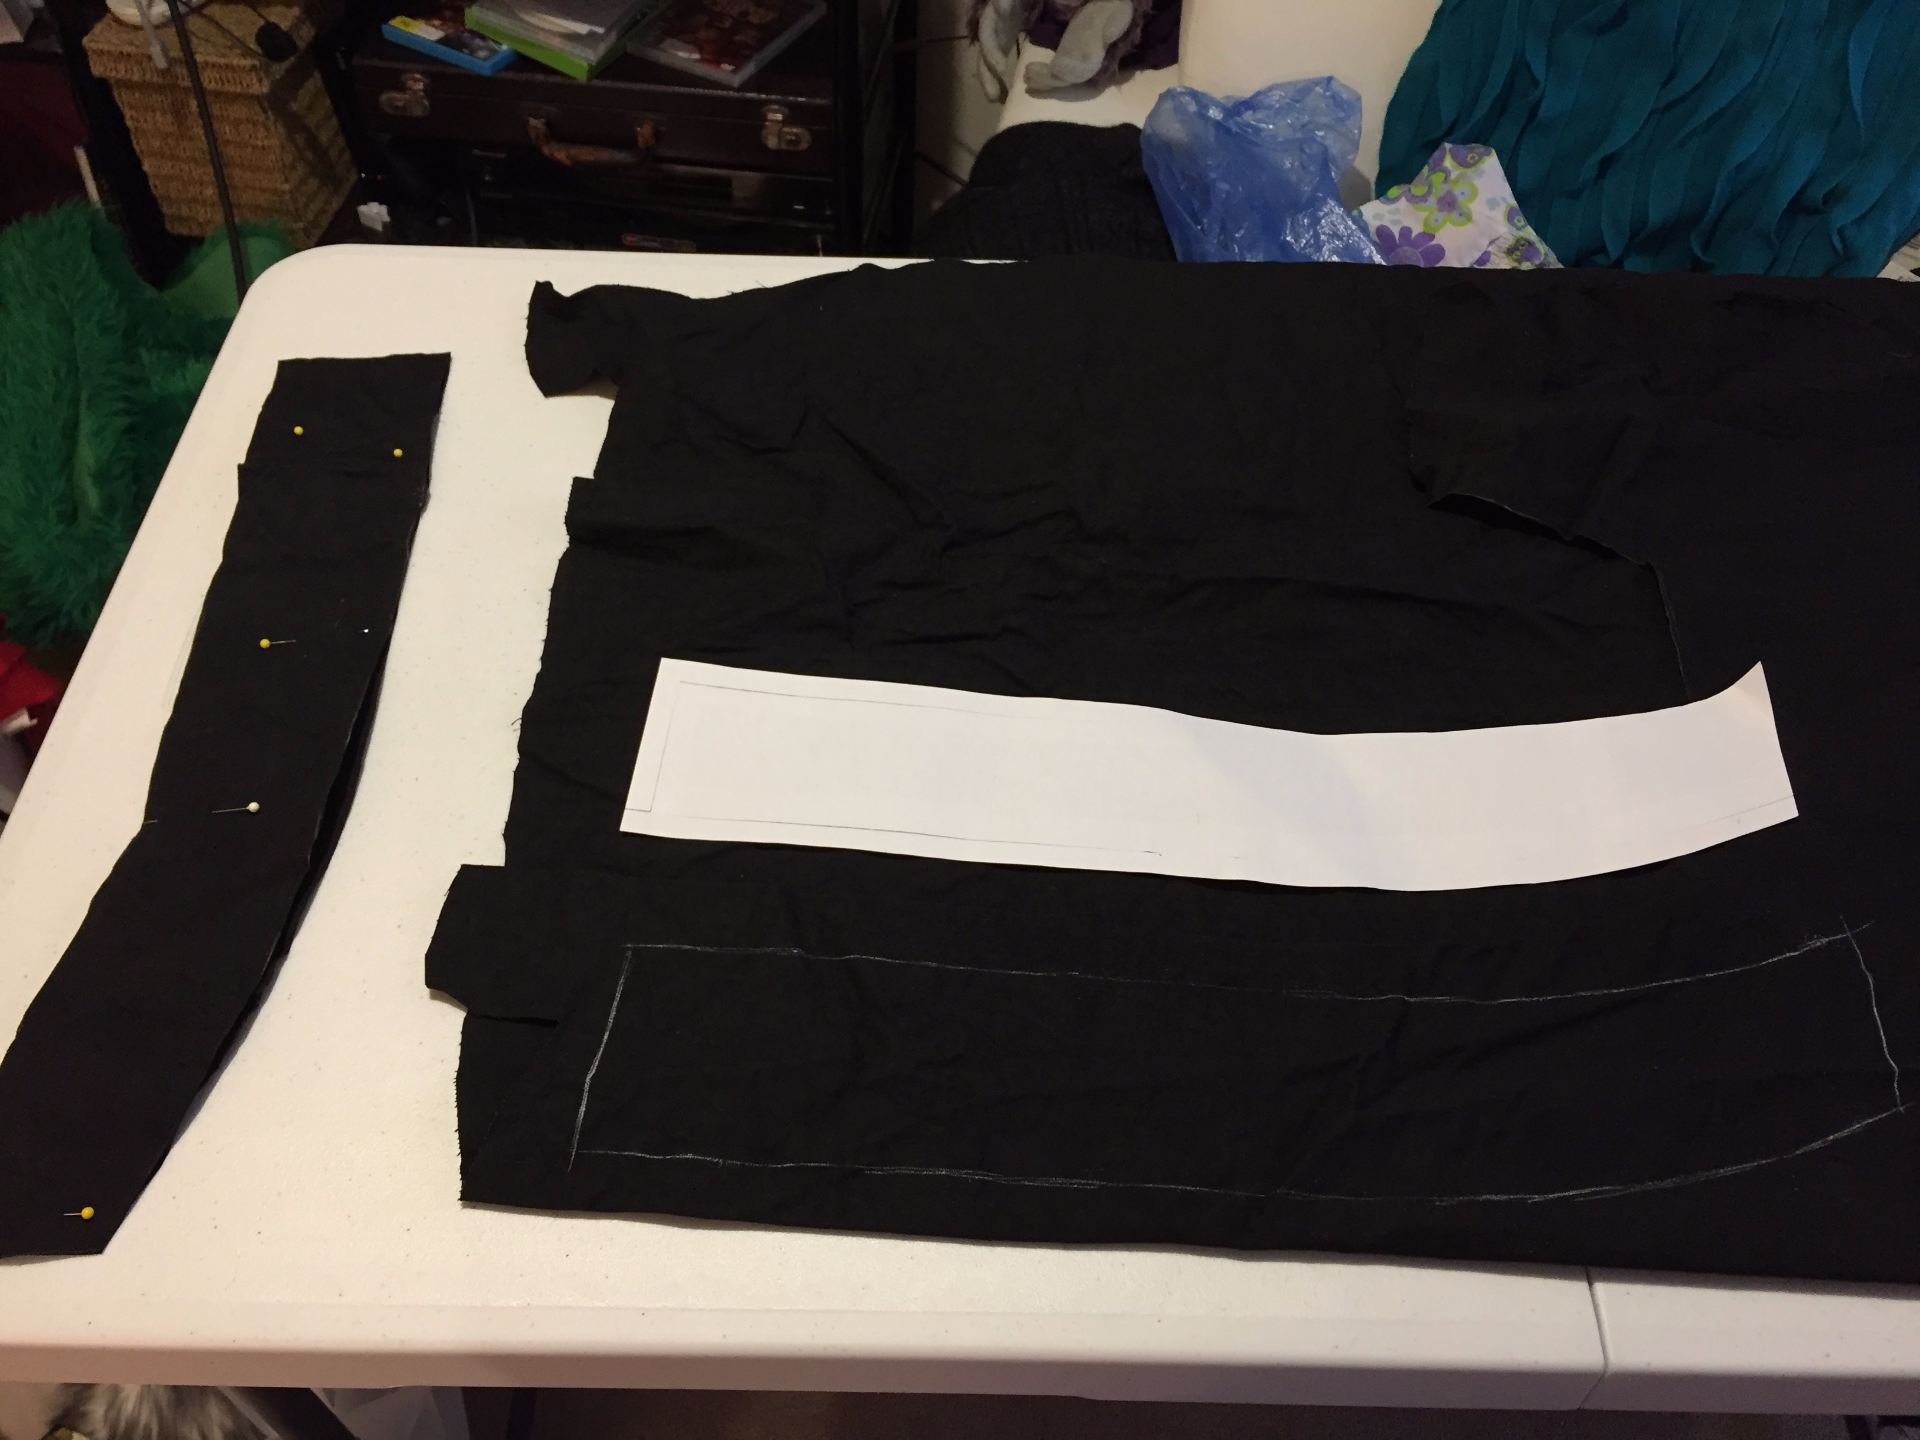
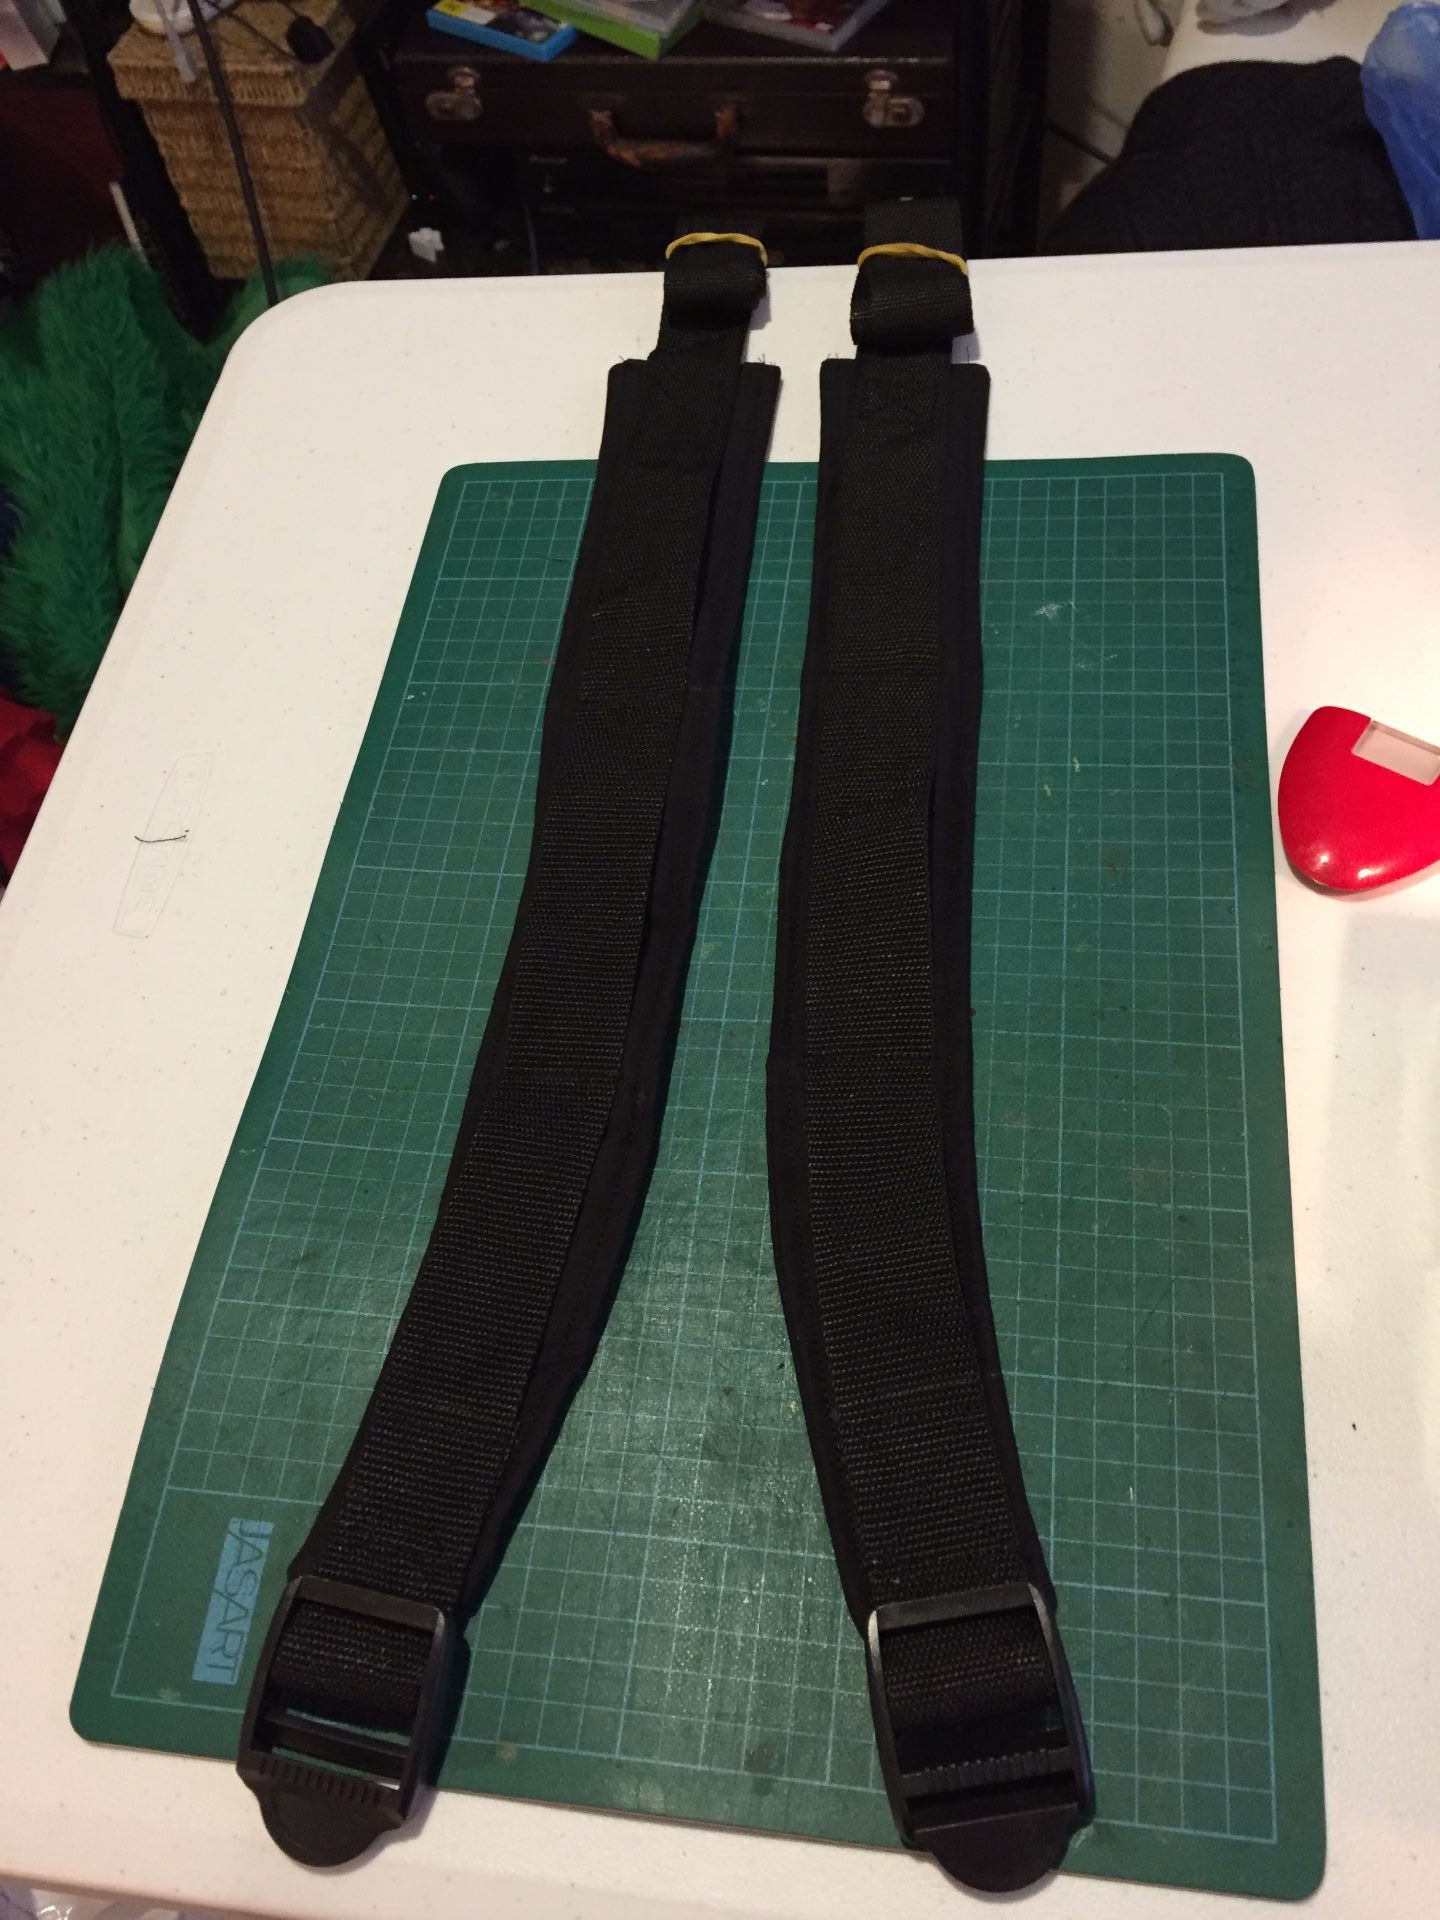
The part of the backpack that I am most proud of is that I made all the straps myself using a great tutorial I found on youtube.
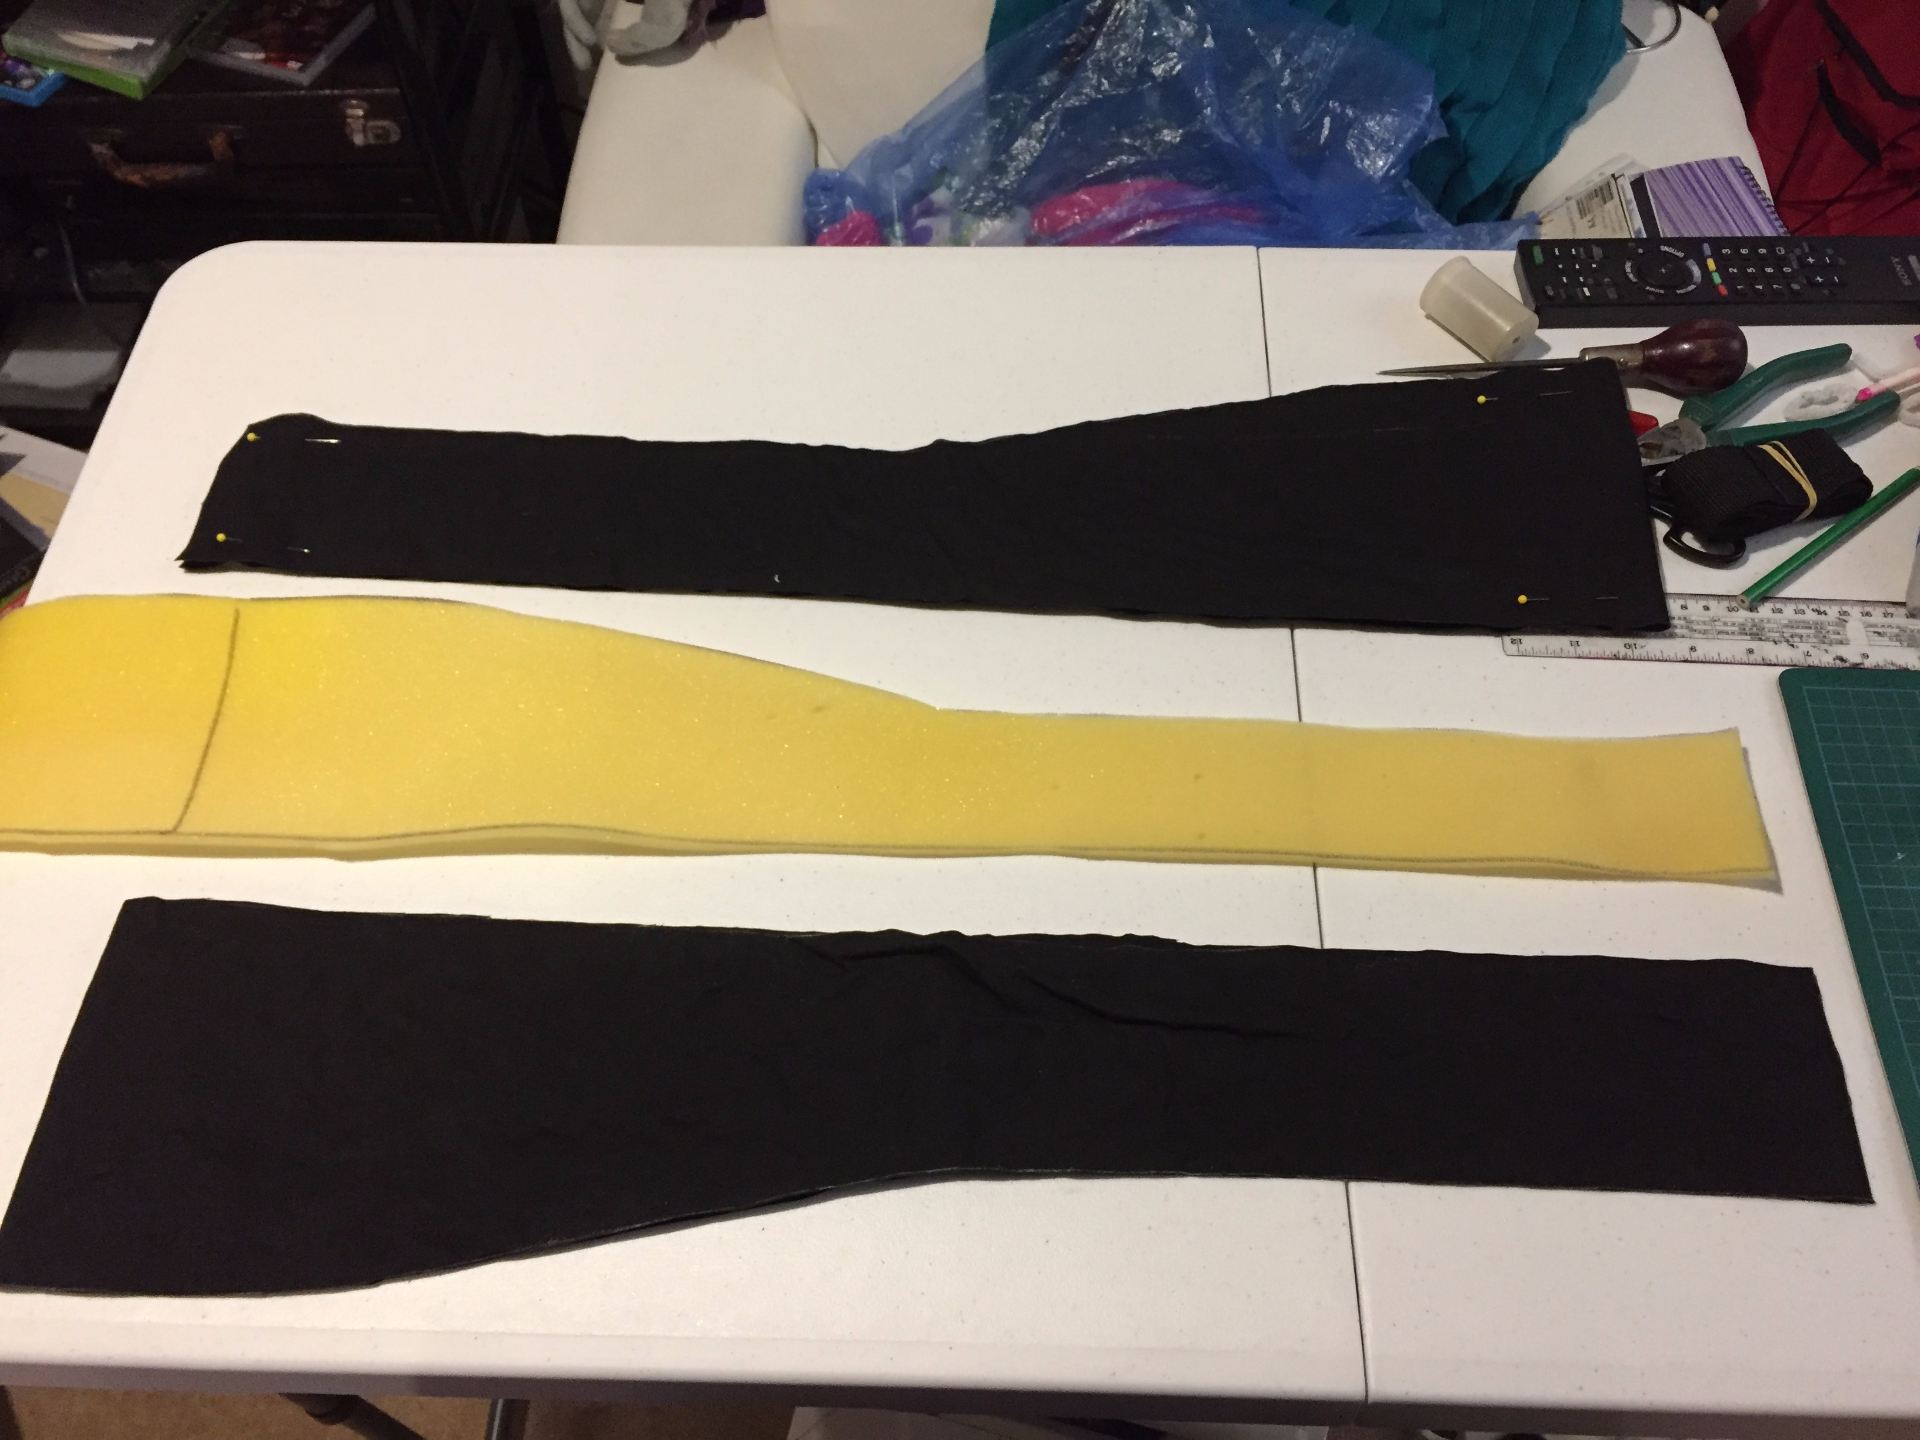
Drawing up the template onto black canvas fabric
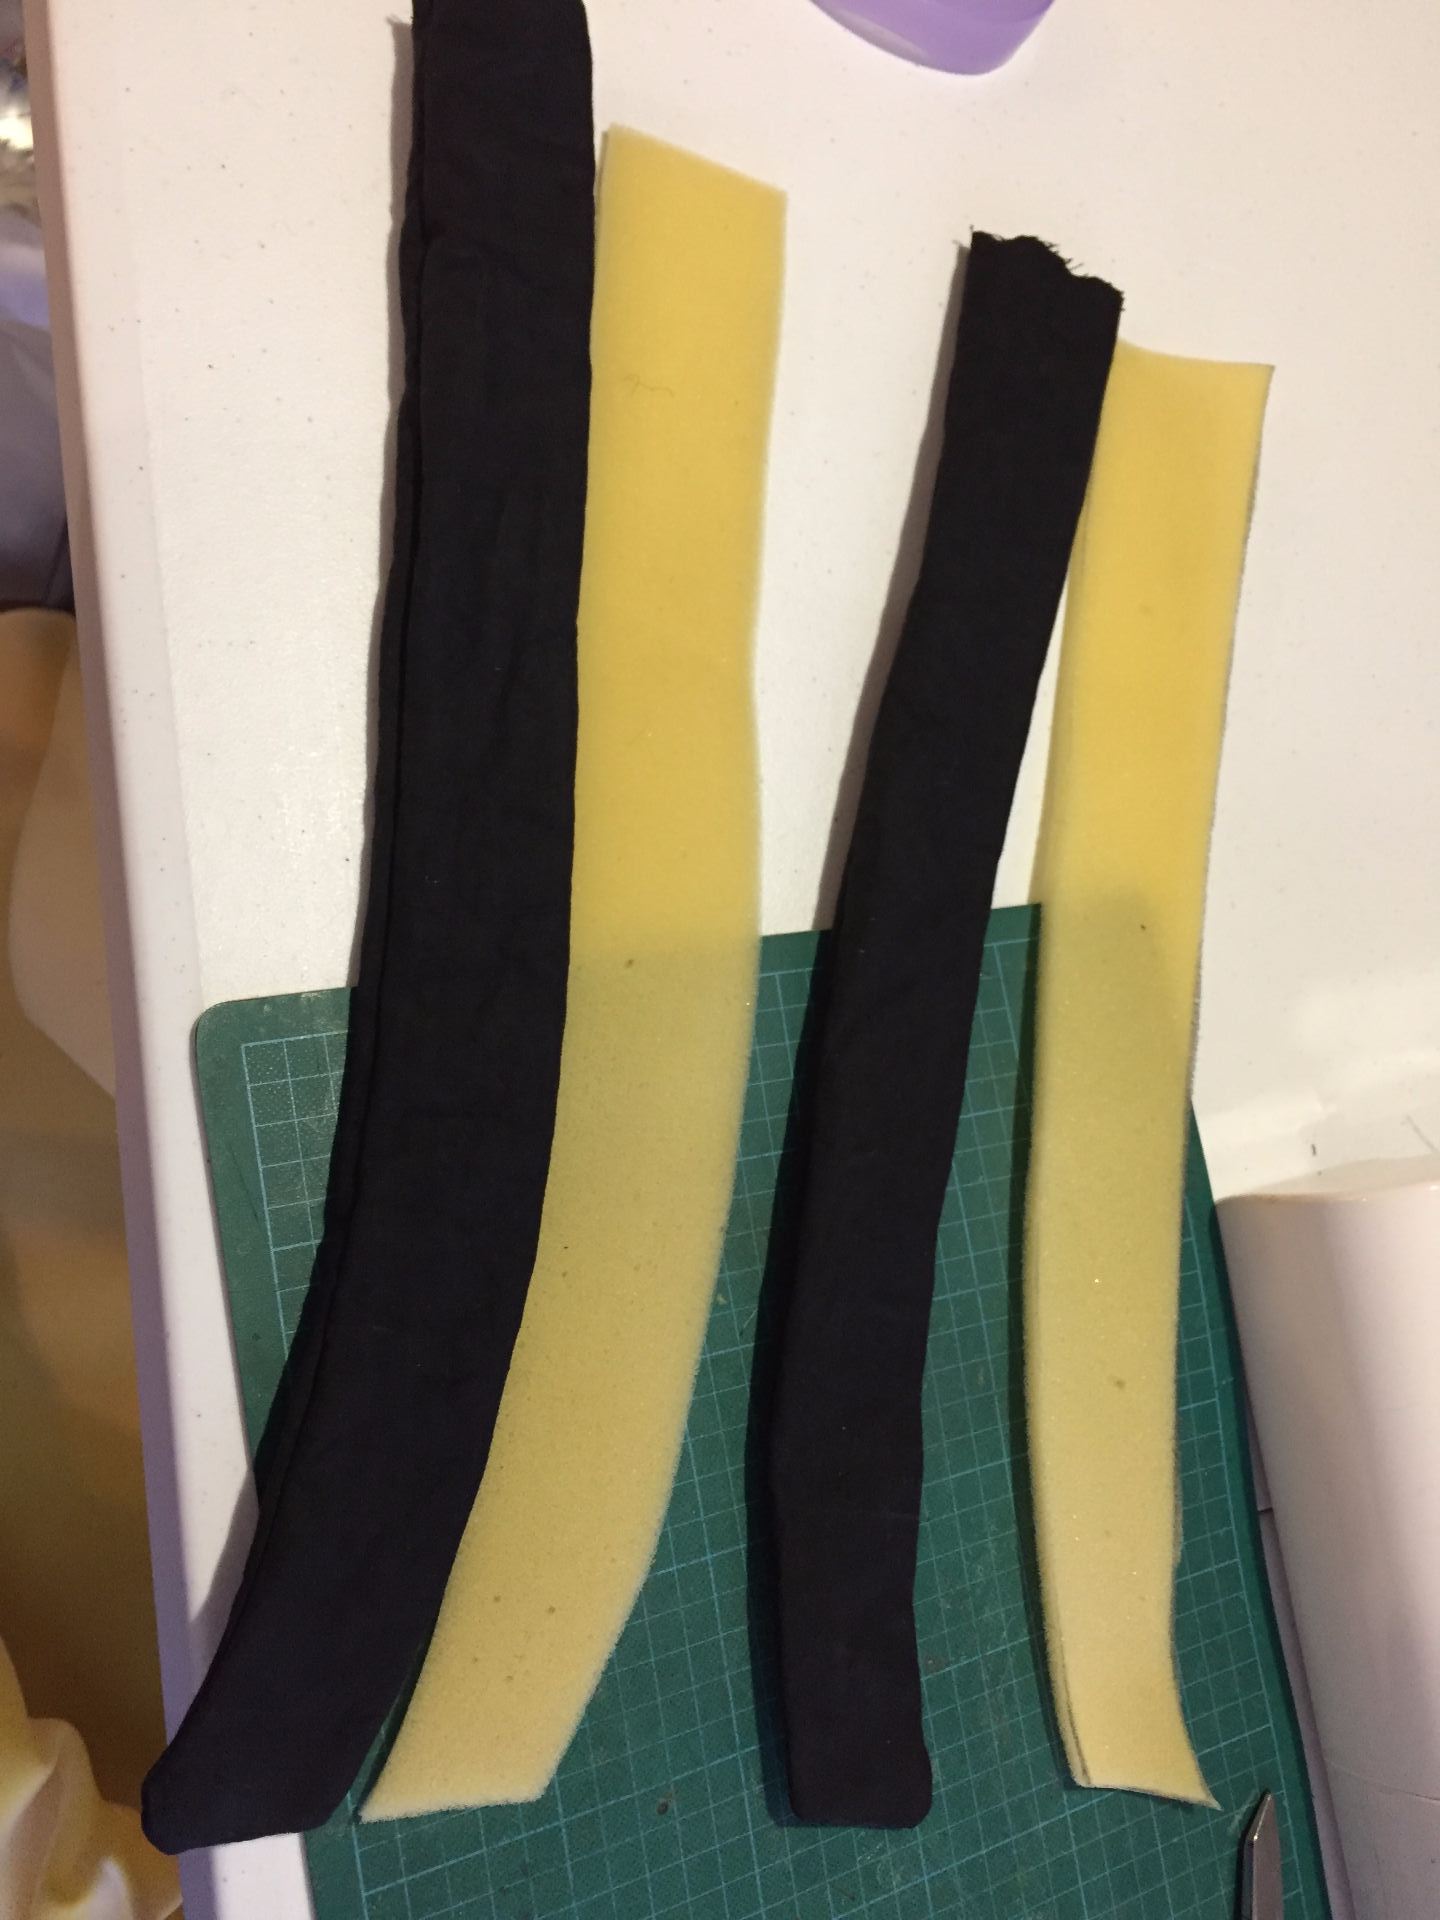
Making the foam padding inserts for the shoulder straps.
Sewing the layers of the shoulder straps together.
Add the strap webbing and hardware to the shoulder straps.
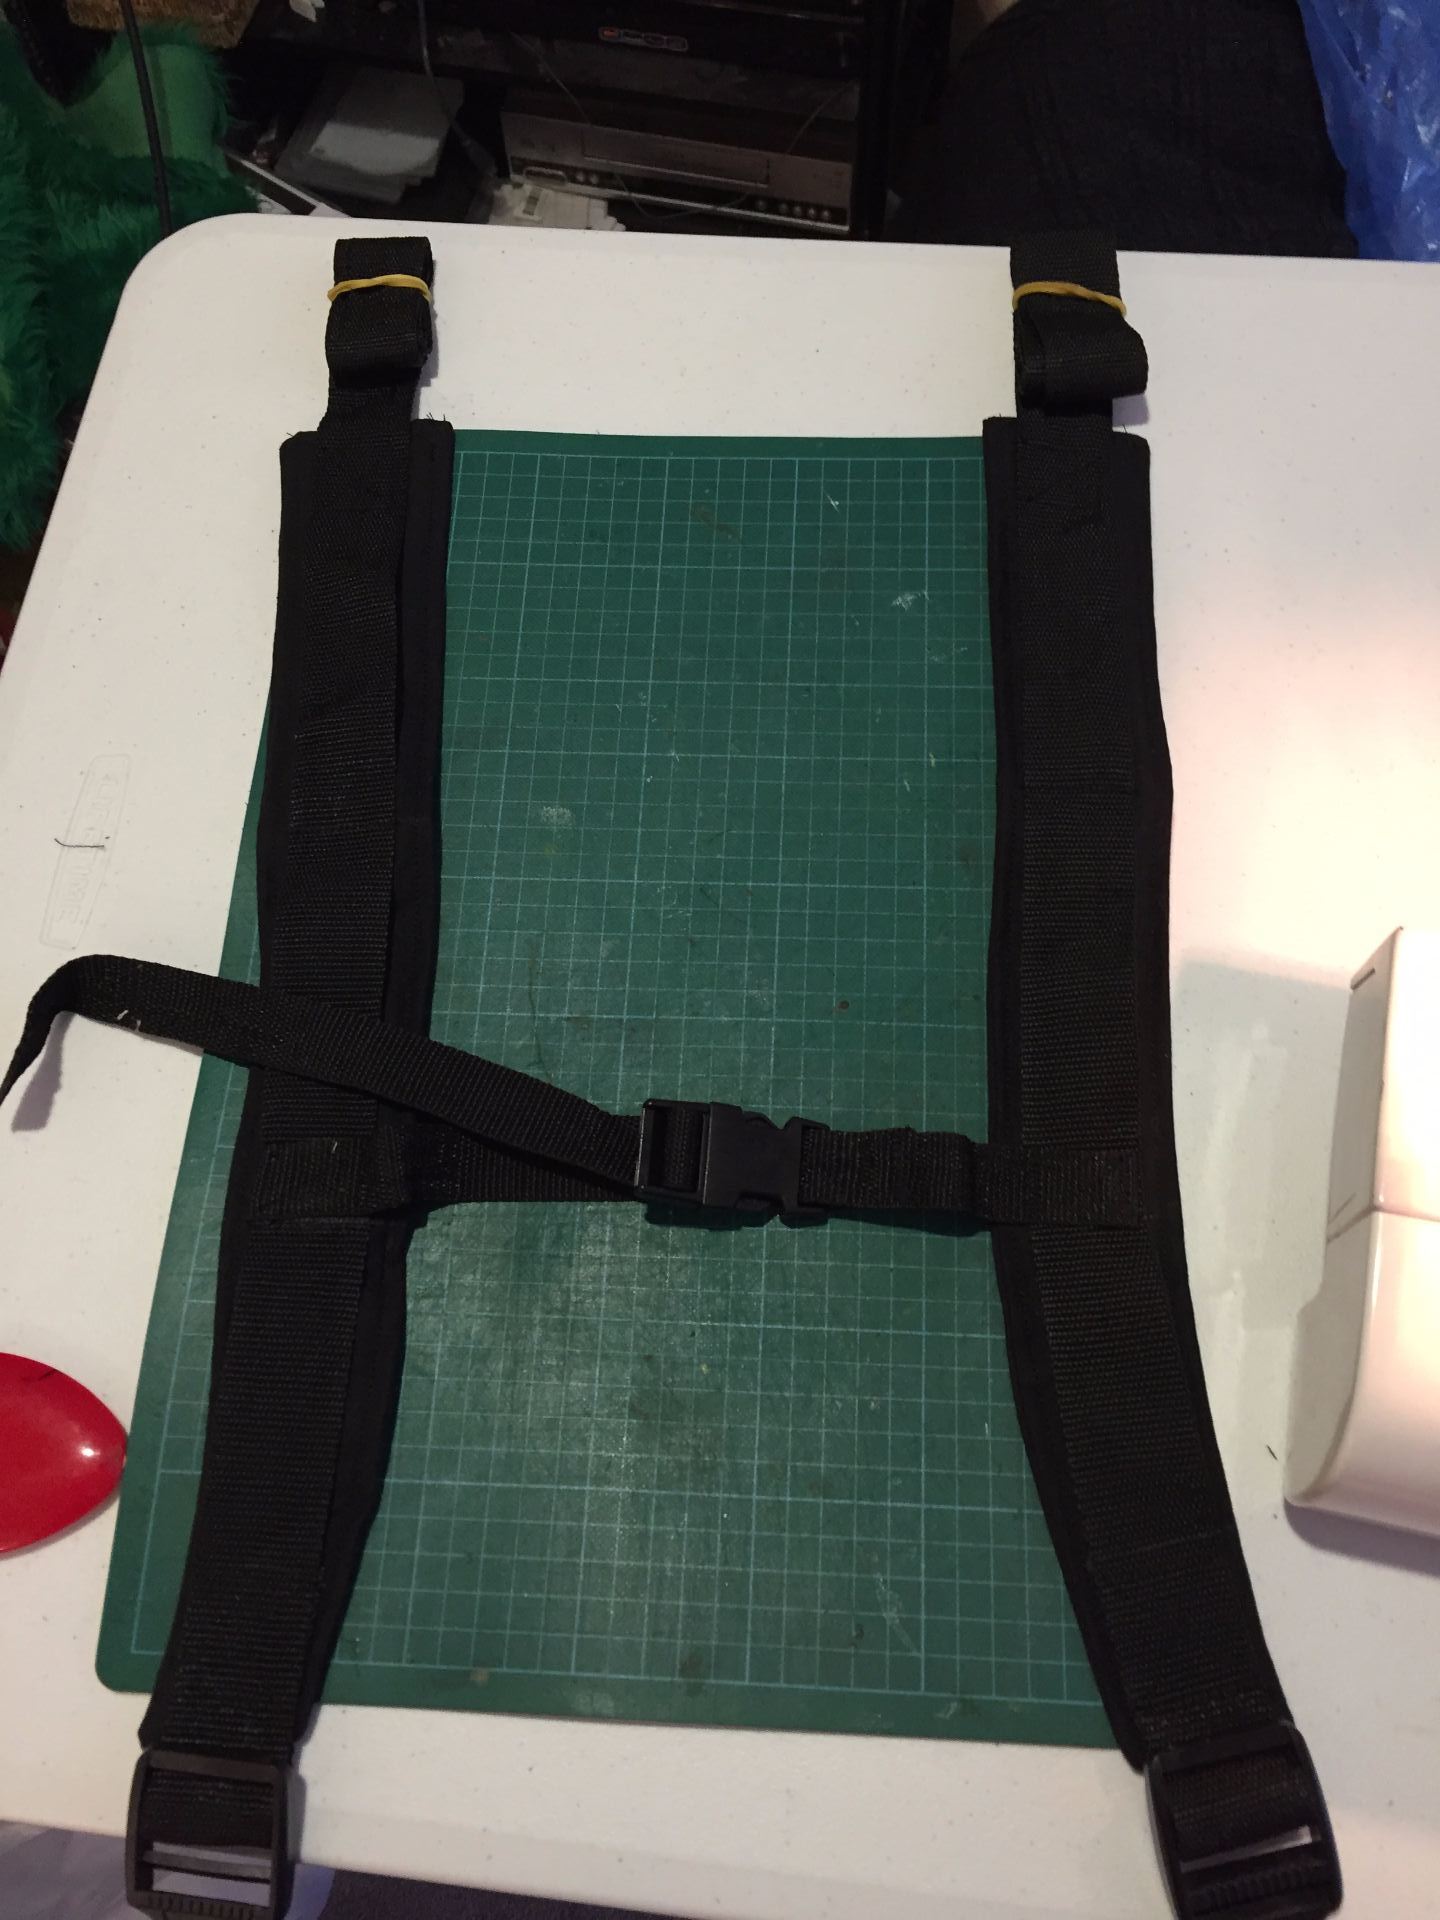
Adding the chest strap.
Making the waist strap
Finished backpack frame on the mannequin. Front view.
Finished backpack frame on the mannequin. Side view.
Finished backpack frame on the mannequin. Back view.
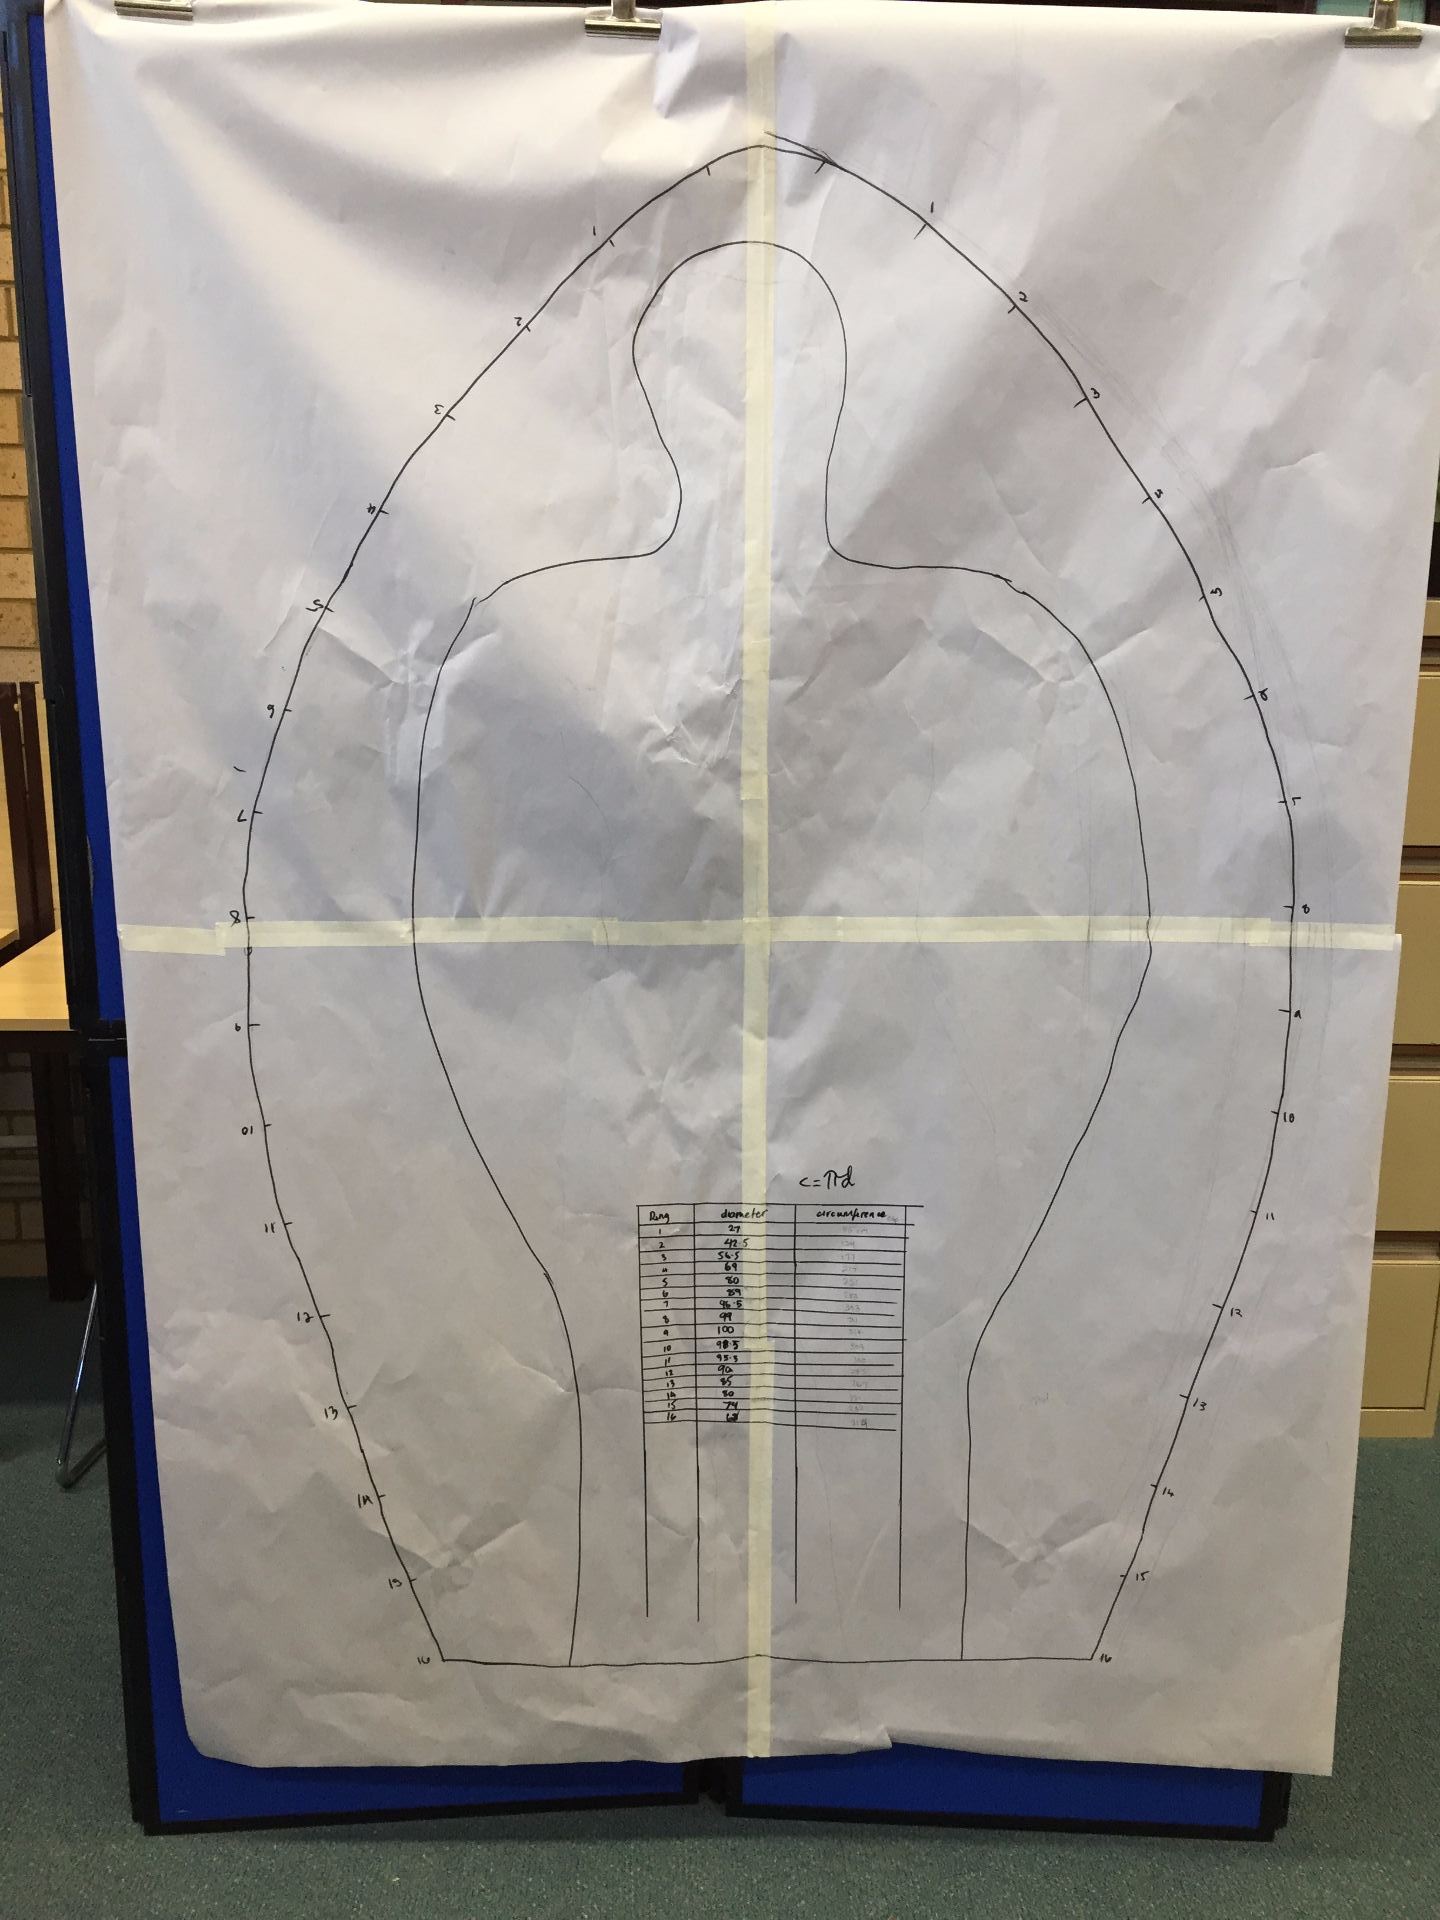
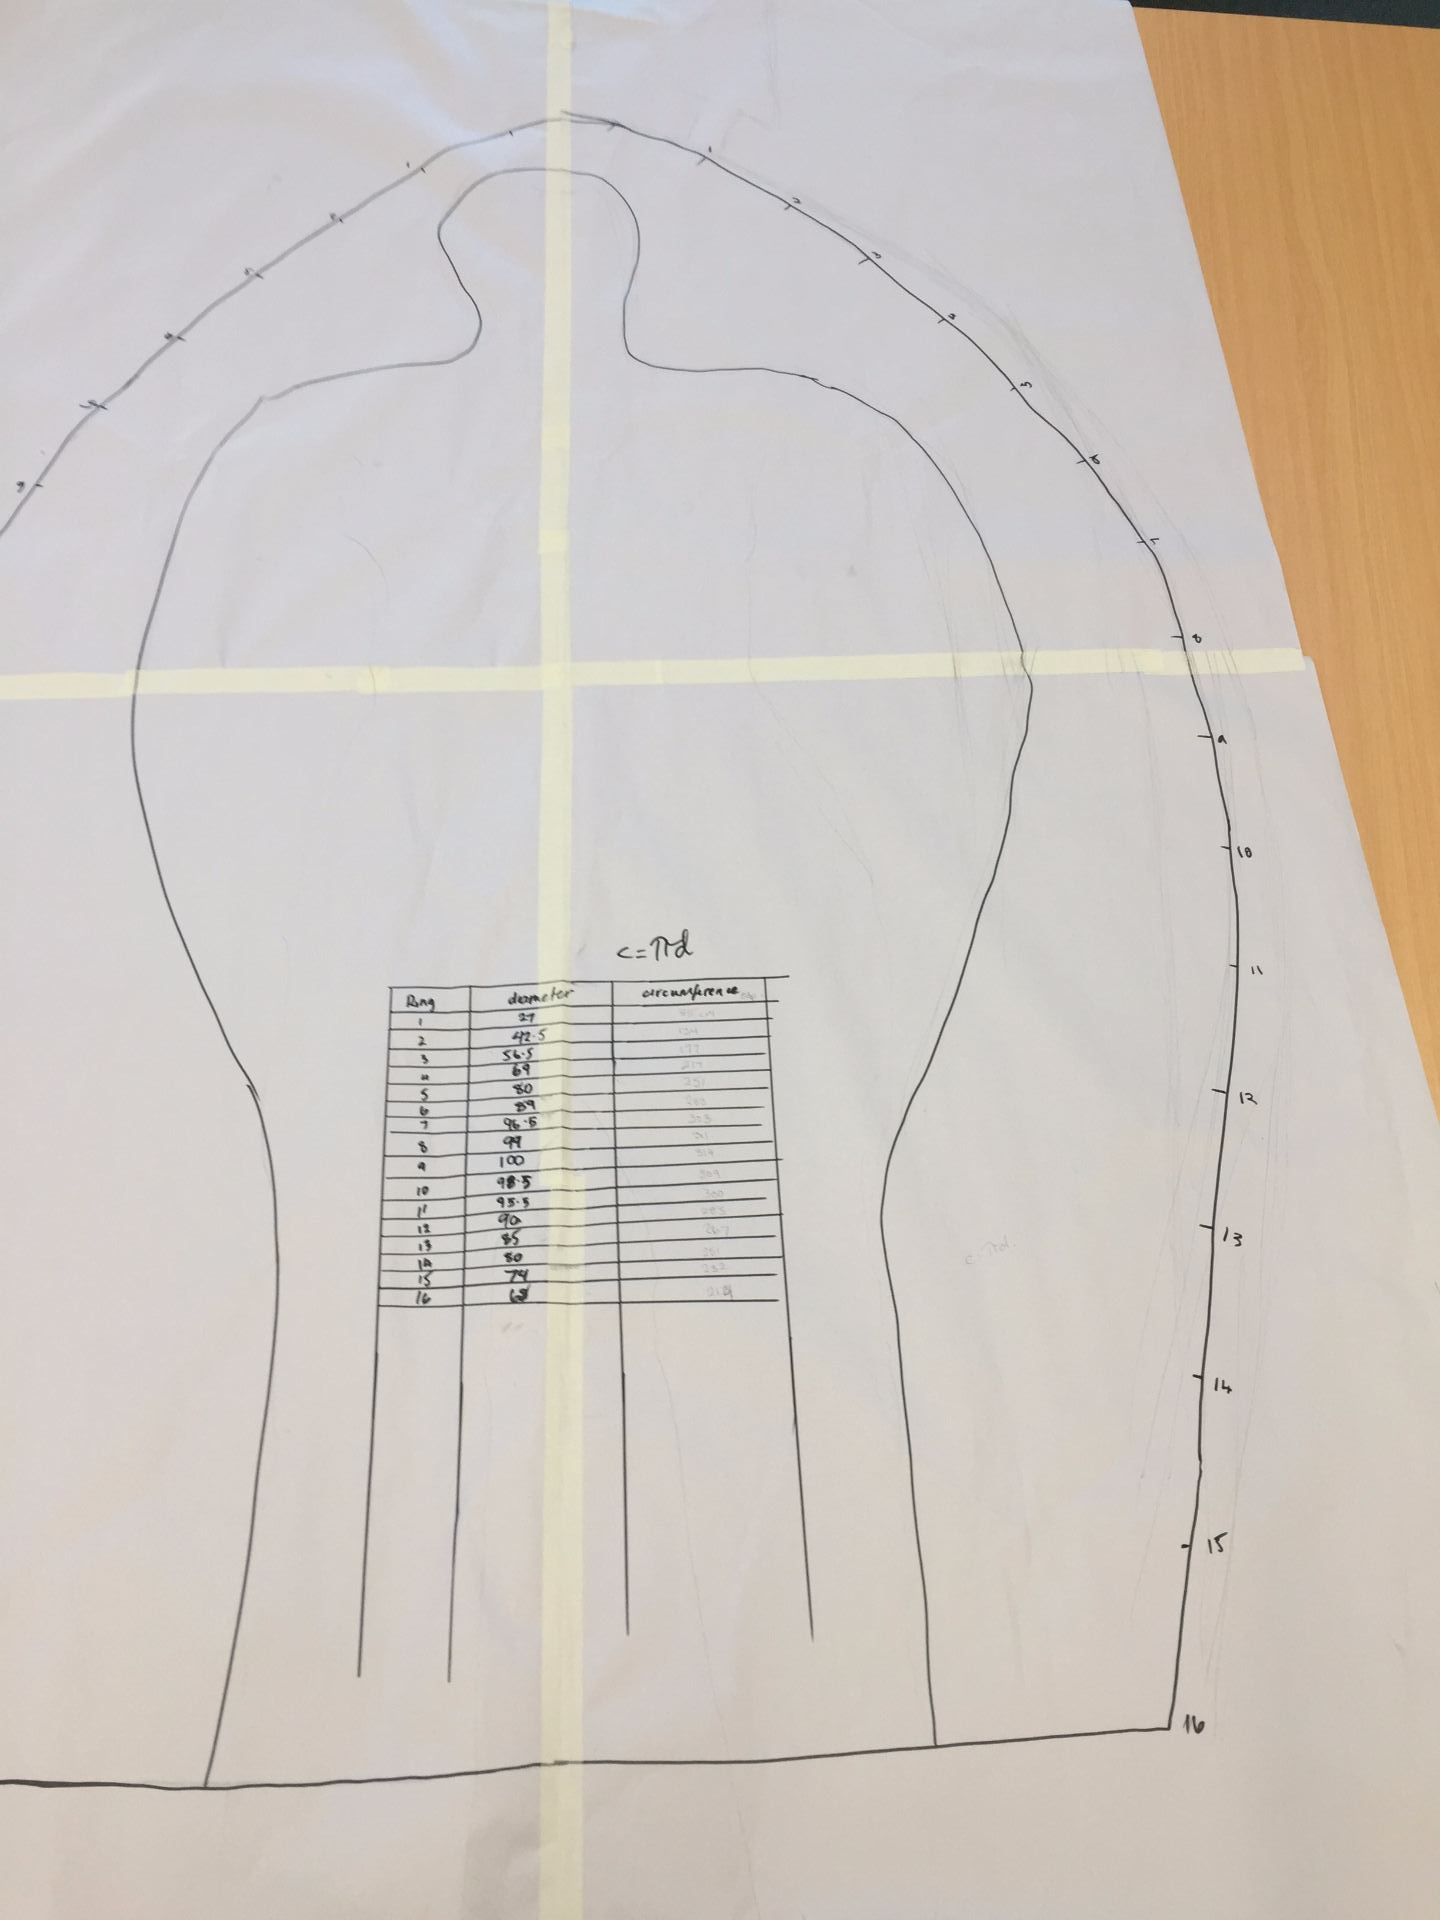
After watching the video by Adam Savage, I used sheets of butchers paper to draw a template of a figure my size so that I could plan the size of the cane rings I would need for my Totoro.
Working out the size of the rings
This process took most of the afternoon to work through, but I ended up with 16 ring dimensions. The widest ring is 1m in diameter, which means that the circumference of cane is 3.2 m!
Table of ring dimensions.
Now that I have a plan, it is time to order the cane. I am ordering the cane from http://www.wickerworks.com.au/. I decided to order a 500 gram bundle of 5mm round core cane which will give me about 50 metres of cane to work with.
One form of puppetry that I have not yet explored in either building or performing is full body puppets. Basically, the definition of a full body puppet is a puppet which has the puppeteer inside. Famous examples of these puppets are Big Bird, Bear from Bear in the Big, Blue House, and Humphrey B Bear. This year, I have the opportunity to build my first and second full body puppet, but at the time of writing, I can only talk about the first one as the second is for a special event later this year.
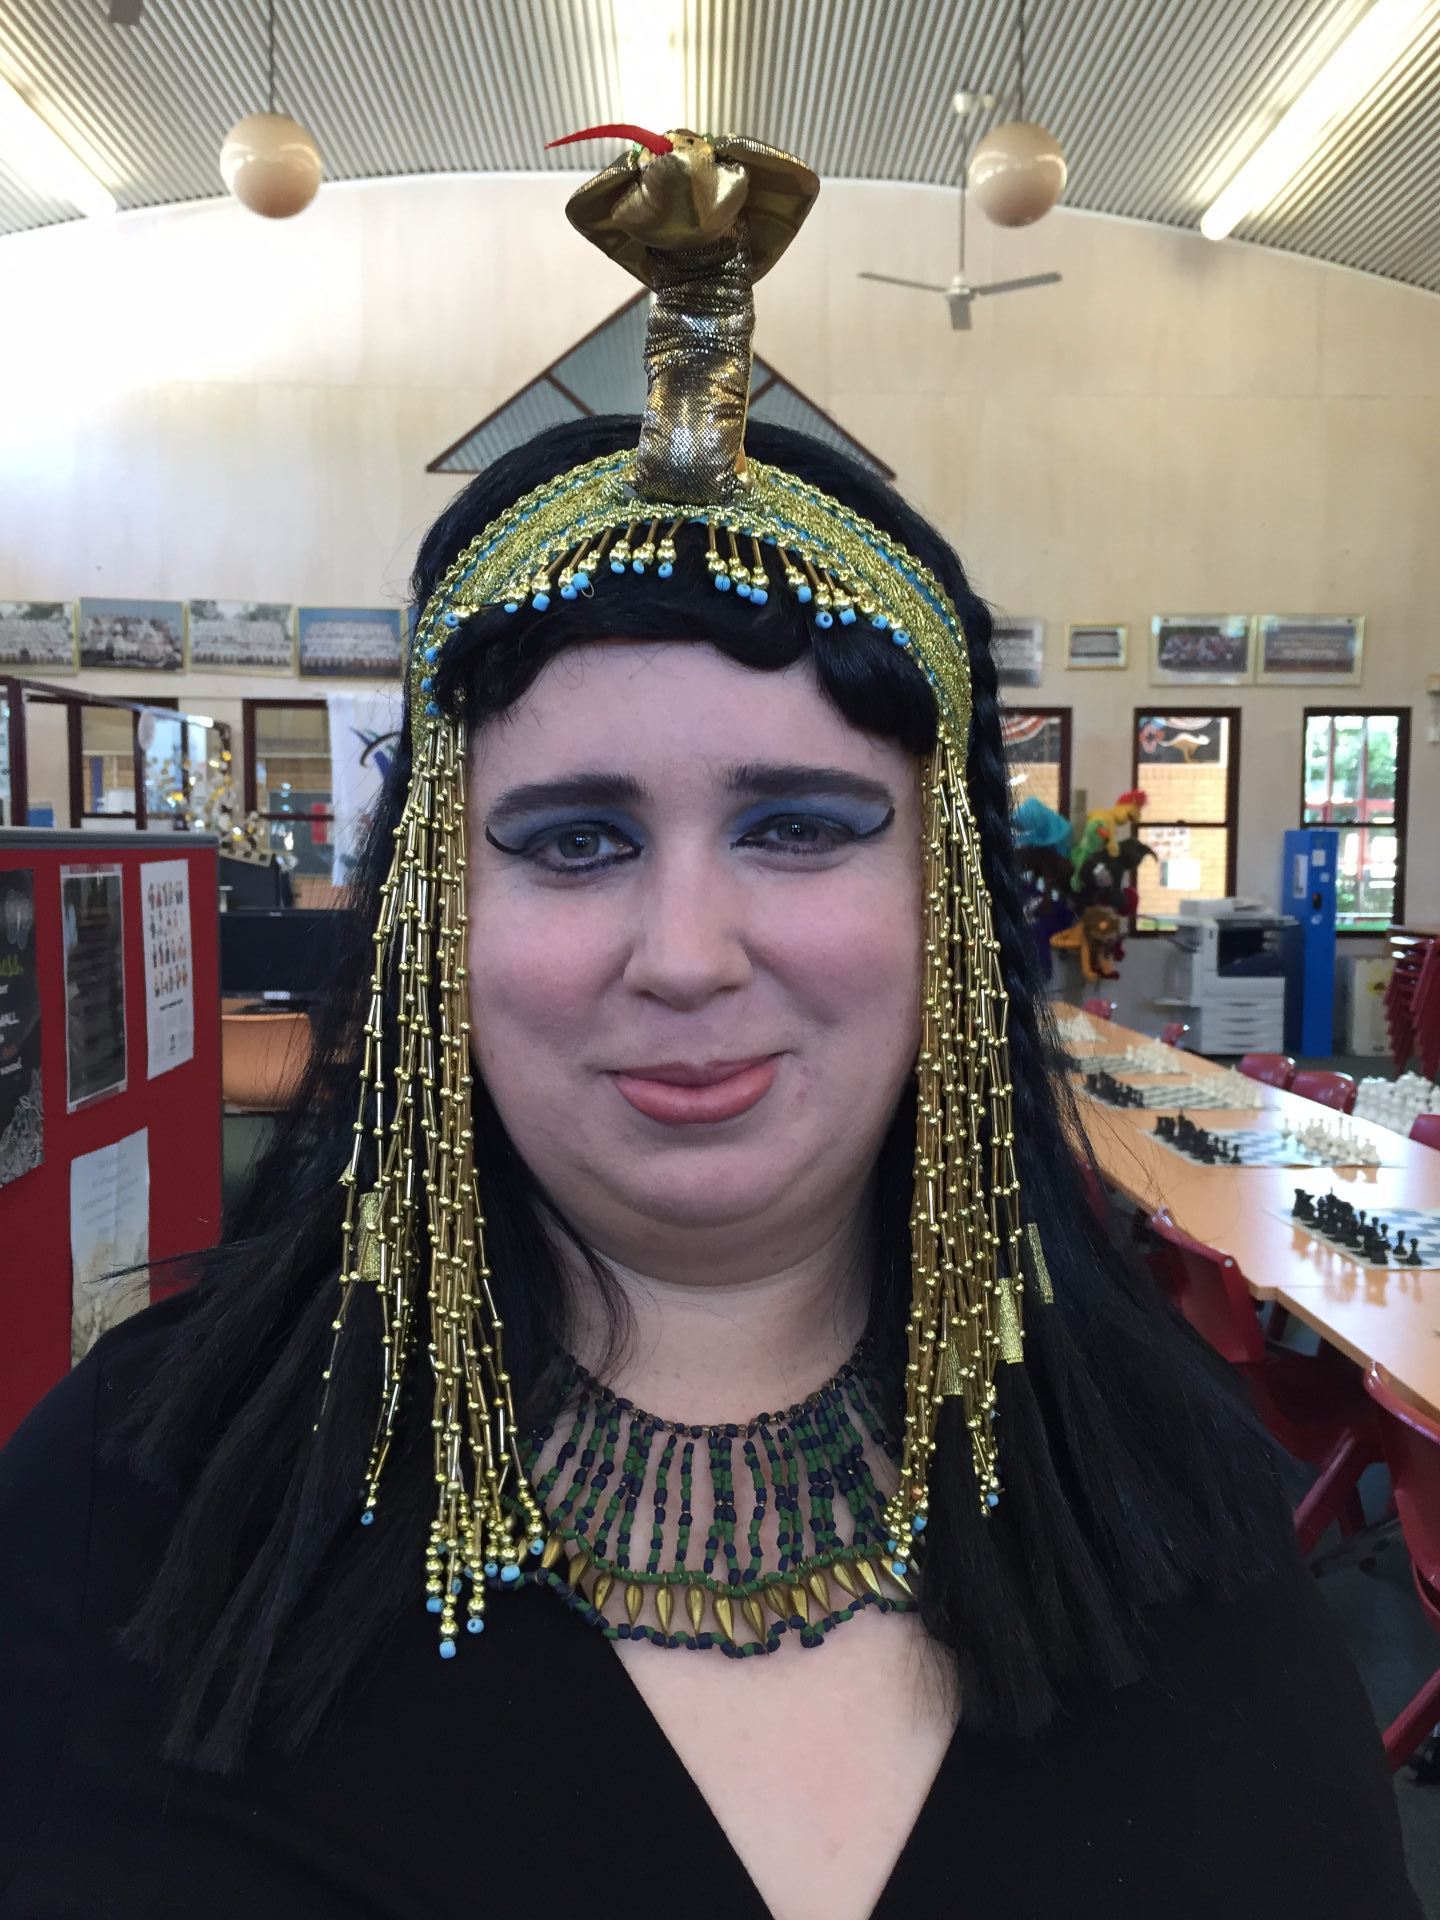
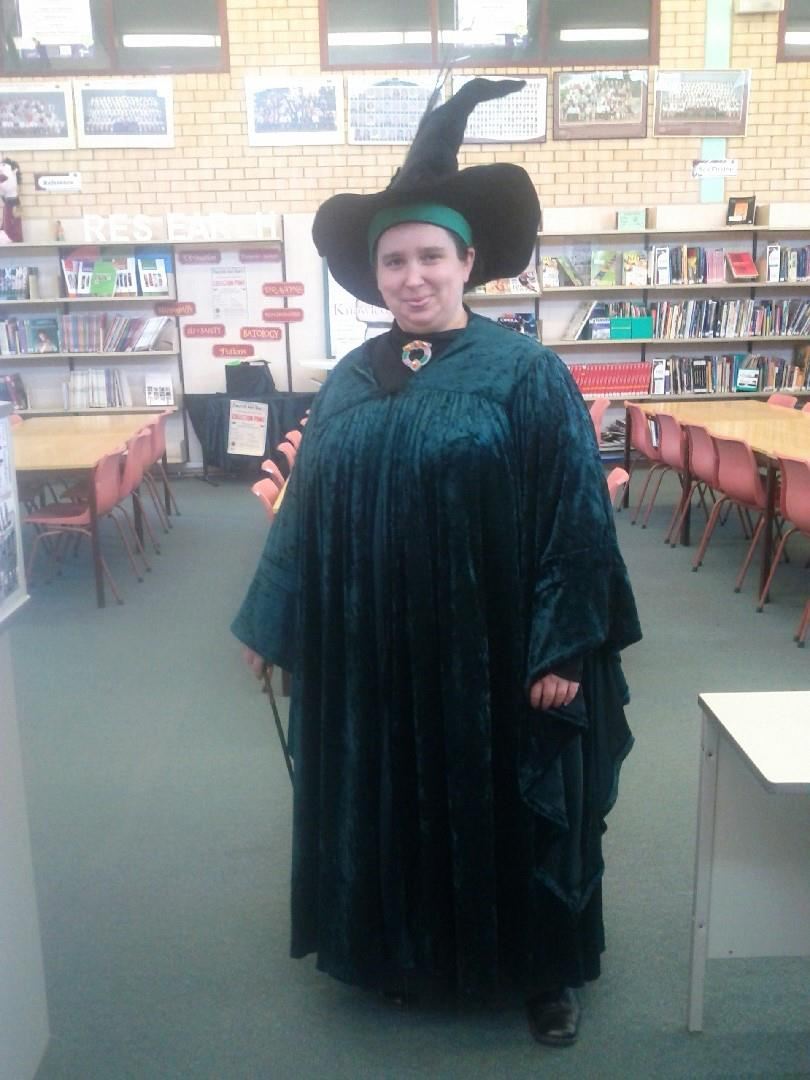
Every year, the school I work at holds an event called Celebration Day. It is a day when we celebrate the diverse cultures that make up our school with food, costumes, activities, but we also celebrate the fun culture of our school. Each year, I make a costume based on that year’s theme. in 2012 we celebrated the National Year of Reading, so I went as Professor McGonagall wearing her famous green outfit from Harry Potter and the Philosopher’s Stone that I made myself. In 2013 we celebrated going to the movies, so I made Maleficent’s costume from Disney’s animated version of Sleeping Beauty. I was on leave in 2014 and dressed up as McGonagall again in 2015 but in 2016, I was Elizabeth Taylor’s Cleopatra.
Me as Cleopatra in 2016Me as Professor McGonagall in 2012Me as Maleficent in 2013
For 2017, the theme is Legends and I am planning to dress up as Totoro from the great Japanese animation, My neighbor Totoro (1988) directed by Hayao Miyazaki. I plan to build my costume in the school Library so that the students can see how things are made and maybe inspire them to create their own costume.
I have had the good fortune to be inspired by, and a head start on building my Totoro by watching Adam Savage build his own Totoro!
For me, the first step is working out how I am going to wear my Totoro as the frame Adam’s Totoro sits on, is beyond my skill set. My current thinking is to use a camping/ hiking backpack frame. Since the top of Totoro is above my head and I need a pole from the backpack frame to the top of Totoro, I am currently thinking of building the backpack frame from PVC pipe like this:
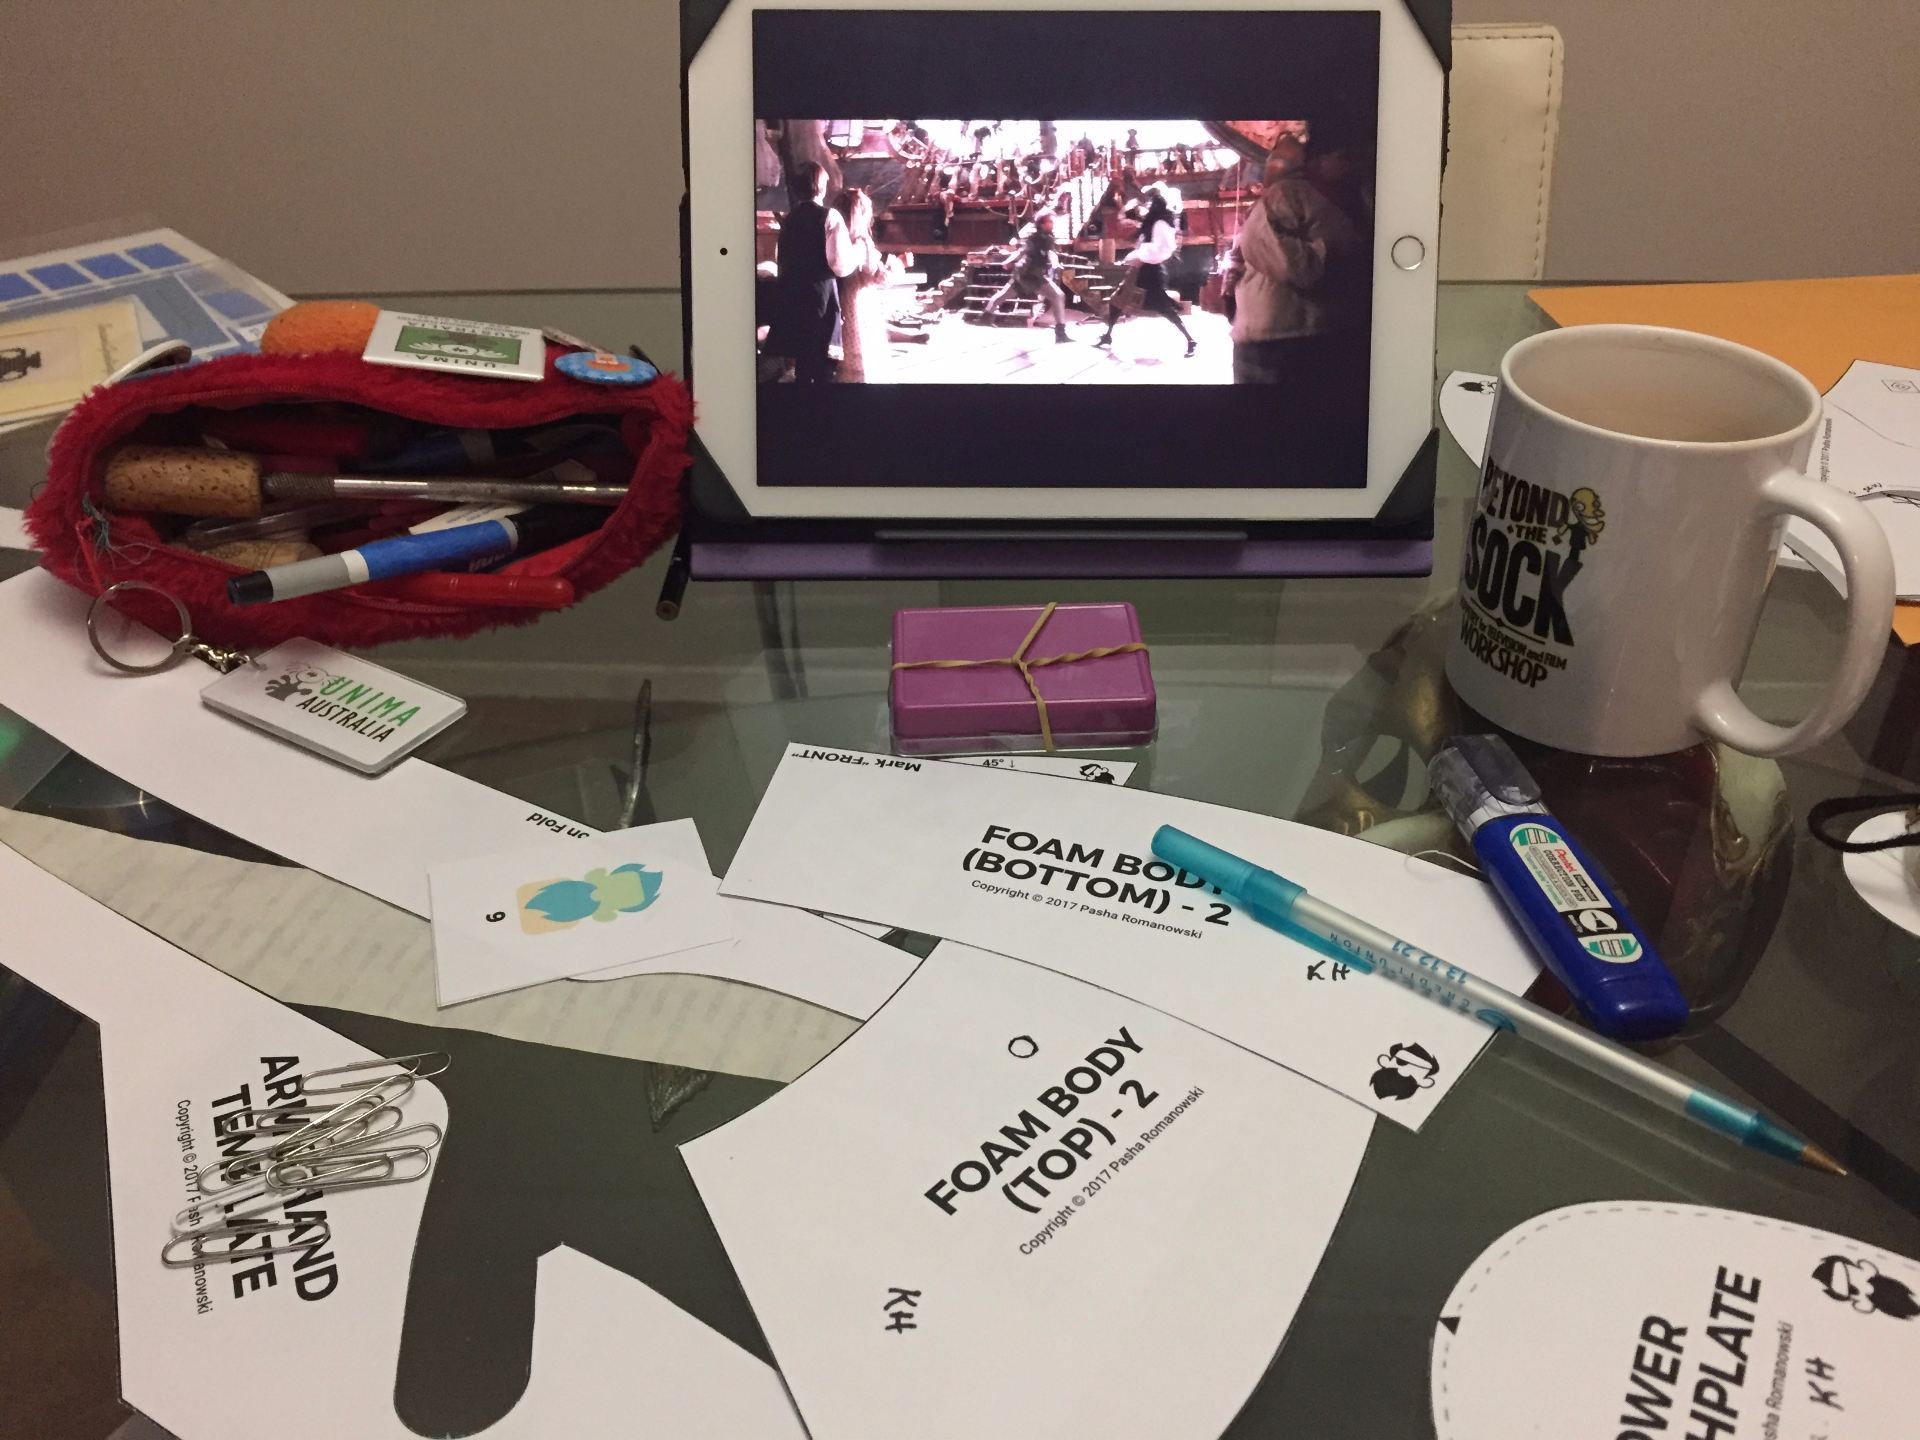
My favourite thing to do in the world of puppetry is build puppets. I have been building puppets for 15 years, mostly out of foam in what is known commonly as Muppet style. When Lucy Green and I attended Beyond the Sock Puppetry for Television and Film Workshop in June this year, one of the special features of this year’s workshop was that attendees were given two puppet patterns to build. Pattern A was a round head pattern, and pattern B is a tall, pill shaped head. Both patterns were designed exclusively for Beyond the Sock by Pasha Romanowski, who runs the amazing Project Puppet and teaches the building side of the workshop.
Each year, the overall theme of the workshop is different. My first year was 2015, which was Monkey puppets on a tropical island. My second year, 2016 was Chicken puppets on a space ship. This year, 2017, the theme was pirates! My puppet travelling companion Lucy blogged about our pirate experience.
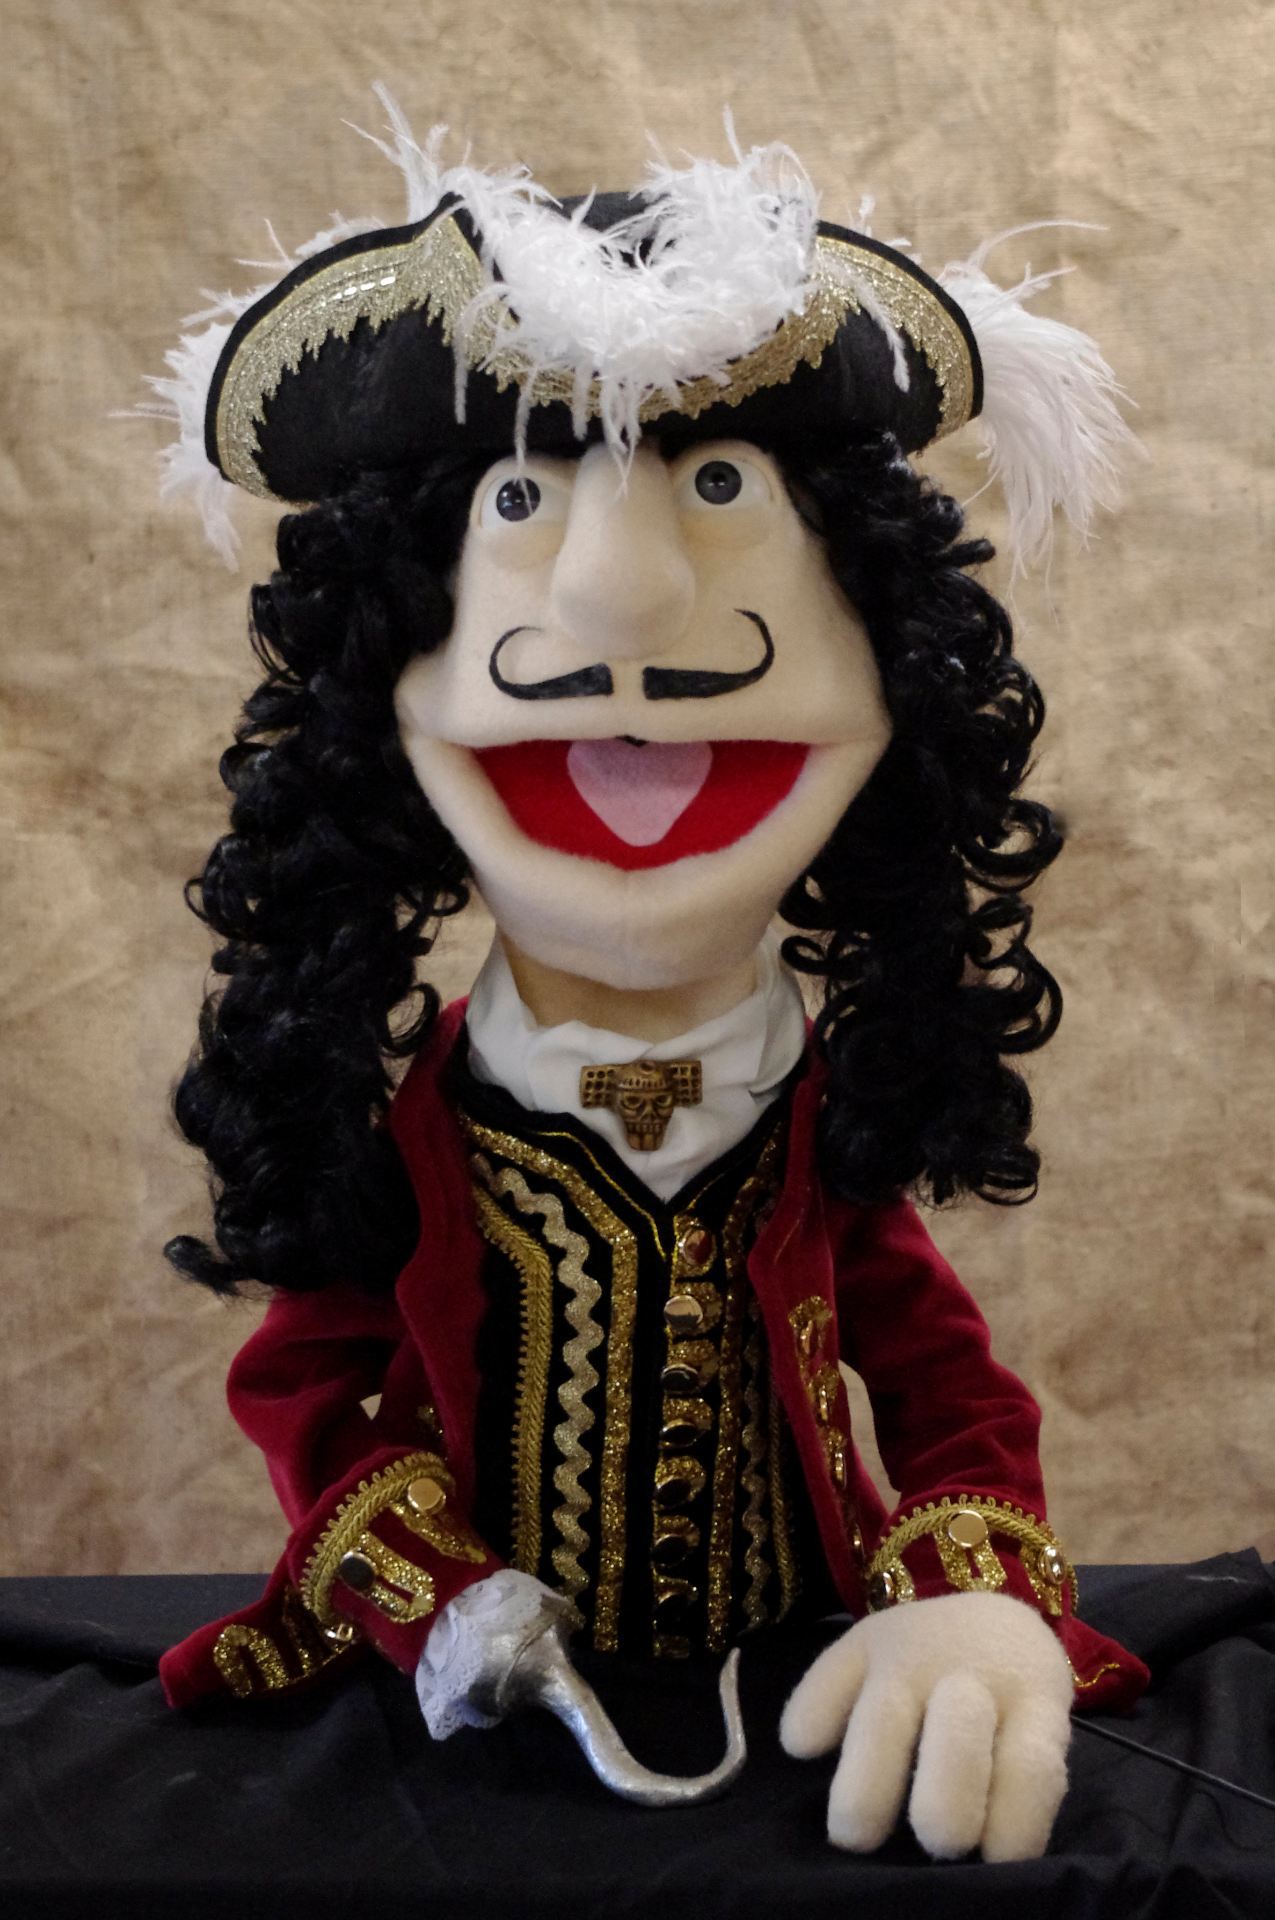
During the workshop, I built pattern B as it was a new head form for me to explore. Once I got home to Australia, I wanted to build puppet pattern A before I forgot all the special instructions for that pattern. The tricky part was trying to decide what character I wanted to make, but unpacking all my puppets and putting them back where they belong in my house and on the tree at school, I was struck by an “apostrophe” to quote one of my favourite movies. I would make Peter Pan to be a great and worthy opponent to my best ever puppet, Captain James Hook!
I wanted my Peter Pan to have the same level of detail and workmanship that my Captain Hook has. I built Hook in early 2014 and I built everything from scratch except for his wig. Sufficed to say, I am very proud of my Captain Hook. I consider him to be my best ever puppet, and I took him with me to America this year so I could show him to my puppet building teacher. For the record, I had no idea that the theme for Beyond the Sock was pirates, it was just an incredible co-incidence! My Captain Hook is even featured on the Project Puppet Gallery
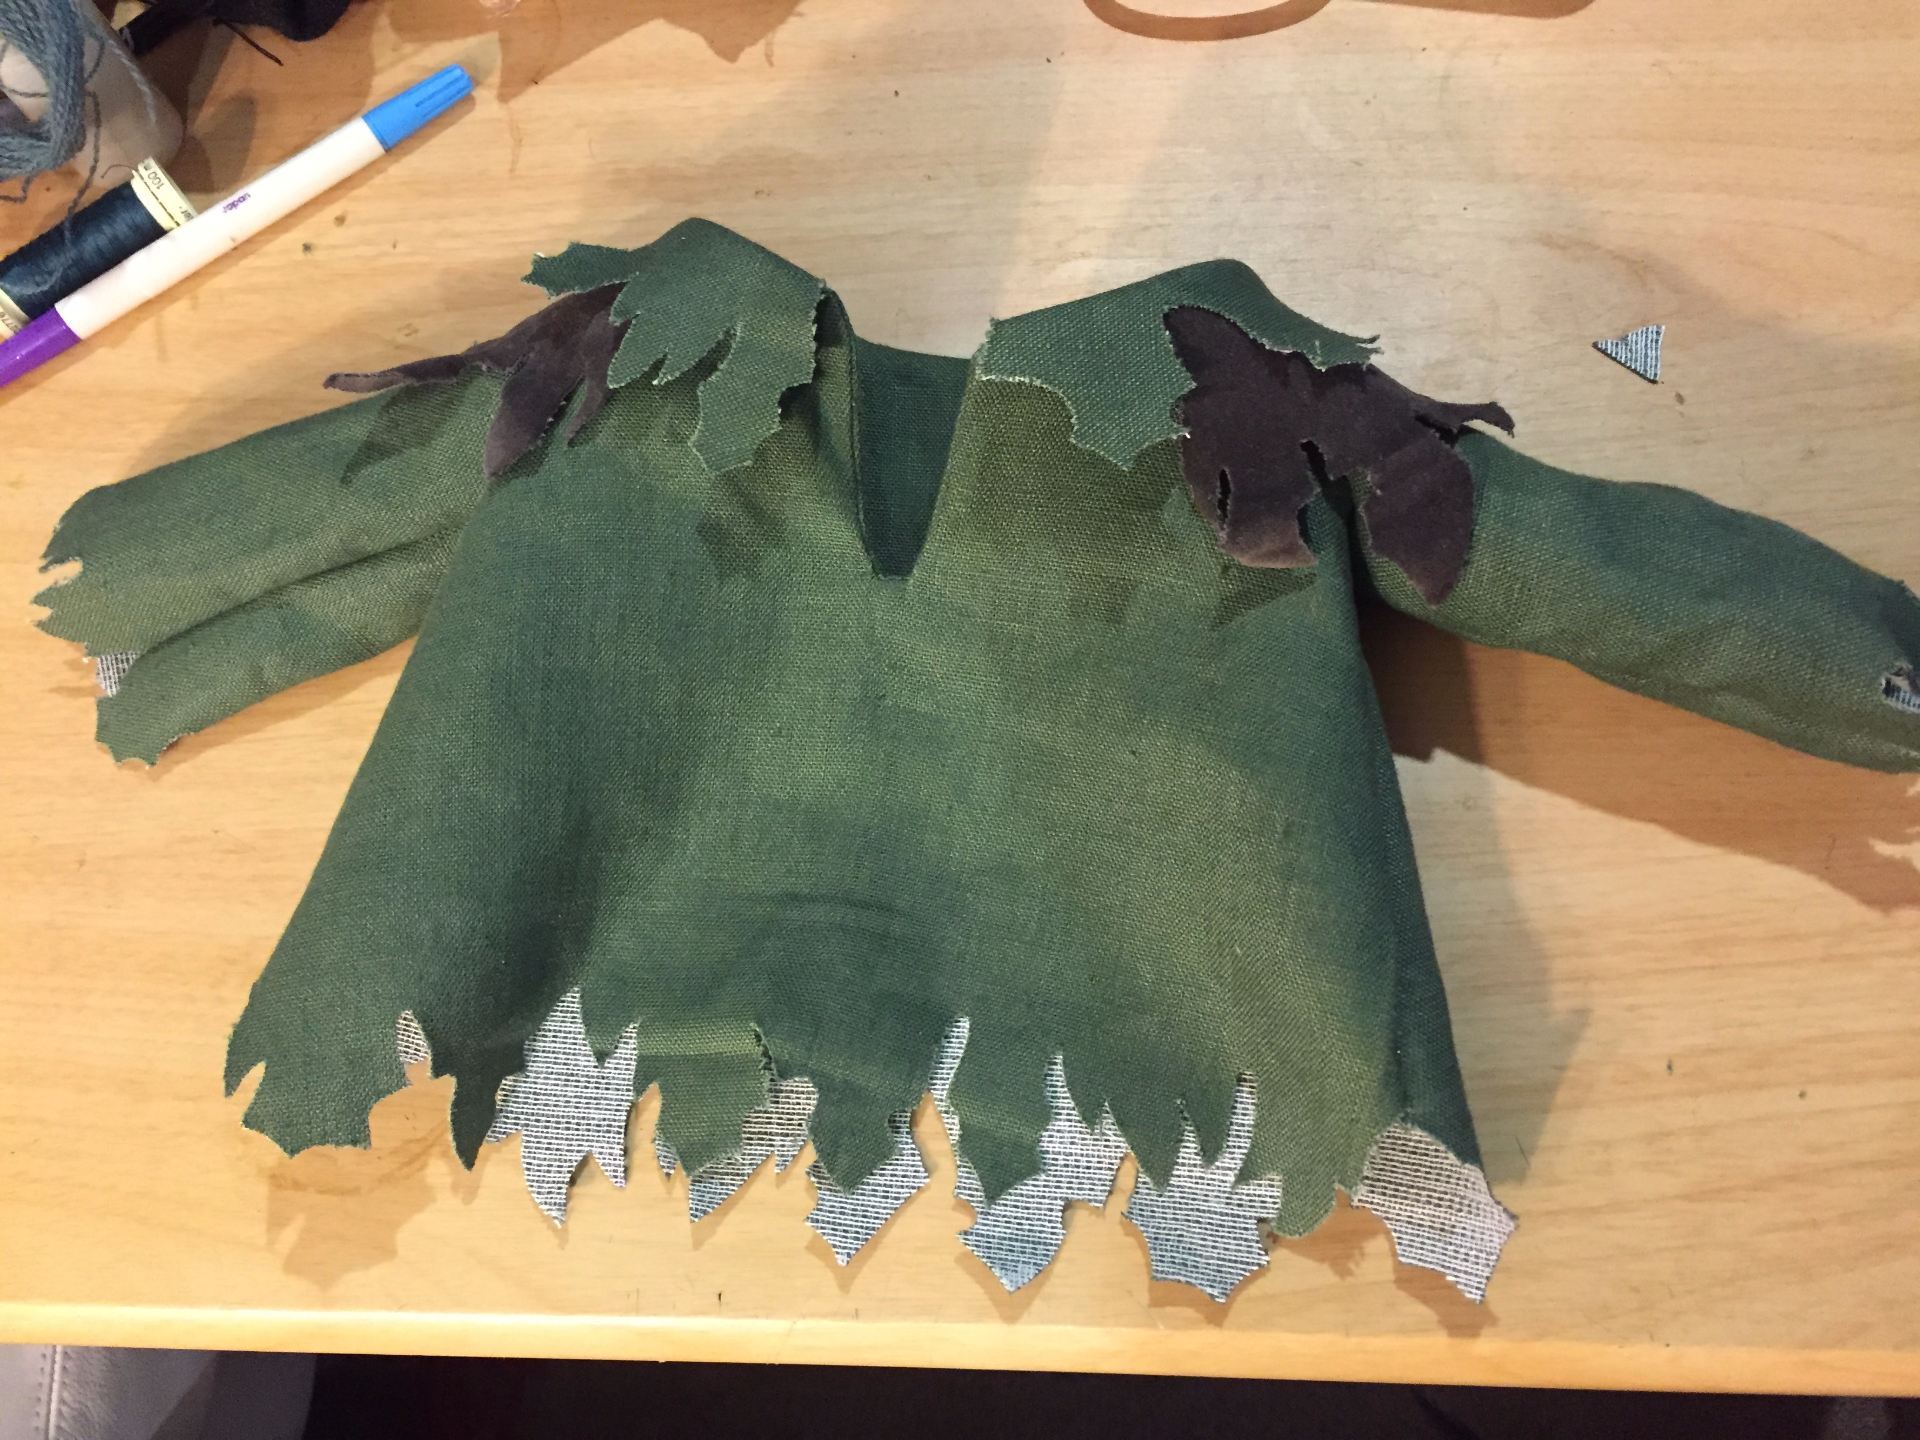
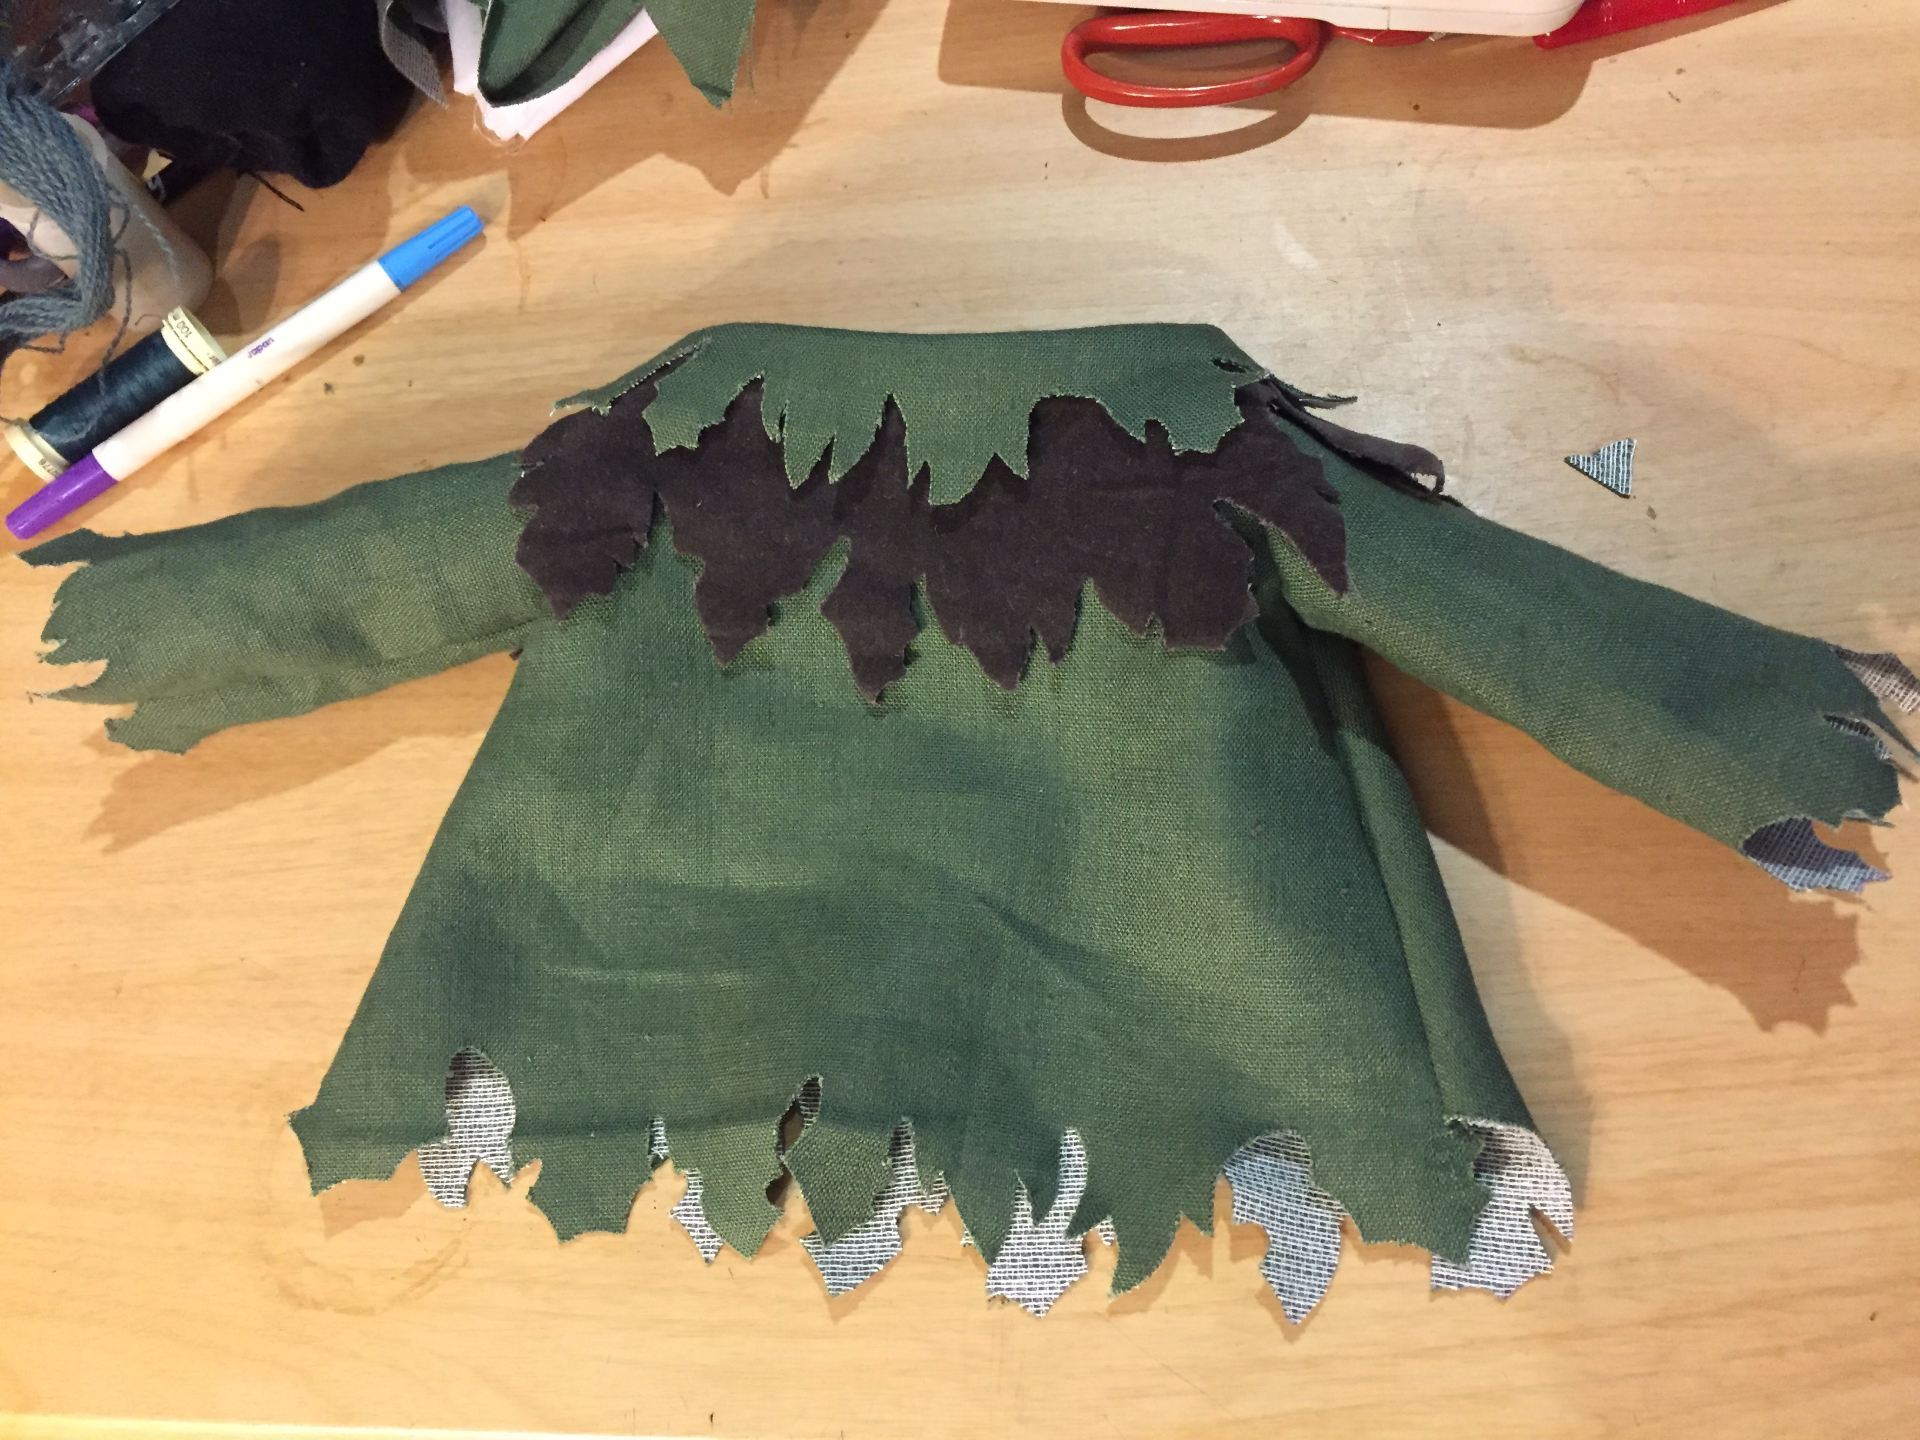
So design and construction began, I used screen shots of the 1991 movie Hook to design Pan’s costume based on the costume worn by Robin Williams. I wanted to include lots of leaf detail but avoid any reference to the stereotypical costume of Robin Hood which is also a green tunic and tights. I also wanted to make the ears more elf/ fairy like, and use the same technique for making the realistic eyes that I had used in 2014 when making Hook.
I used Premium Linen suiting for the main fabric of the shirt with cotton velveteen for the dark brown yoke under the collar, and dark green sheeting for the shorts. I was aiming for a colour pallette that reminded me of eucalyptus leaves. The pattern of the shirt was based on the shirt and pants pattern that came with the puppet pattern. The biggest headache in constructing the shirt was that the edges of the leaf detail keep fraying. I tried to use iron on interfacing to resolve the issue, but in some places, the interfacing hasn’t bonded with the fabric, and I don’t like how the white interfacing is showing up on the underside of the fabric when the puppet moves. If I could remake the shirt, I would try using visy-fix and glue the same fabric on the underside.
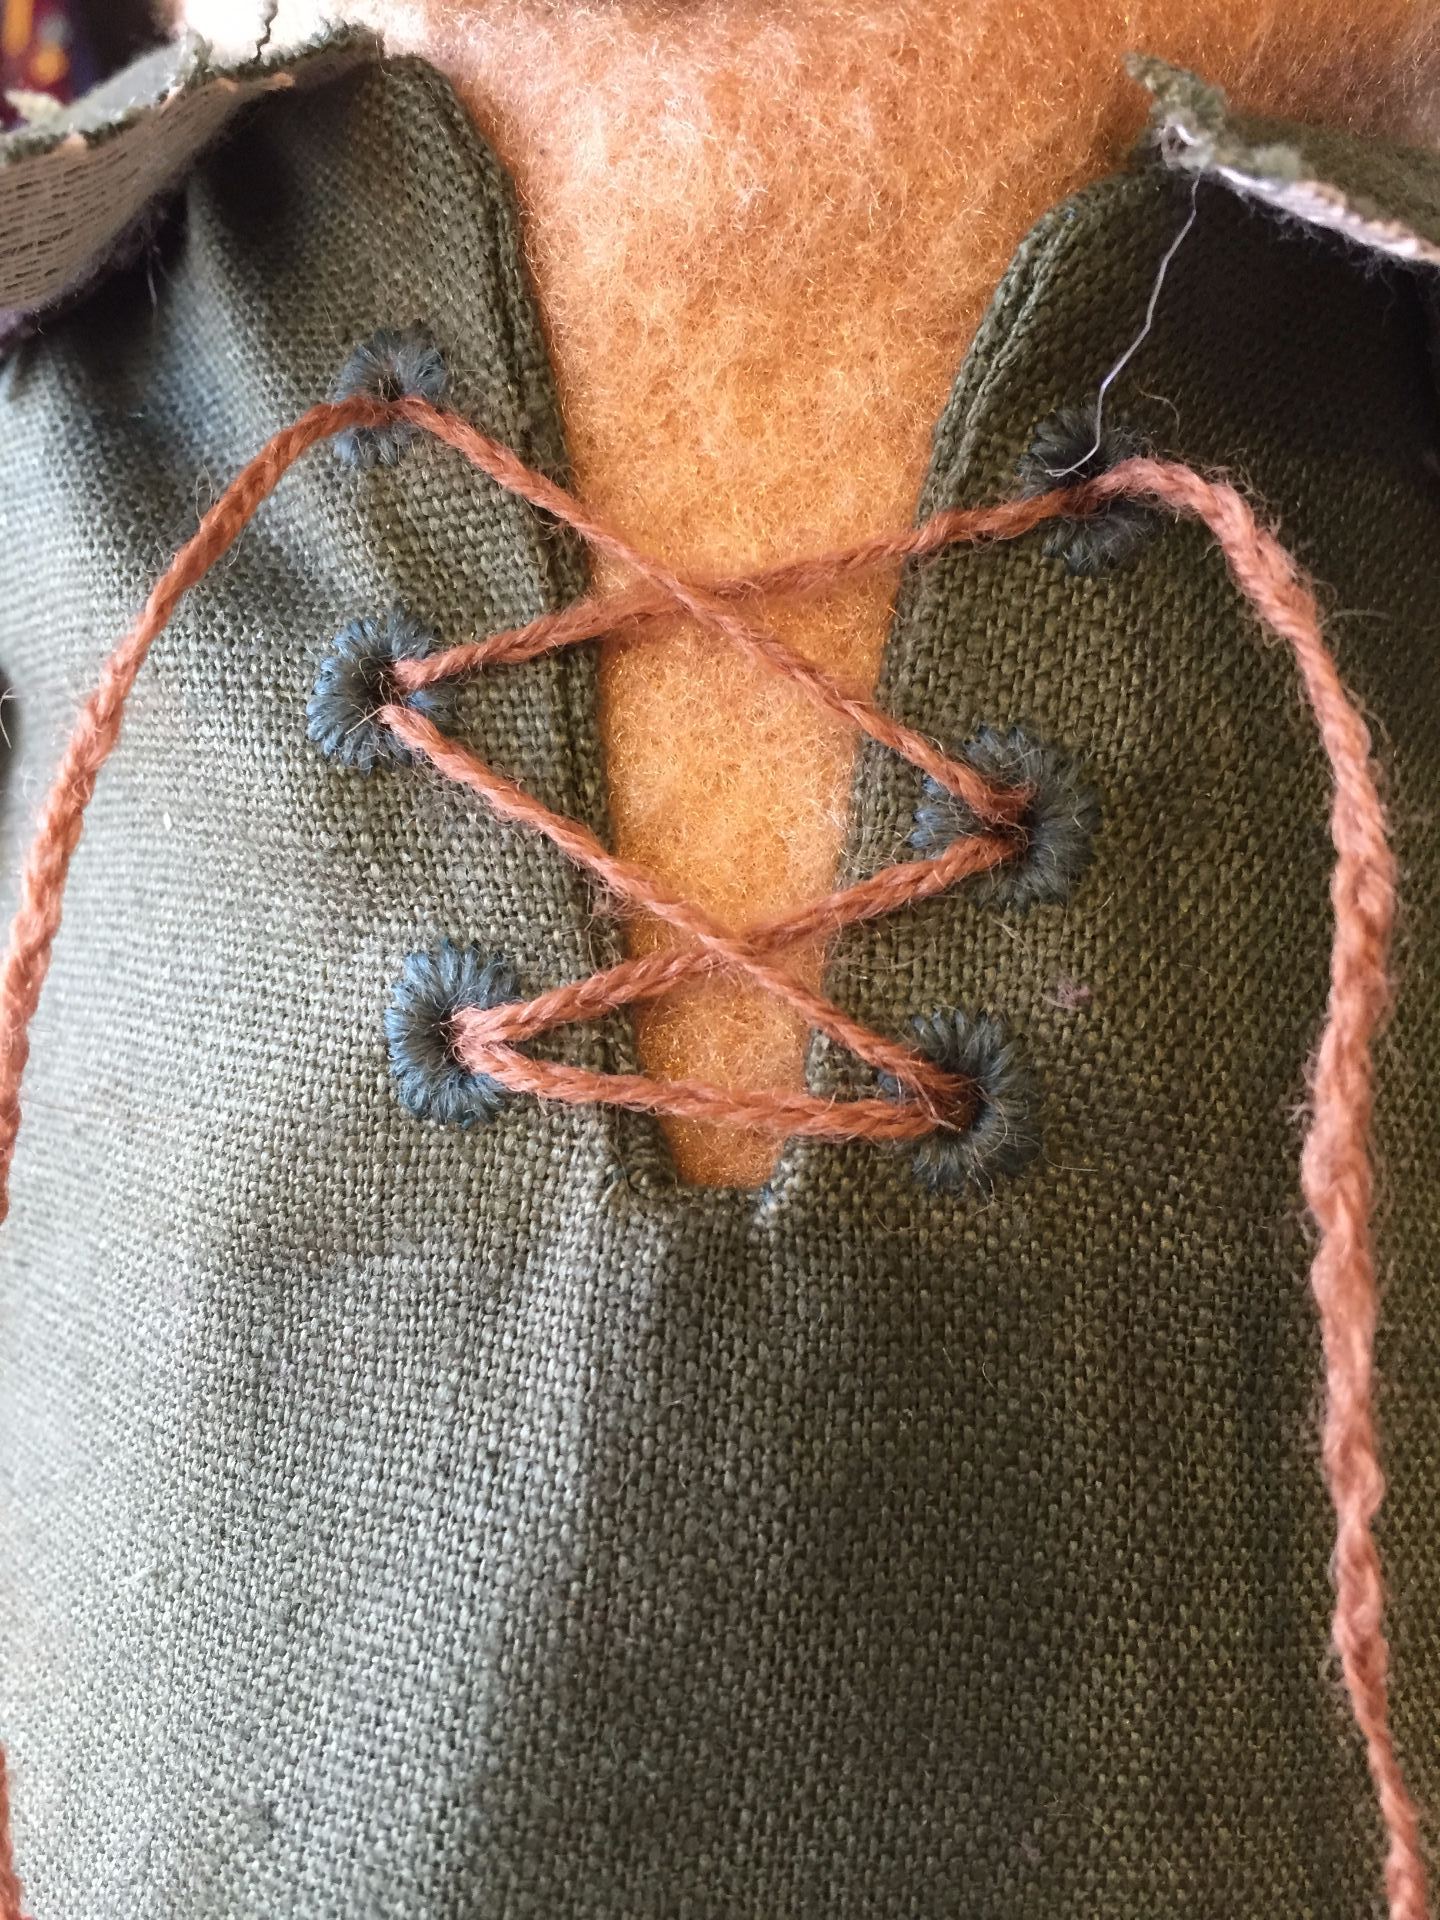
I did learn a new technique while making the shirt. I needed eyelets, but I didn’t want metal. I remembered that in the 16th-17th century, corset eyelets were hand stitched. A little bit of research later, I found that the best approach for puppet scale was to baste the fabric around the inner and outer margins of the eyelet, pierce the shirt with an awl, and use a satin stitch in green embroidery wool.
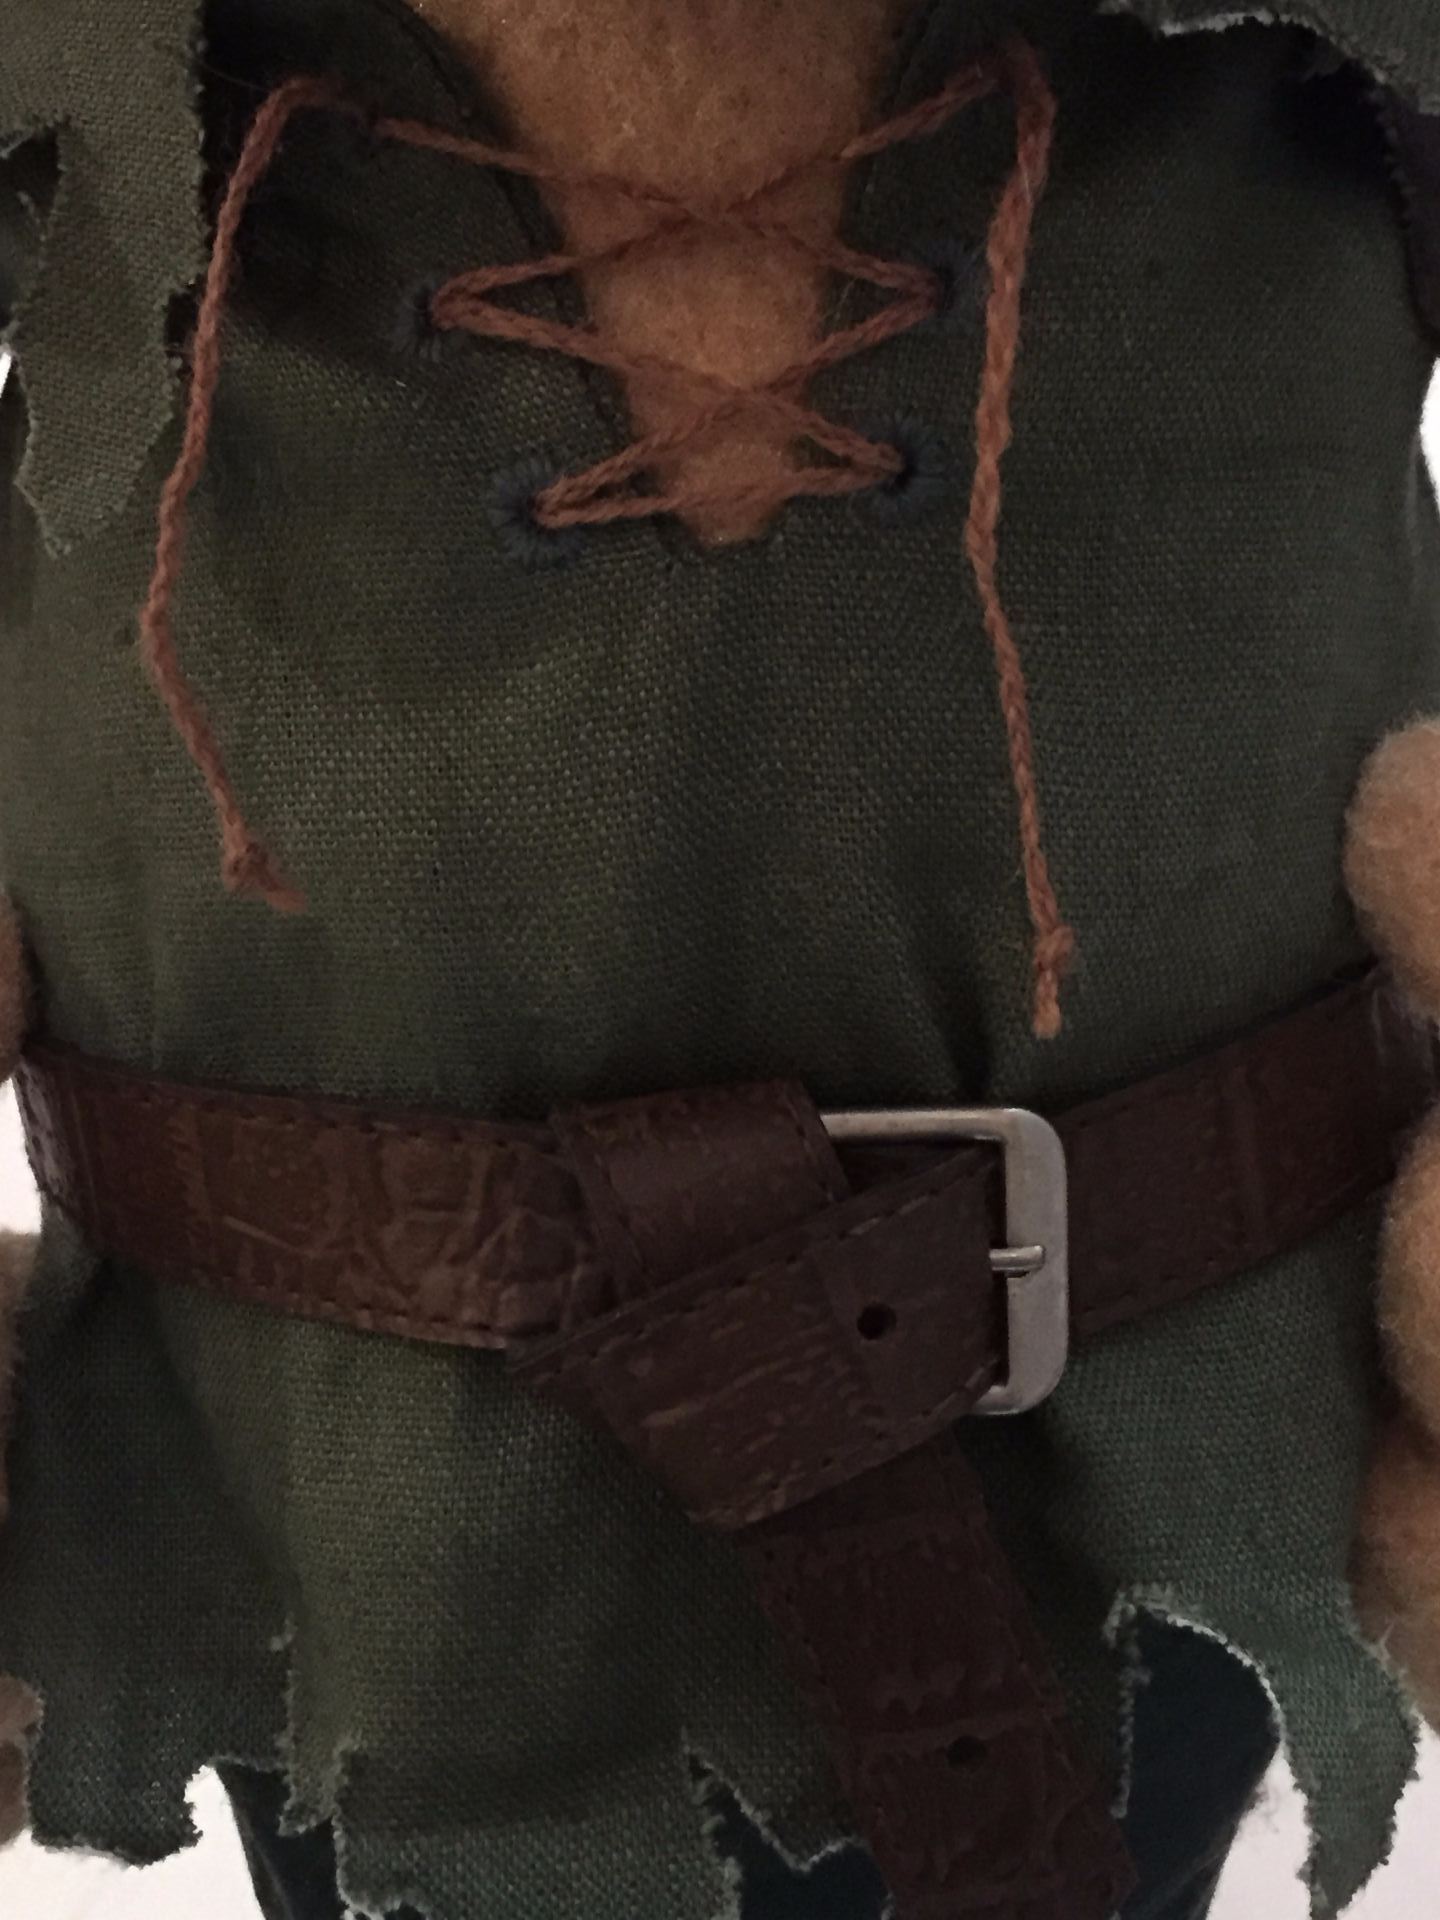
Peter Pan’s belt is made from a old narrow belt I found at a charity shop. I changed the buckle from gold plated to an old galvanised buckle, shortened the length to fit the puppet, punched new holes and wrapped it at the front so that it looked like the screen shots I had collected of the original costume.
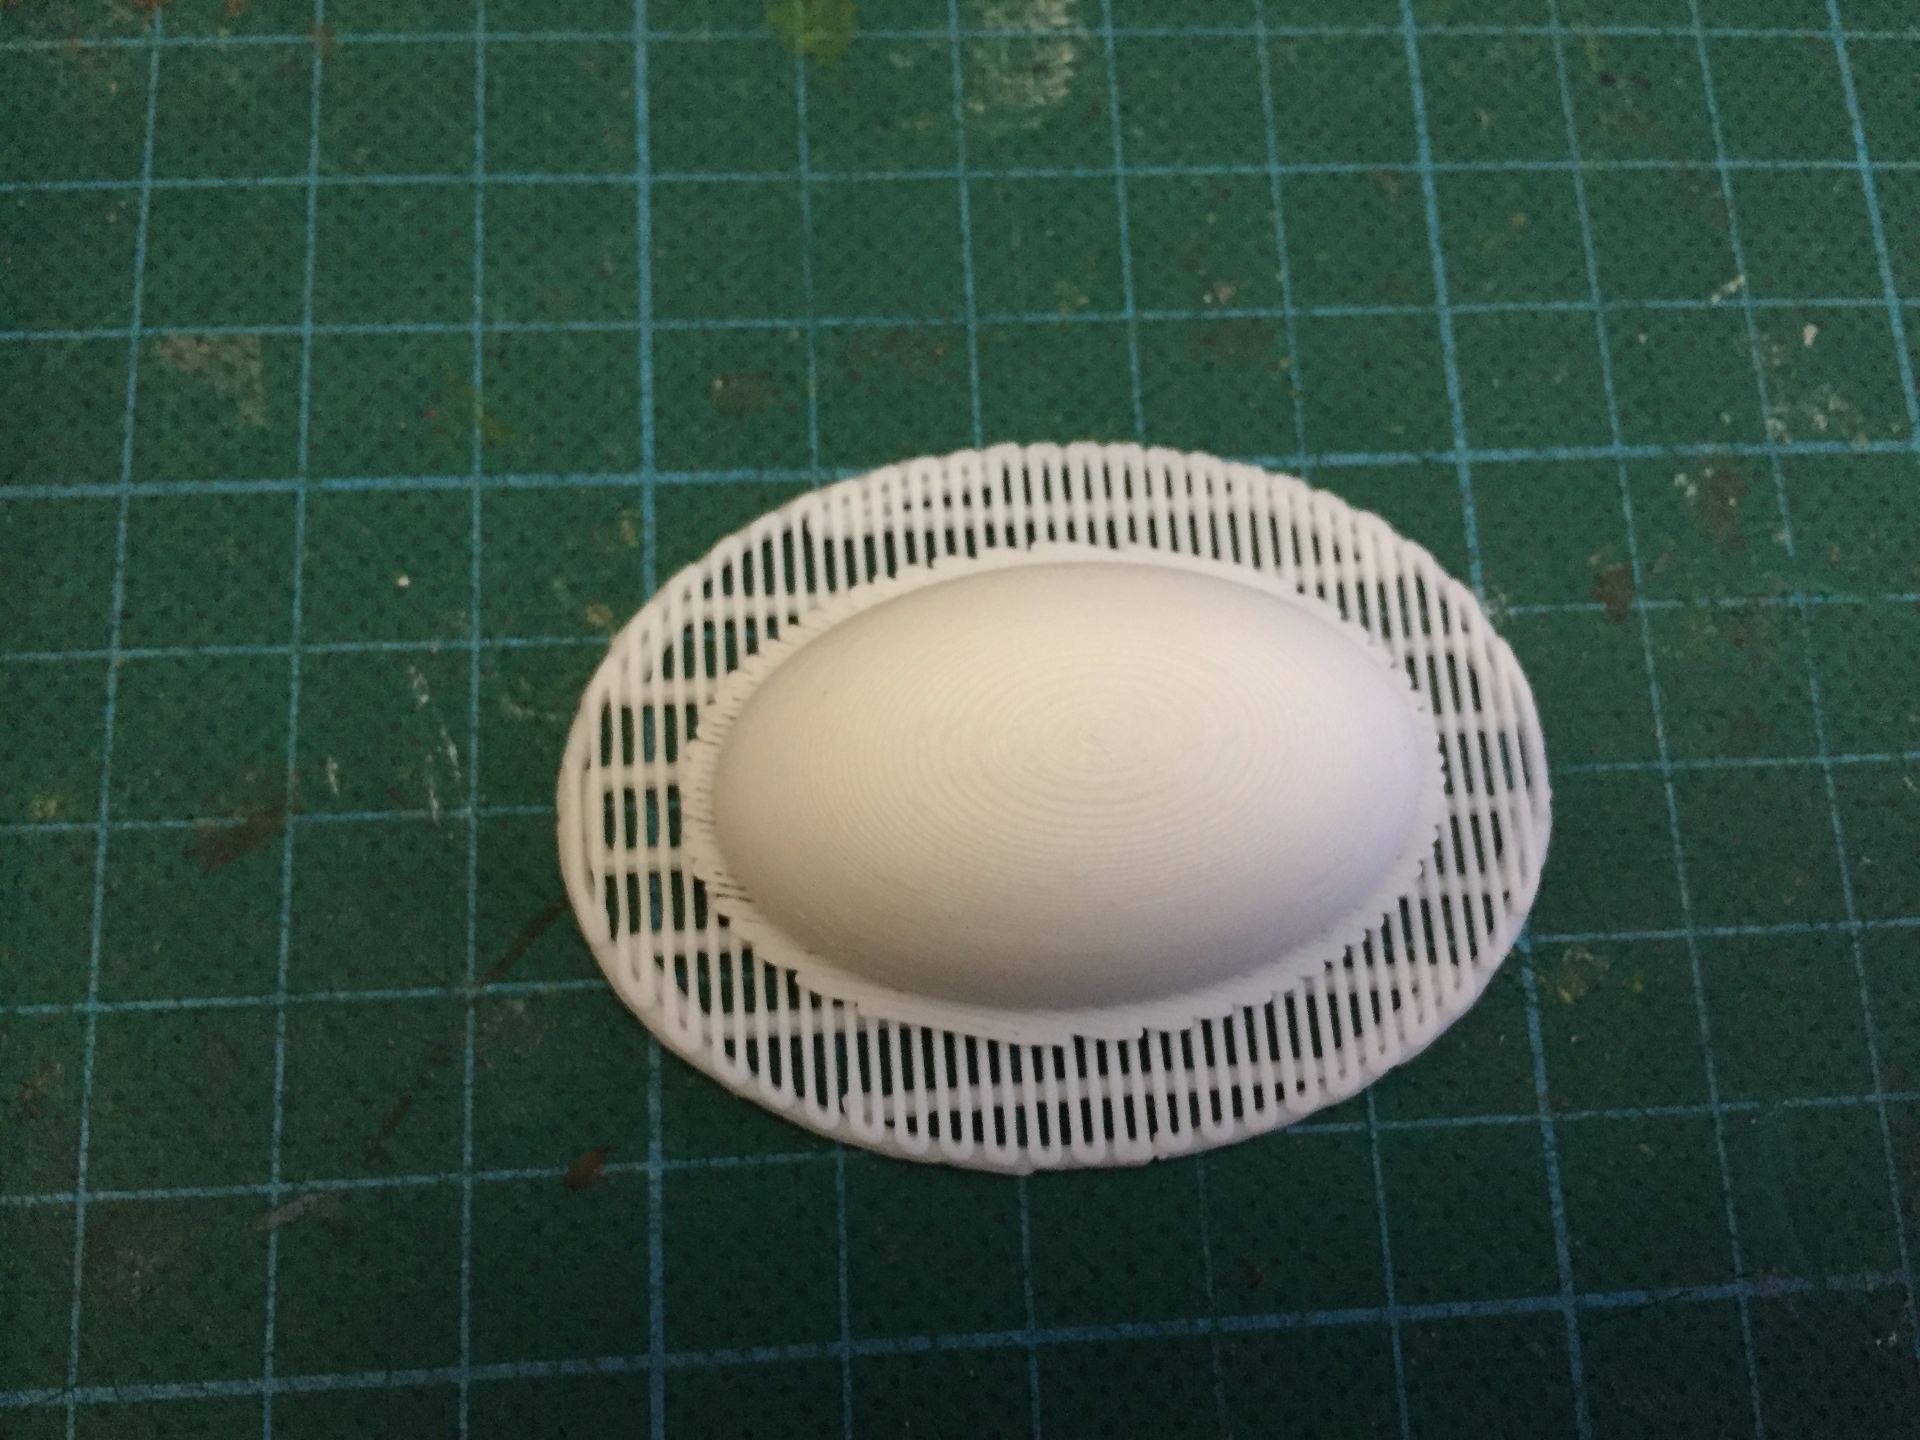
I have recently been experimenting with 3D printed puppet parts as an alternative to carved and polystyrene foam understructures. I used ABS plastic to 3D print an oval nose form and covered it in the same Antron fabric as the rest of the puppet using hot glue. The form was then stitched to the face of the puppet.
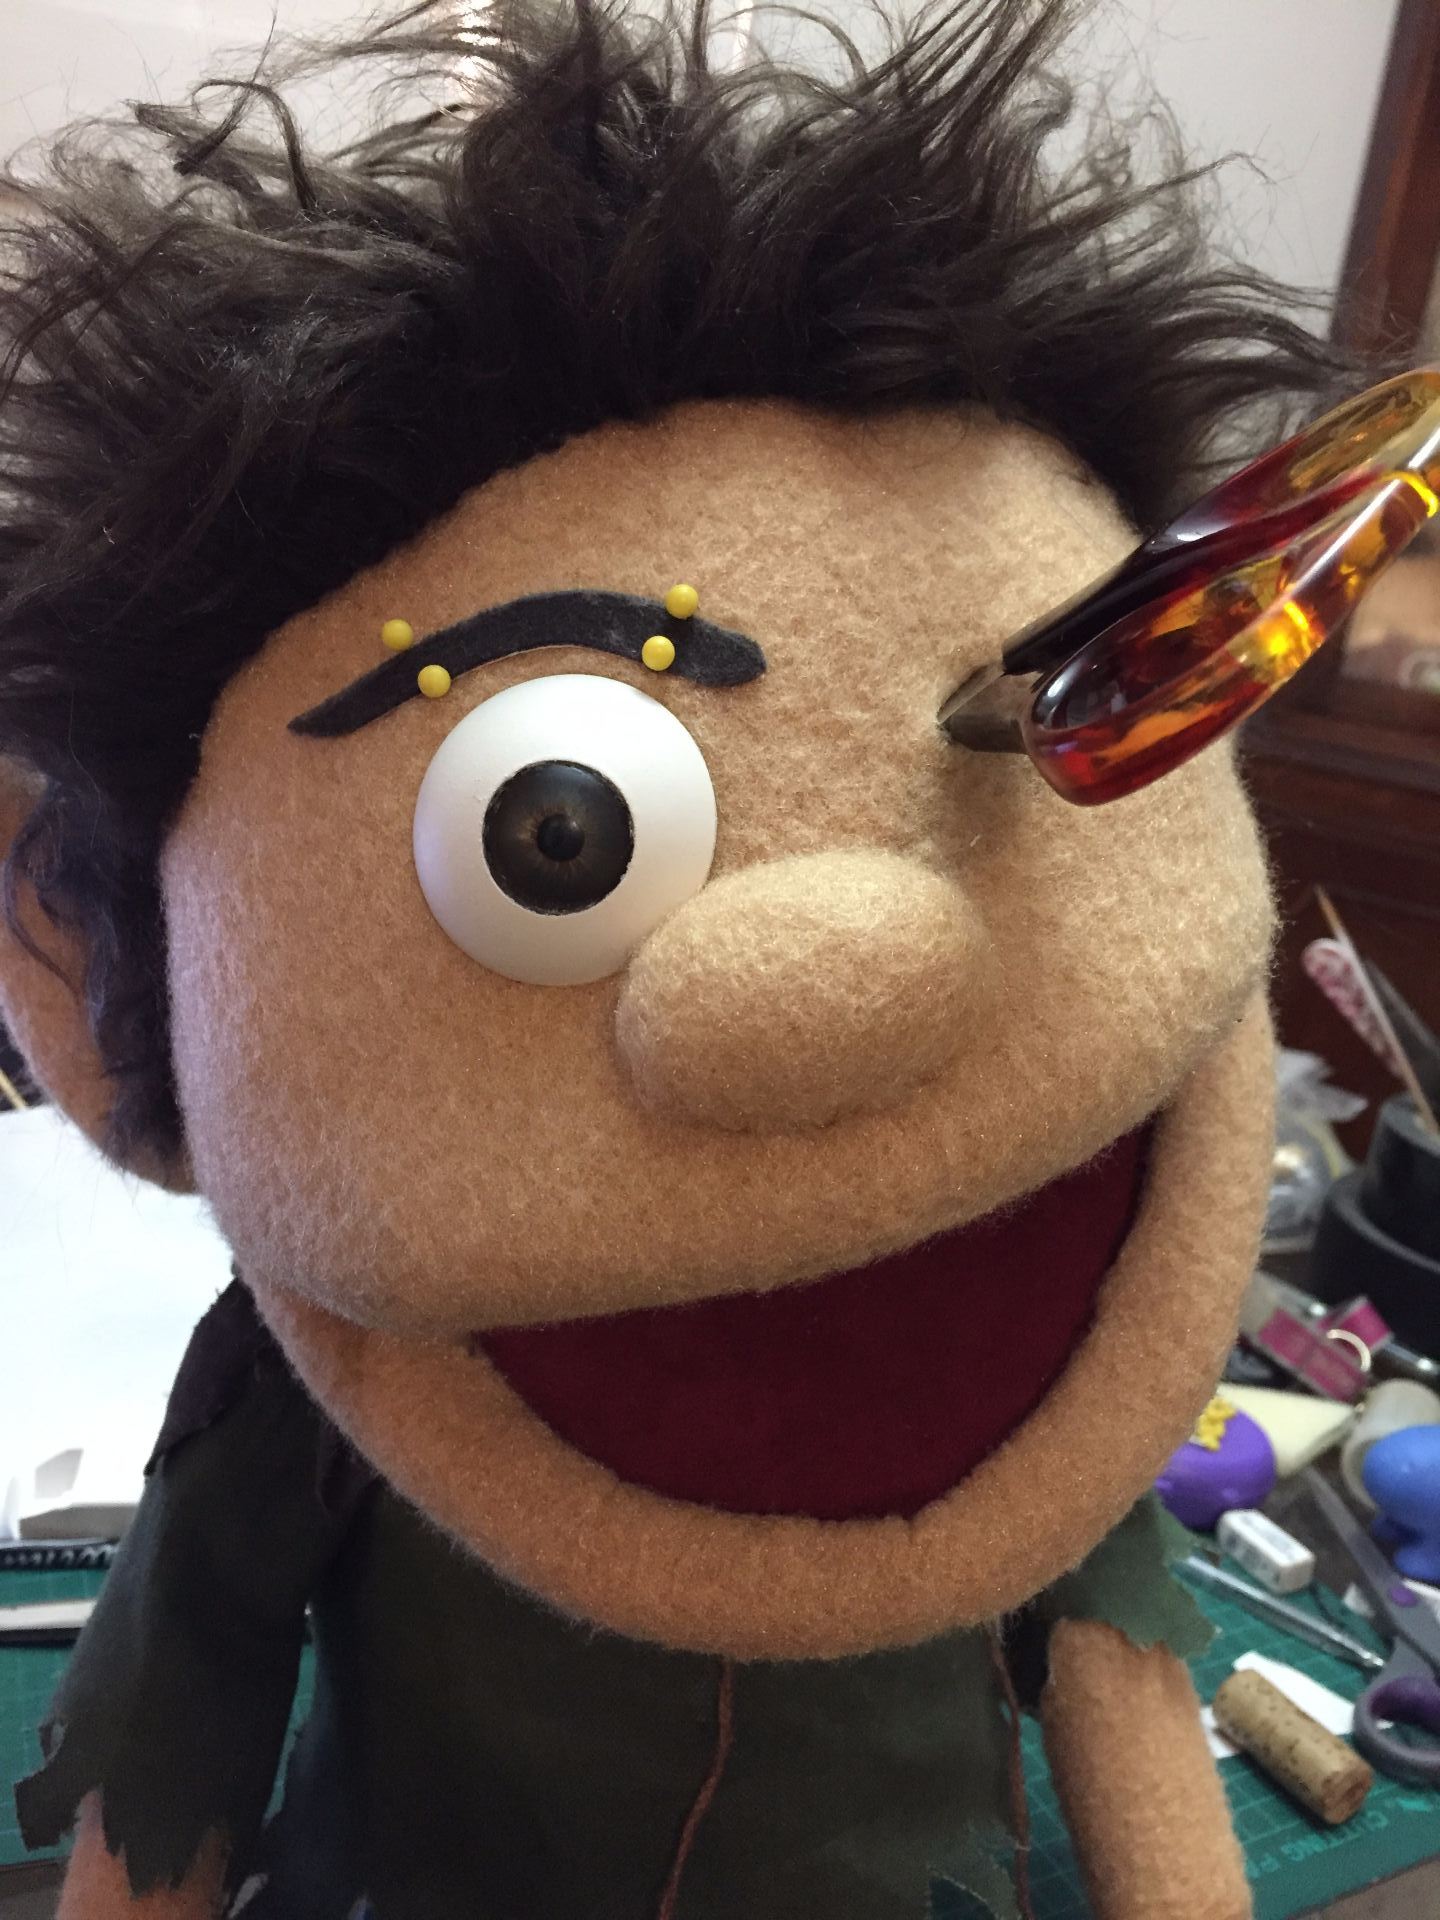
The eyes were a big challenge. I used realistic taxidermy eyes from Van Dykes Taxidermy in the USA. I inserted them into ping pong balls from behind, but the challenge is that there is very little surface area to glue the eye to the ball because of the difference in curved profiles. It is also a big challenge to not have any glue get onto the iris of the eye! The eyebrows were made from the same Mocha cotton Velveteen as I used on the yoke of the shirt. The hair is shaggy brown fur that I laid down in particular directions to get the fur to stand up.
I am very happy with how Peter Pan has turned out. I think is a great and worthy pair/ opponent to my Hook.
Check out the build progress photos in the gallery below!
Watching Hook while preparing pattern A
Designing the shirt pattern. So many leaf shapes!
Front of Pan's Shirt
Back of Pan's shirt
Hand embroidered eyelets on Pan's Shirt
3D printed nose form for Pan.
Taxidermy eyes being inserted into eye forms
Don't run with scissors!- Attaching the eyes to the head.
It’s the last day!!! Nooooooooo! So much has to happen today! First, in the puppetry class, Miss Hannaford had to learn her part of the group song- a karaoke version of the Travelling Wilbury’s End of the Line. Here is the normal version!
https://youtu.be/cwqhdRs4jyA
During the performance, each line has to be performed by a different student with their puppet! Next, we watched the playback of the who are you improv game we played yesterday, along with being given critique from our teachers on how we could improve our puppetry technique.
Something special happened for Miss Hannaford during the morning puppetry lesson. Miss Hannaford’s teacher, Peter, asked her to modify the puppet he was going to use during the show that night so that the puppet had 2 arm rods. It made her feel valued and respected as a puppet builder to be trusted with something like modifying another puppeteer’s personal puppet.
In the afternoon, Miss Hannaford had the final building lesson to finish her puppet. During the lesson, Miss Hannaford had to add the eyes, the beard and moustache, finish sewing the hands closed, attaching the arms to the body and dressing the puppet!
Among all those jobs was making the teeth of the puppet. Miss Hannaford needed teeth, but it was really important that the teeth did not prevent the puppet’s mouth from closing properly. The solution was to use makeup sponges that were cut, then carved with a Dremel rotary tool to make the curved surface. Makeup sponges are flexible enough to bend when the puppet’s mouth is closed but spring back into place when the puppet opens it’s mouth.
At 4:45pm there was the first and pretty much only combined group rehearsal of the finale of tonight’s show! Then it was a nice quiet dinner break for Miss Hannaford because for the first time at Beyond the Sock, Miss Hannaford’s puppet was finished before the deadline!!!!
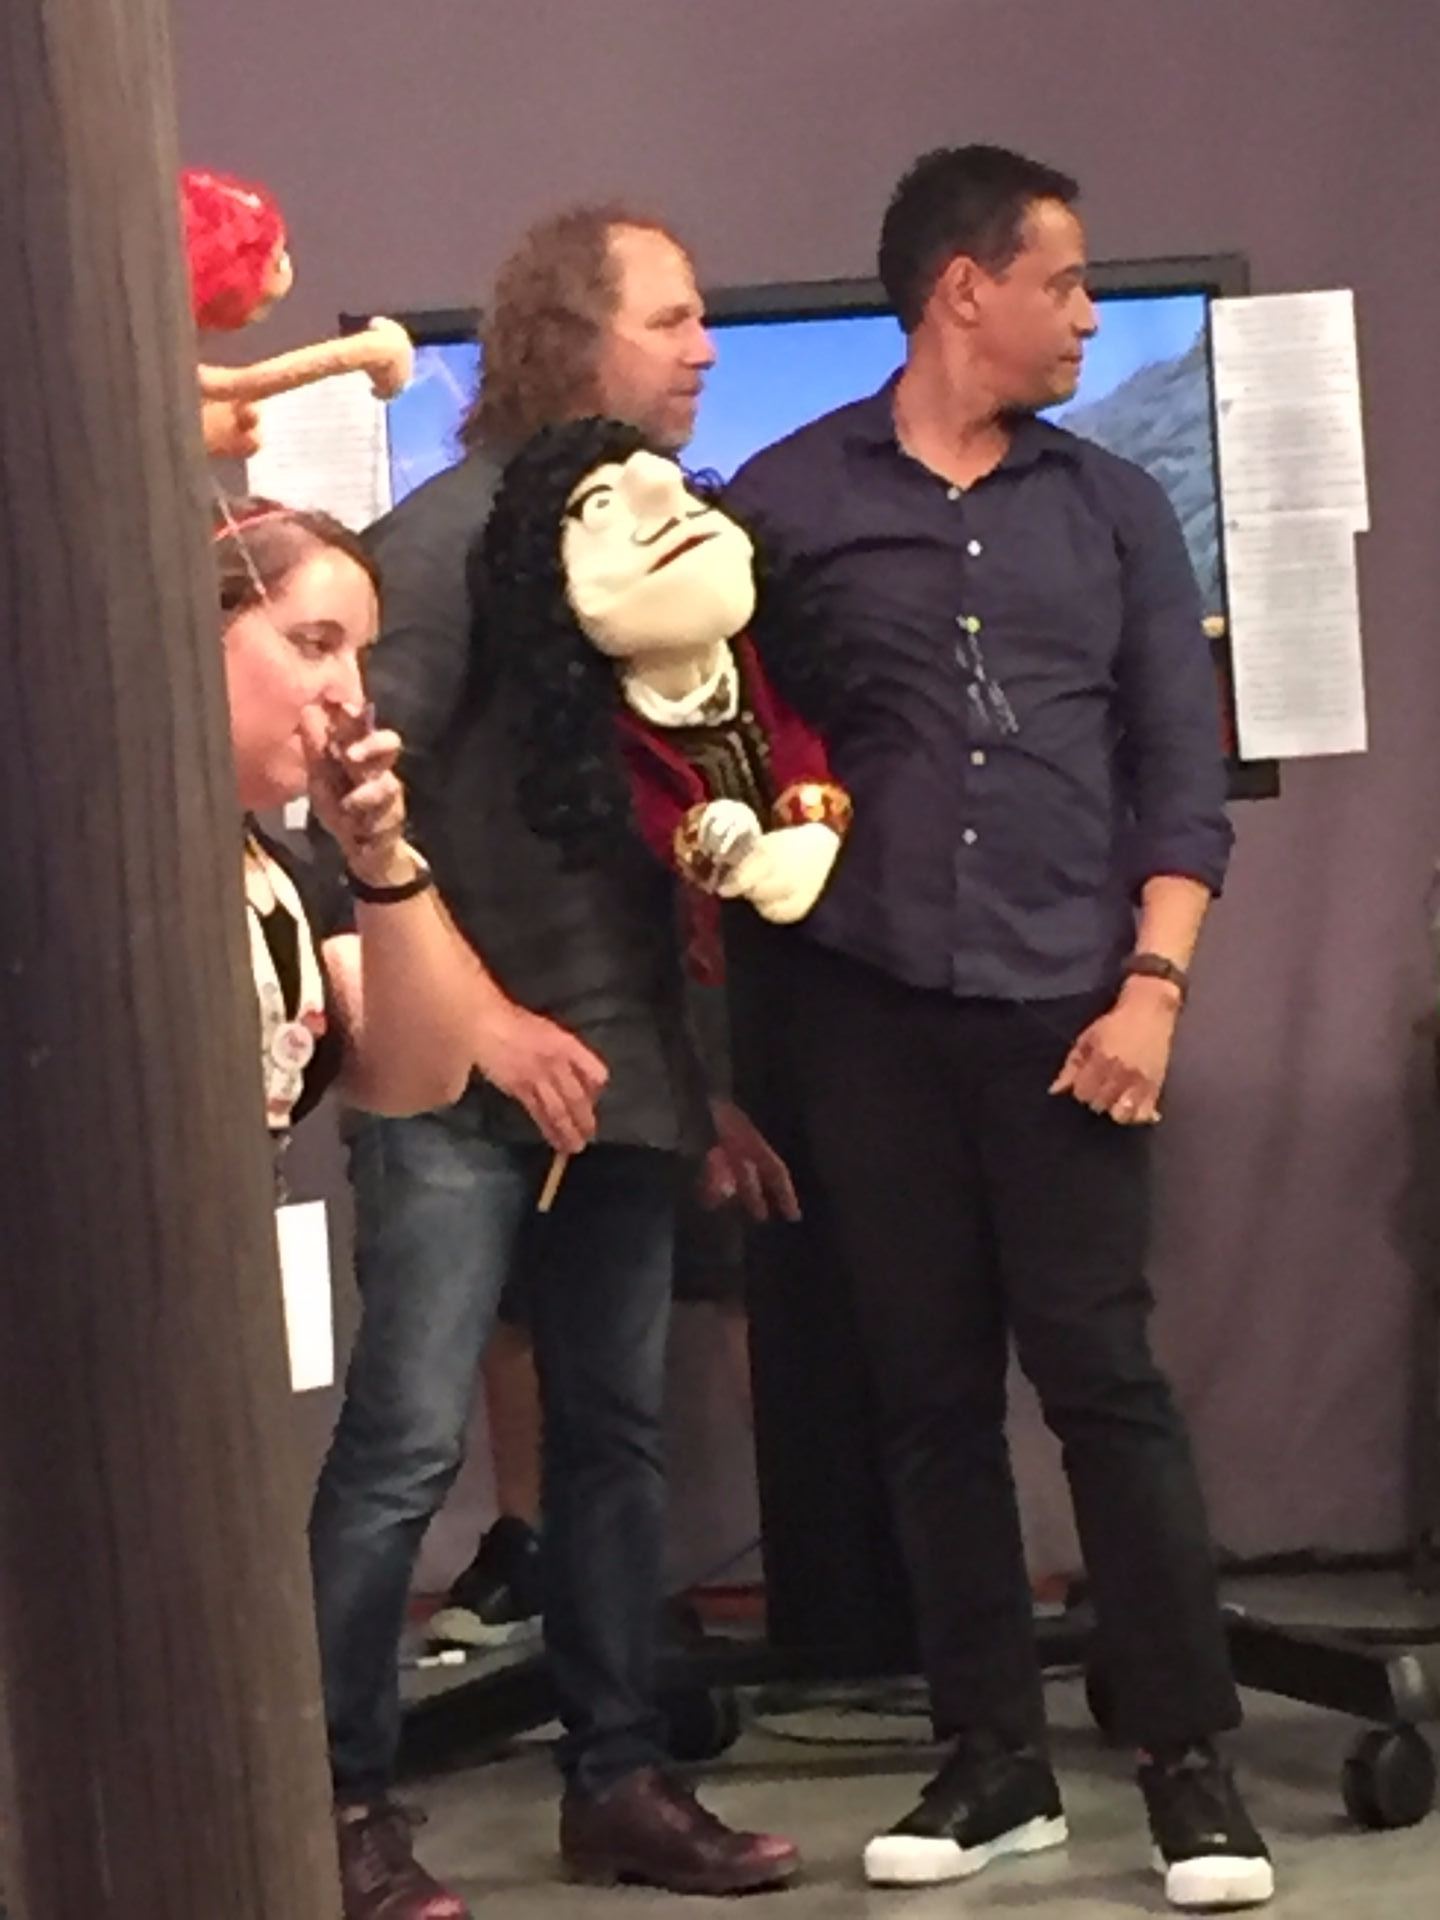
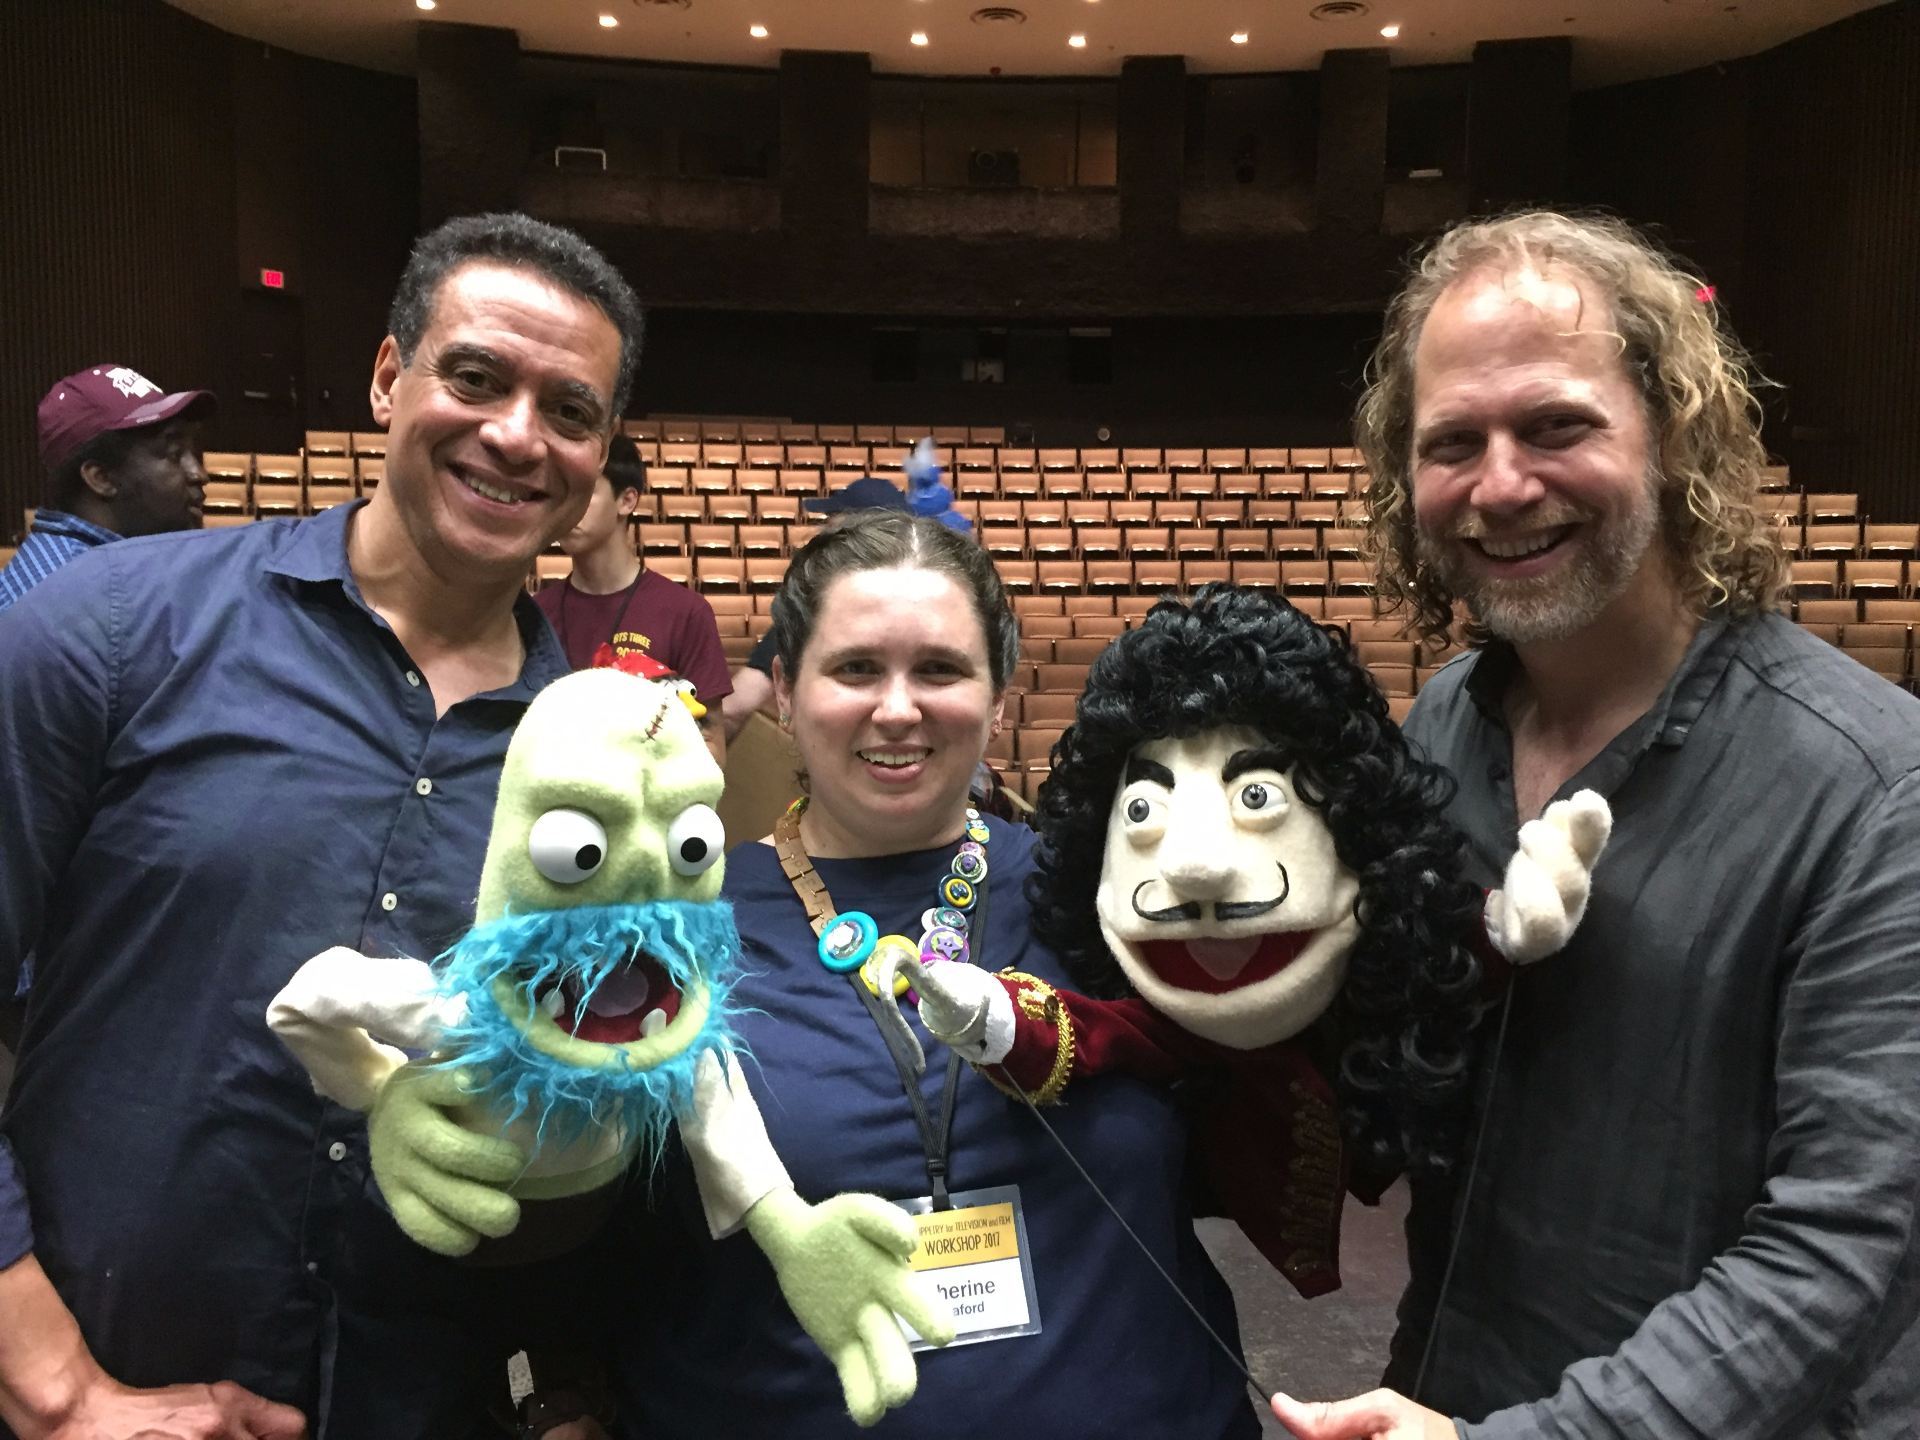
At 8pm, it was showtime back in the main studio, but just before showtime, Miss Hannaford got these great photos with puppet building teacher Pasha and her puppet “He’s Dead Jim”.
Here are photos of the final performance!
Miss Hannaford’s proudest moment was to see her Captain Hook puppet brought to life during the final show by her teachers. The Captain Hook puppet is Miss Hannaford’s best ever puppet. She made every single part of the puppet including the costume! The only thing she did not make was the wig.
This is Captain Hook in all his glory!
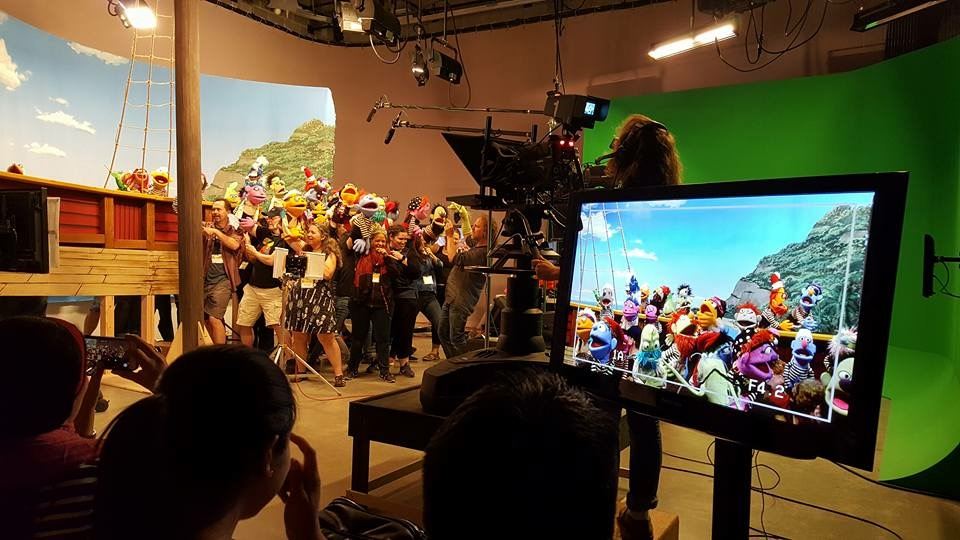
The group finale performance meant that there were 23 puppeteers and 2 teachers in a very small area!
After the show, Miss Hannaford, He’s Dead Jim, and Captain Hook had pictures taken with her teachers Noel and Peter.
It has been a wonderful week full of laughter, games and lots of puppets! Tomorrow, Miss Hannaford, the puppets and I are flying directly home. Miss Hannaford is very tired so she will sleep most of the way home.
Today Miss Hannaford continued to work on her puppetry in the TV studio. The first activity of the day was one of Miss Hannaford’s favourite activities from Beyond the Sock 2015- Word Pairs Mahna Mahna. All the students had to take turns in front of the camera to say a word right after the person before them, but the tricky part was to keep the rhythm so as to not break the chain. Some of the word pairs were very funny!
The next activity was an game where 4 puppeteers had to construct a story one word at a time! The funniest story was about a Purple dinosaur Jedi Baby! Followed by a game where the groups of 4 puppeteers had to construct a different story one sentence at a time! There was a great deal of silliness which made the lesson so much fun!
Miss Hannaford was really excited during the class because her teachers Noel and Peter gave her a quick lesson on using a live hand puppet. One of our puppet travelling companions is No Name, the purple live hand monster that Miss Hannaford made in 2011.
Having No Name in the studio with us, gave other students the opportunity to learn how to perform other kinds of foam puppets . Miss Hannaford also learnt a valuable lesson in why foam puppets like the Muppets, don’t have flat eyes. When the puppet turns sideways to the camera, the audience can’t see both eyes!
https://youtu.be/jZUMw0nrq24
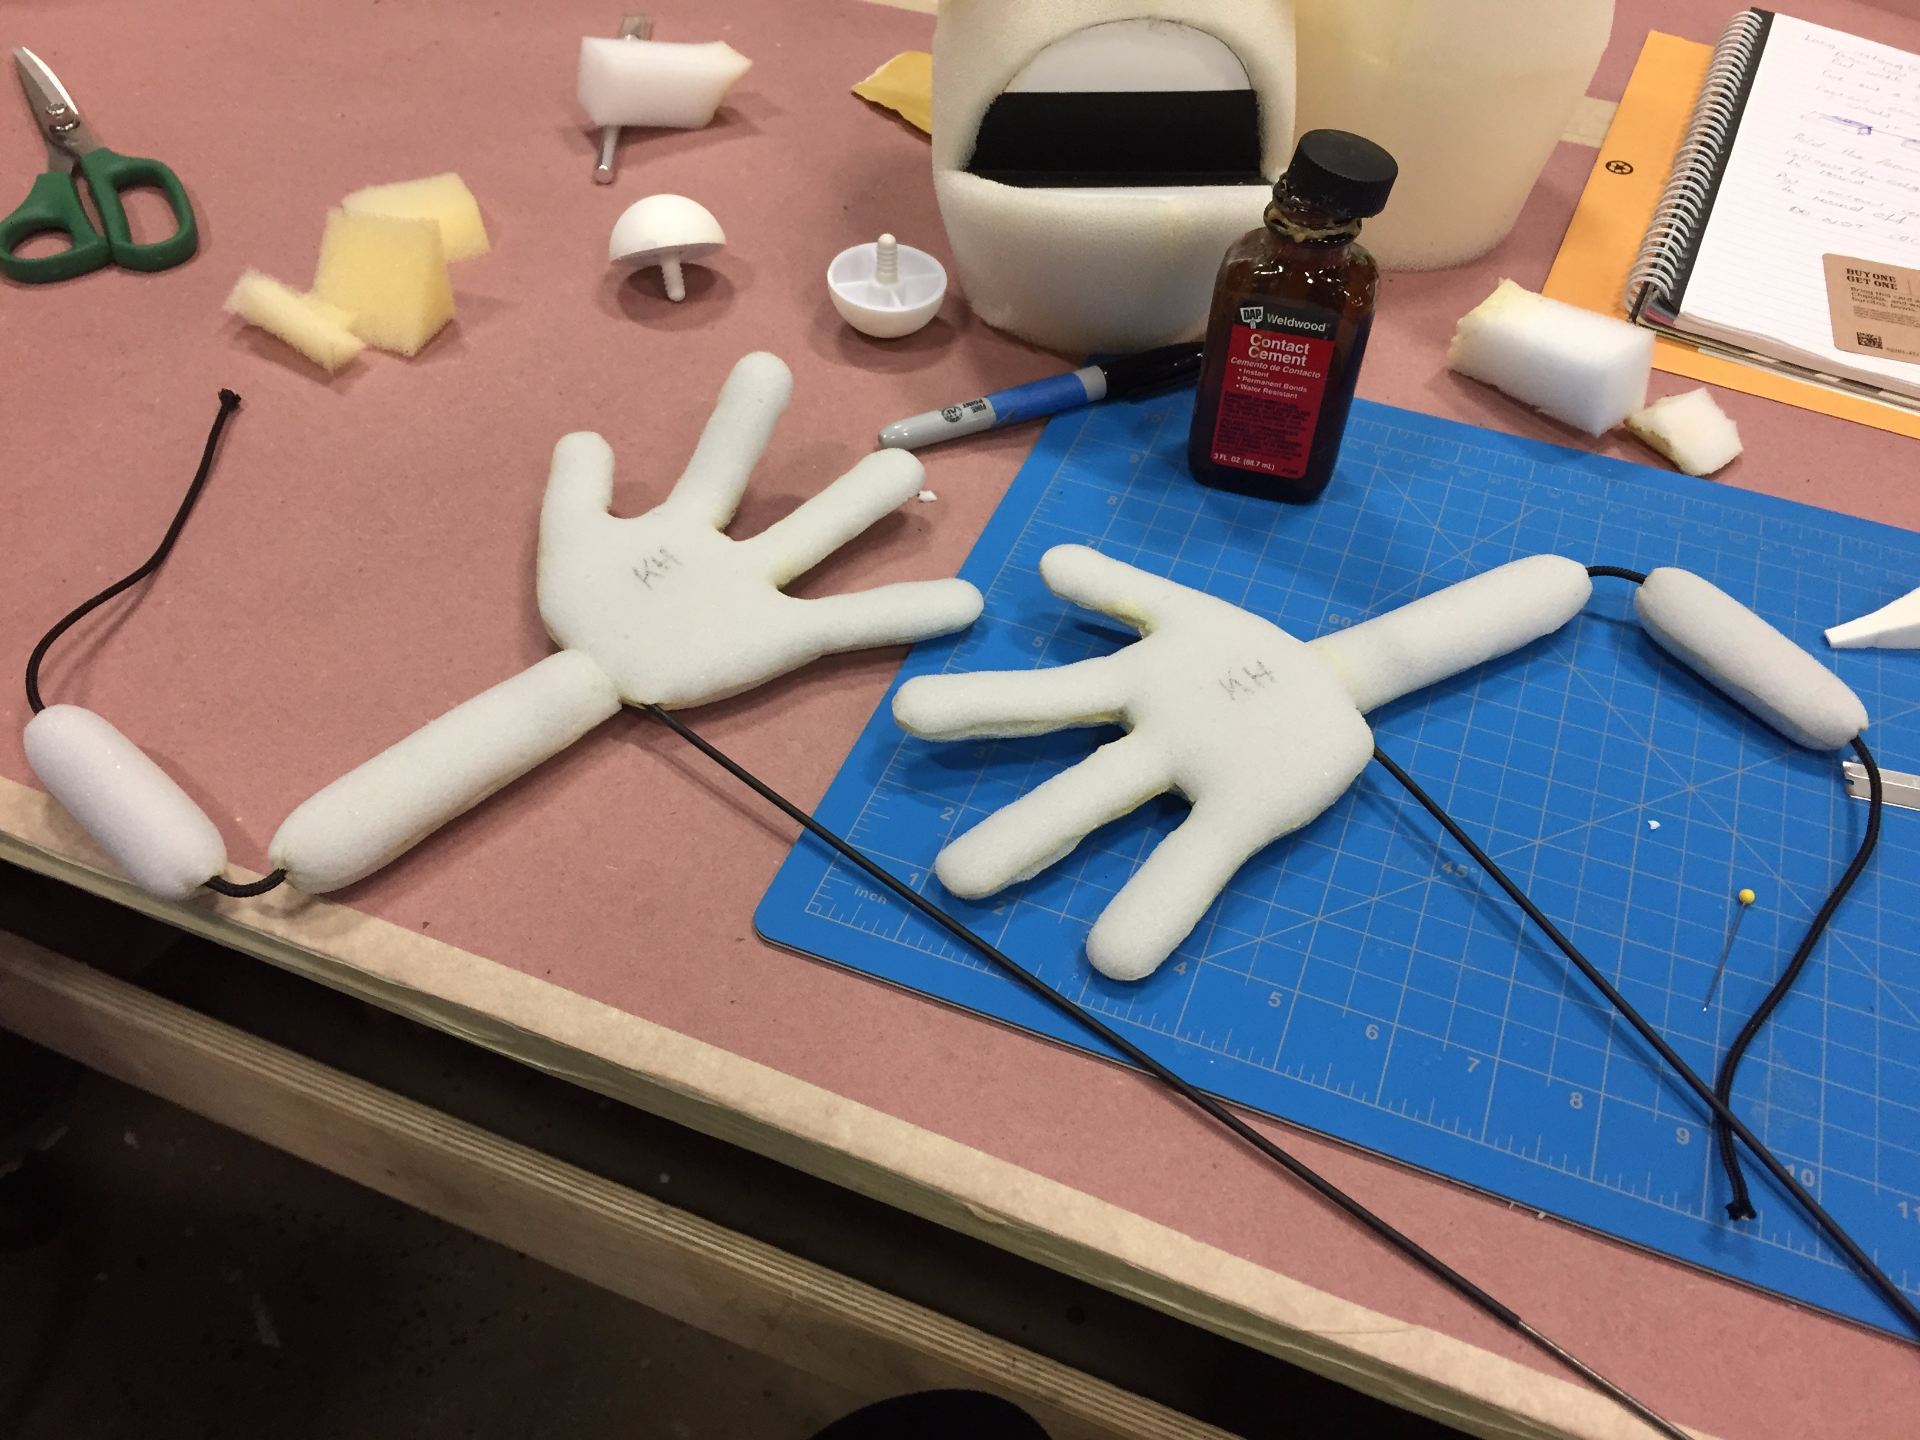
After lunch, was the next puppet building class. In this class, Miss Hannaford learnt a new way to make puppet arms. She has never made arms with foam muscles around string before!
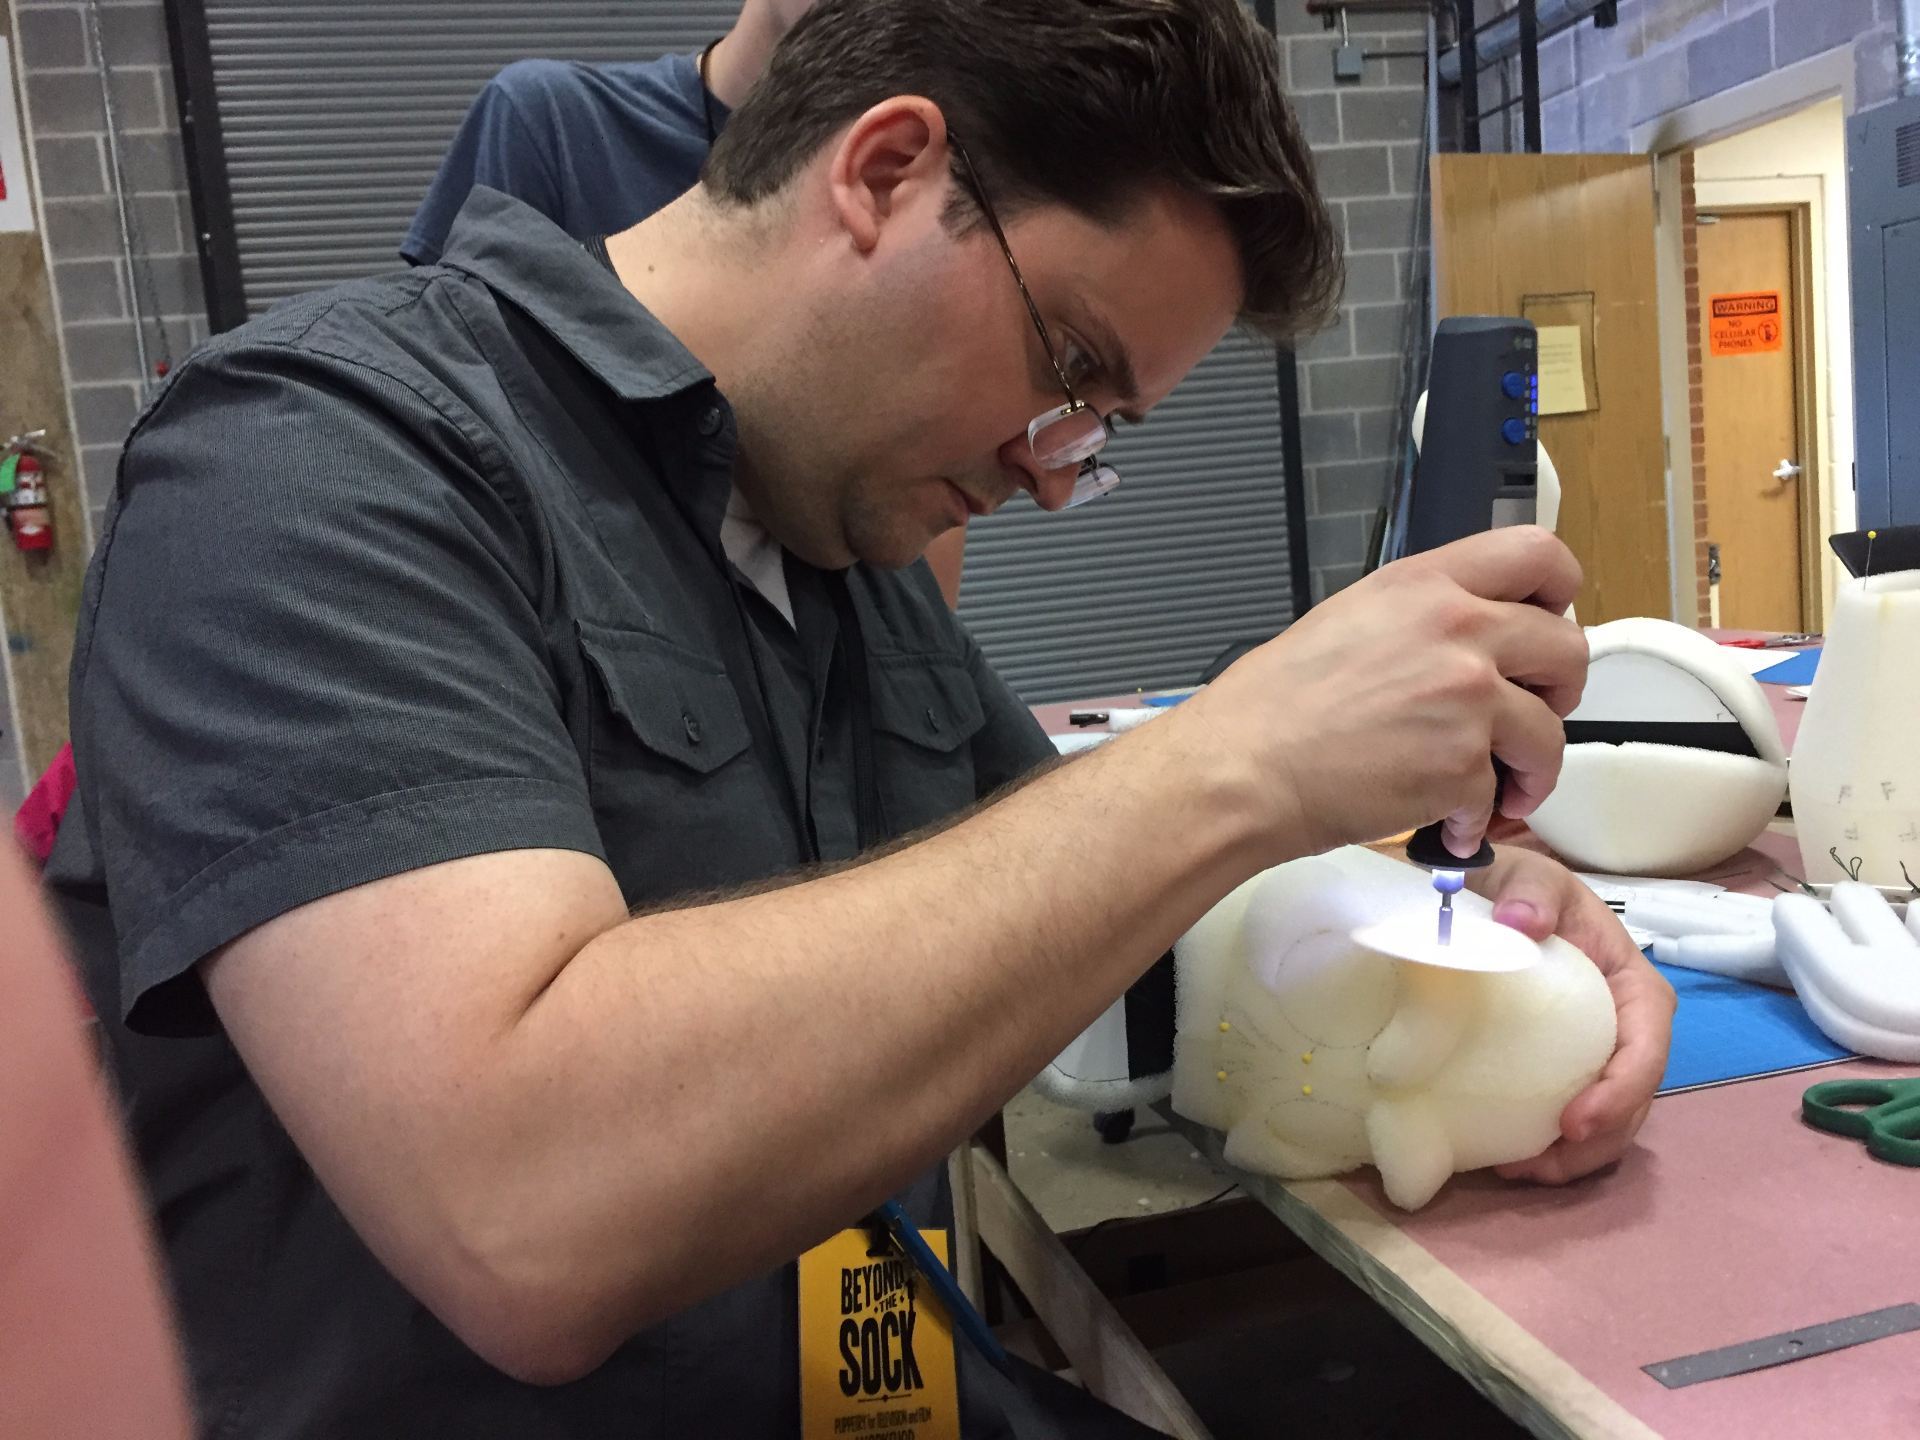
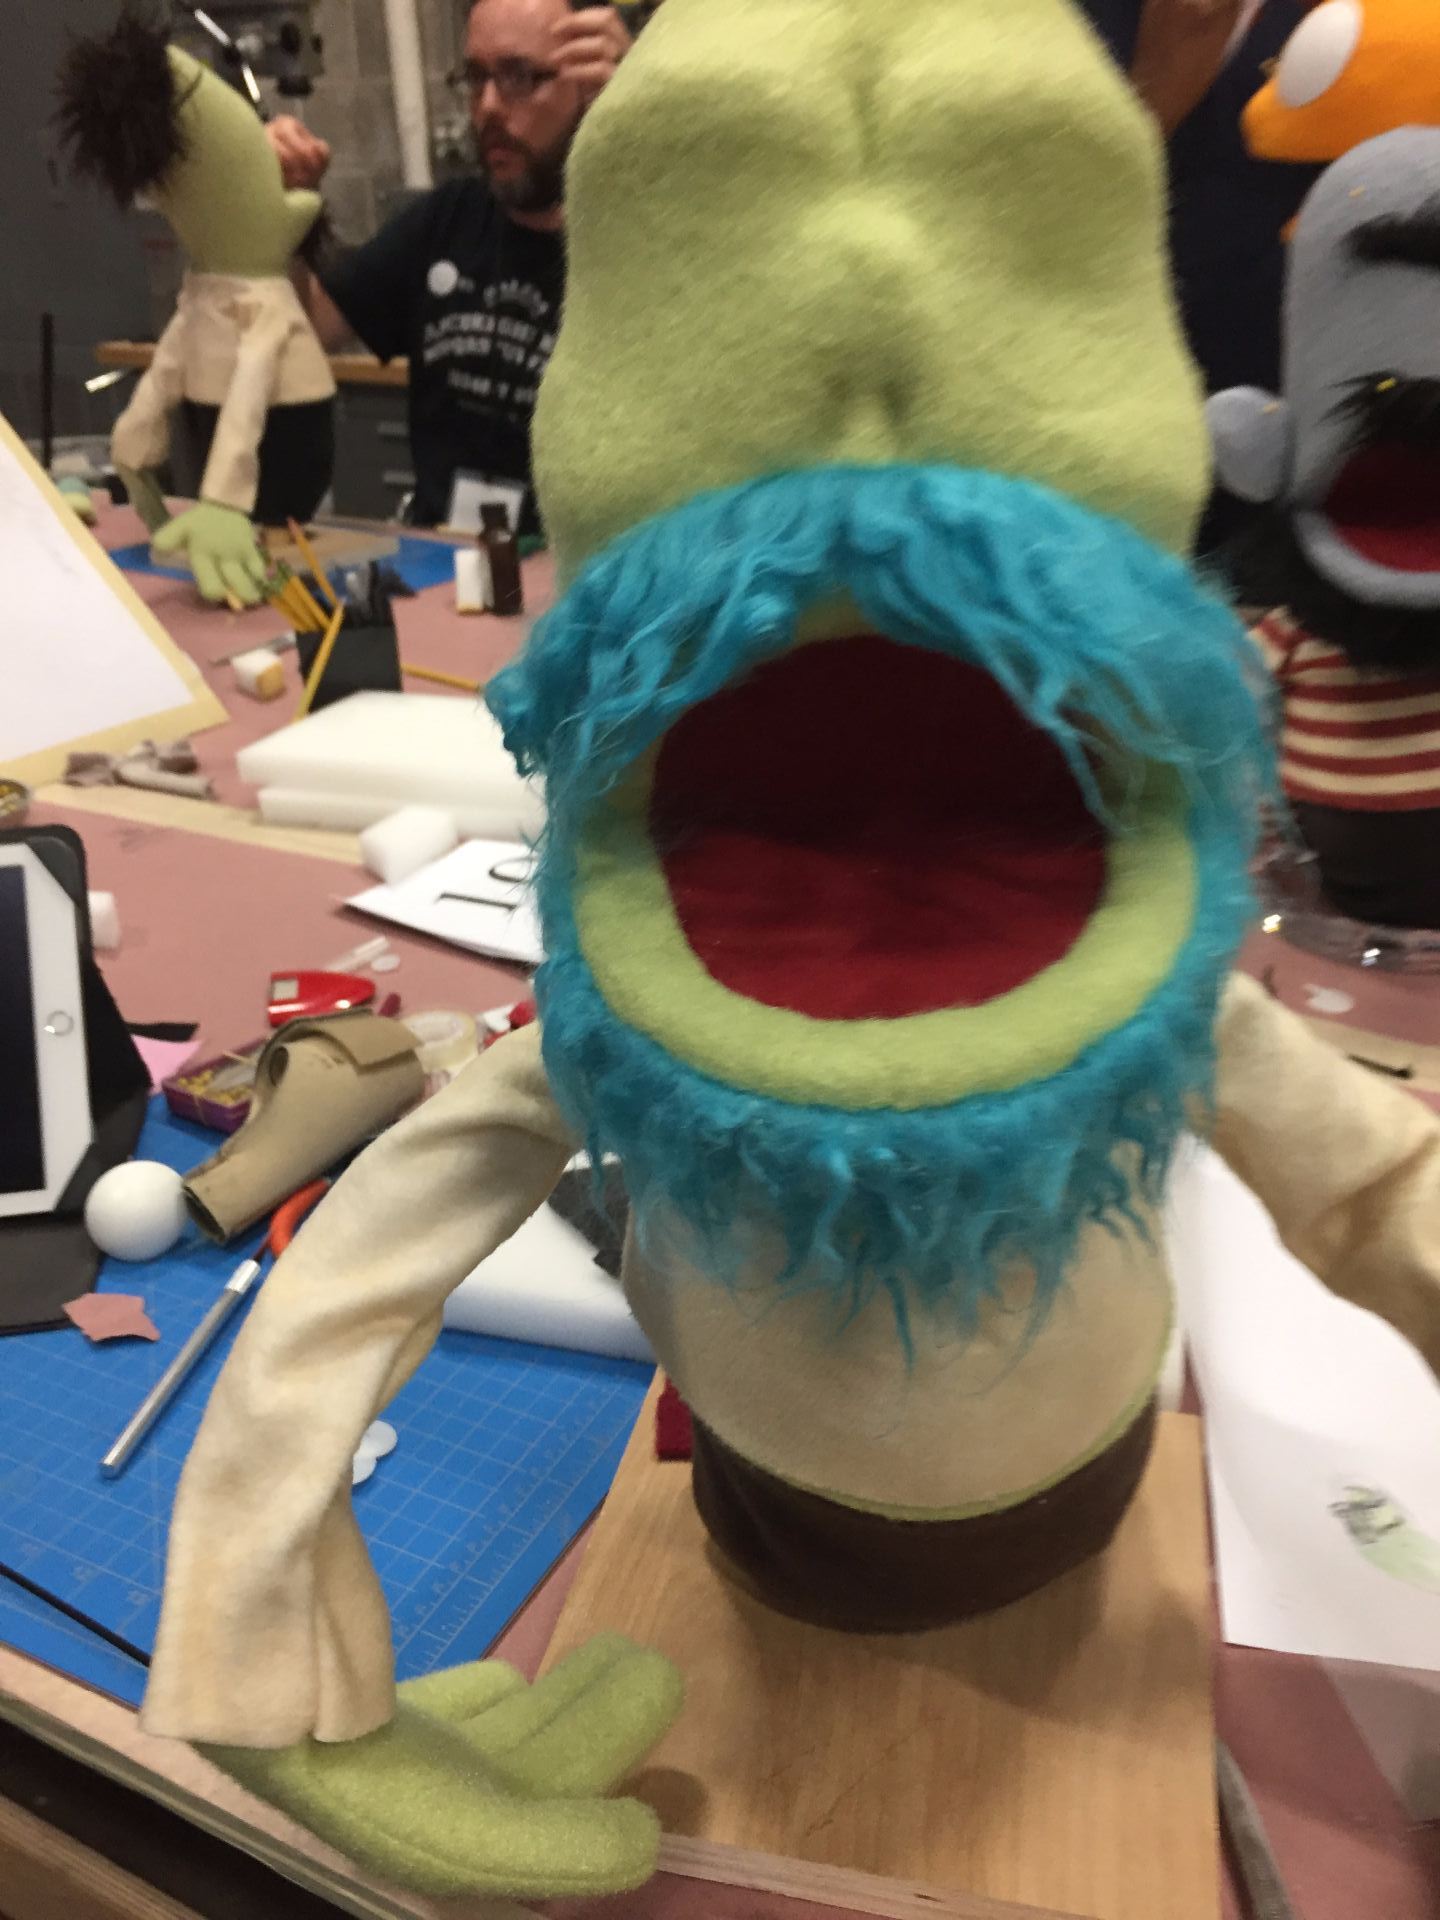
During the lesson, the puppet building teacher Pasha, came around to show Miss Hannaford how to carve down the brow bone and cheek bones on her ghost pirate so that they looked more natural. The first step was to glue the bone pieces onto the skull, including doubling the thickness of the brow bone, then my teacher, Pasha used a blade to carve the bones into smoother shapes. The last step was to use a Dremel tool to smooth out the bone pieces.
The next step was to start covering the face with the fleece. To make the fleece take the form of the bones, it was important to use small dabs of hot glue inside the nose, under the cheek bones, between the eyebrows and above the eyebrows. The back of the head was then sewn closed using the ladder stitch.
Tomorrow, everything has to be finished including learning the lines of the group song!
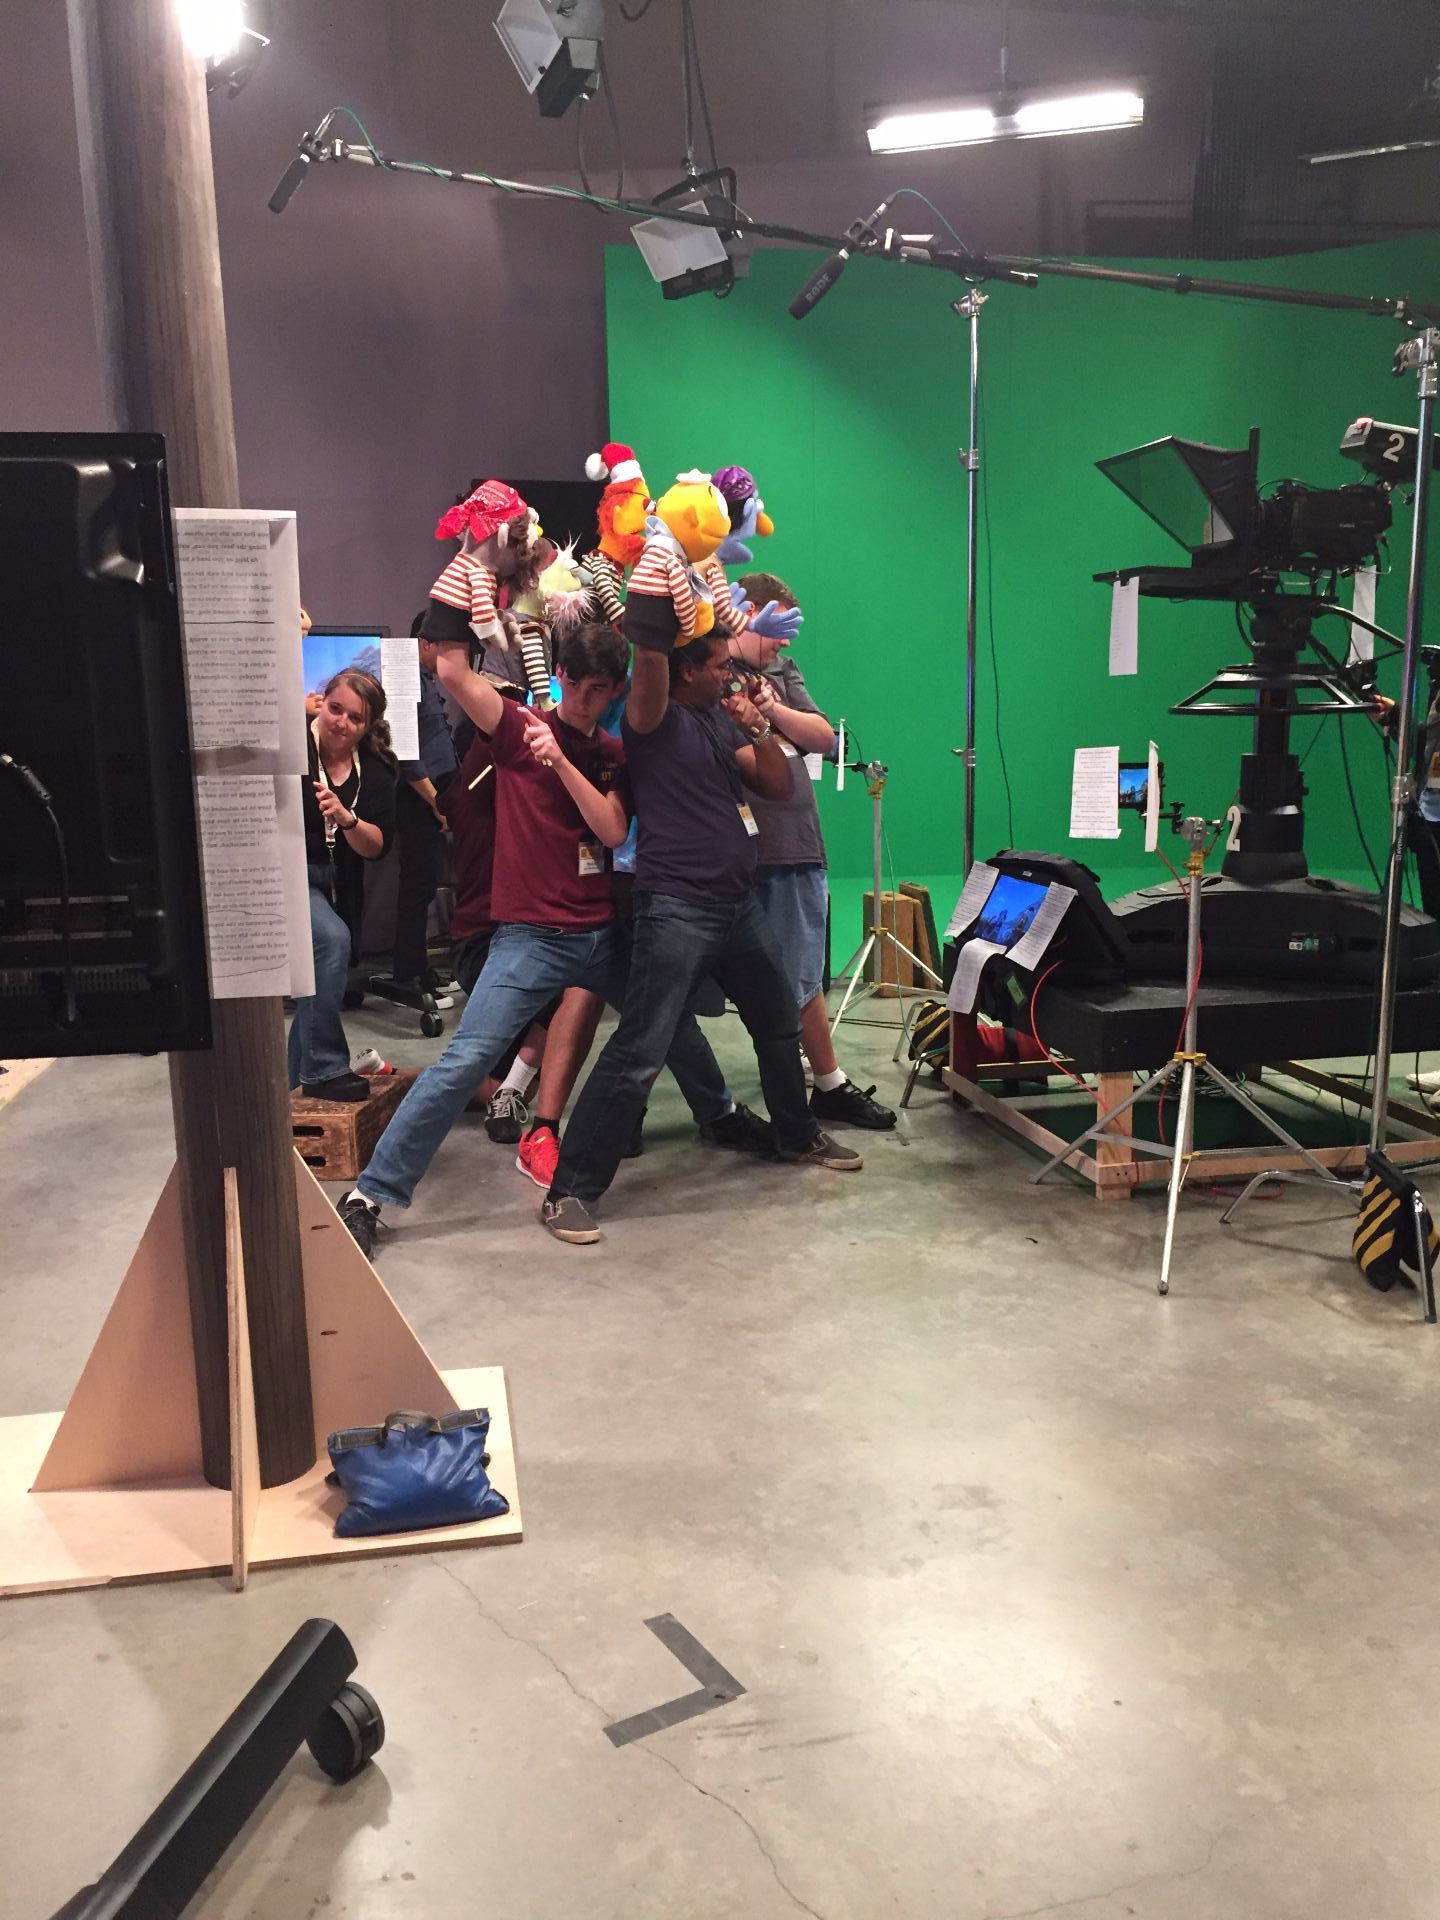
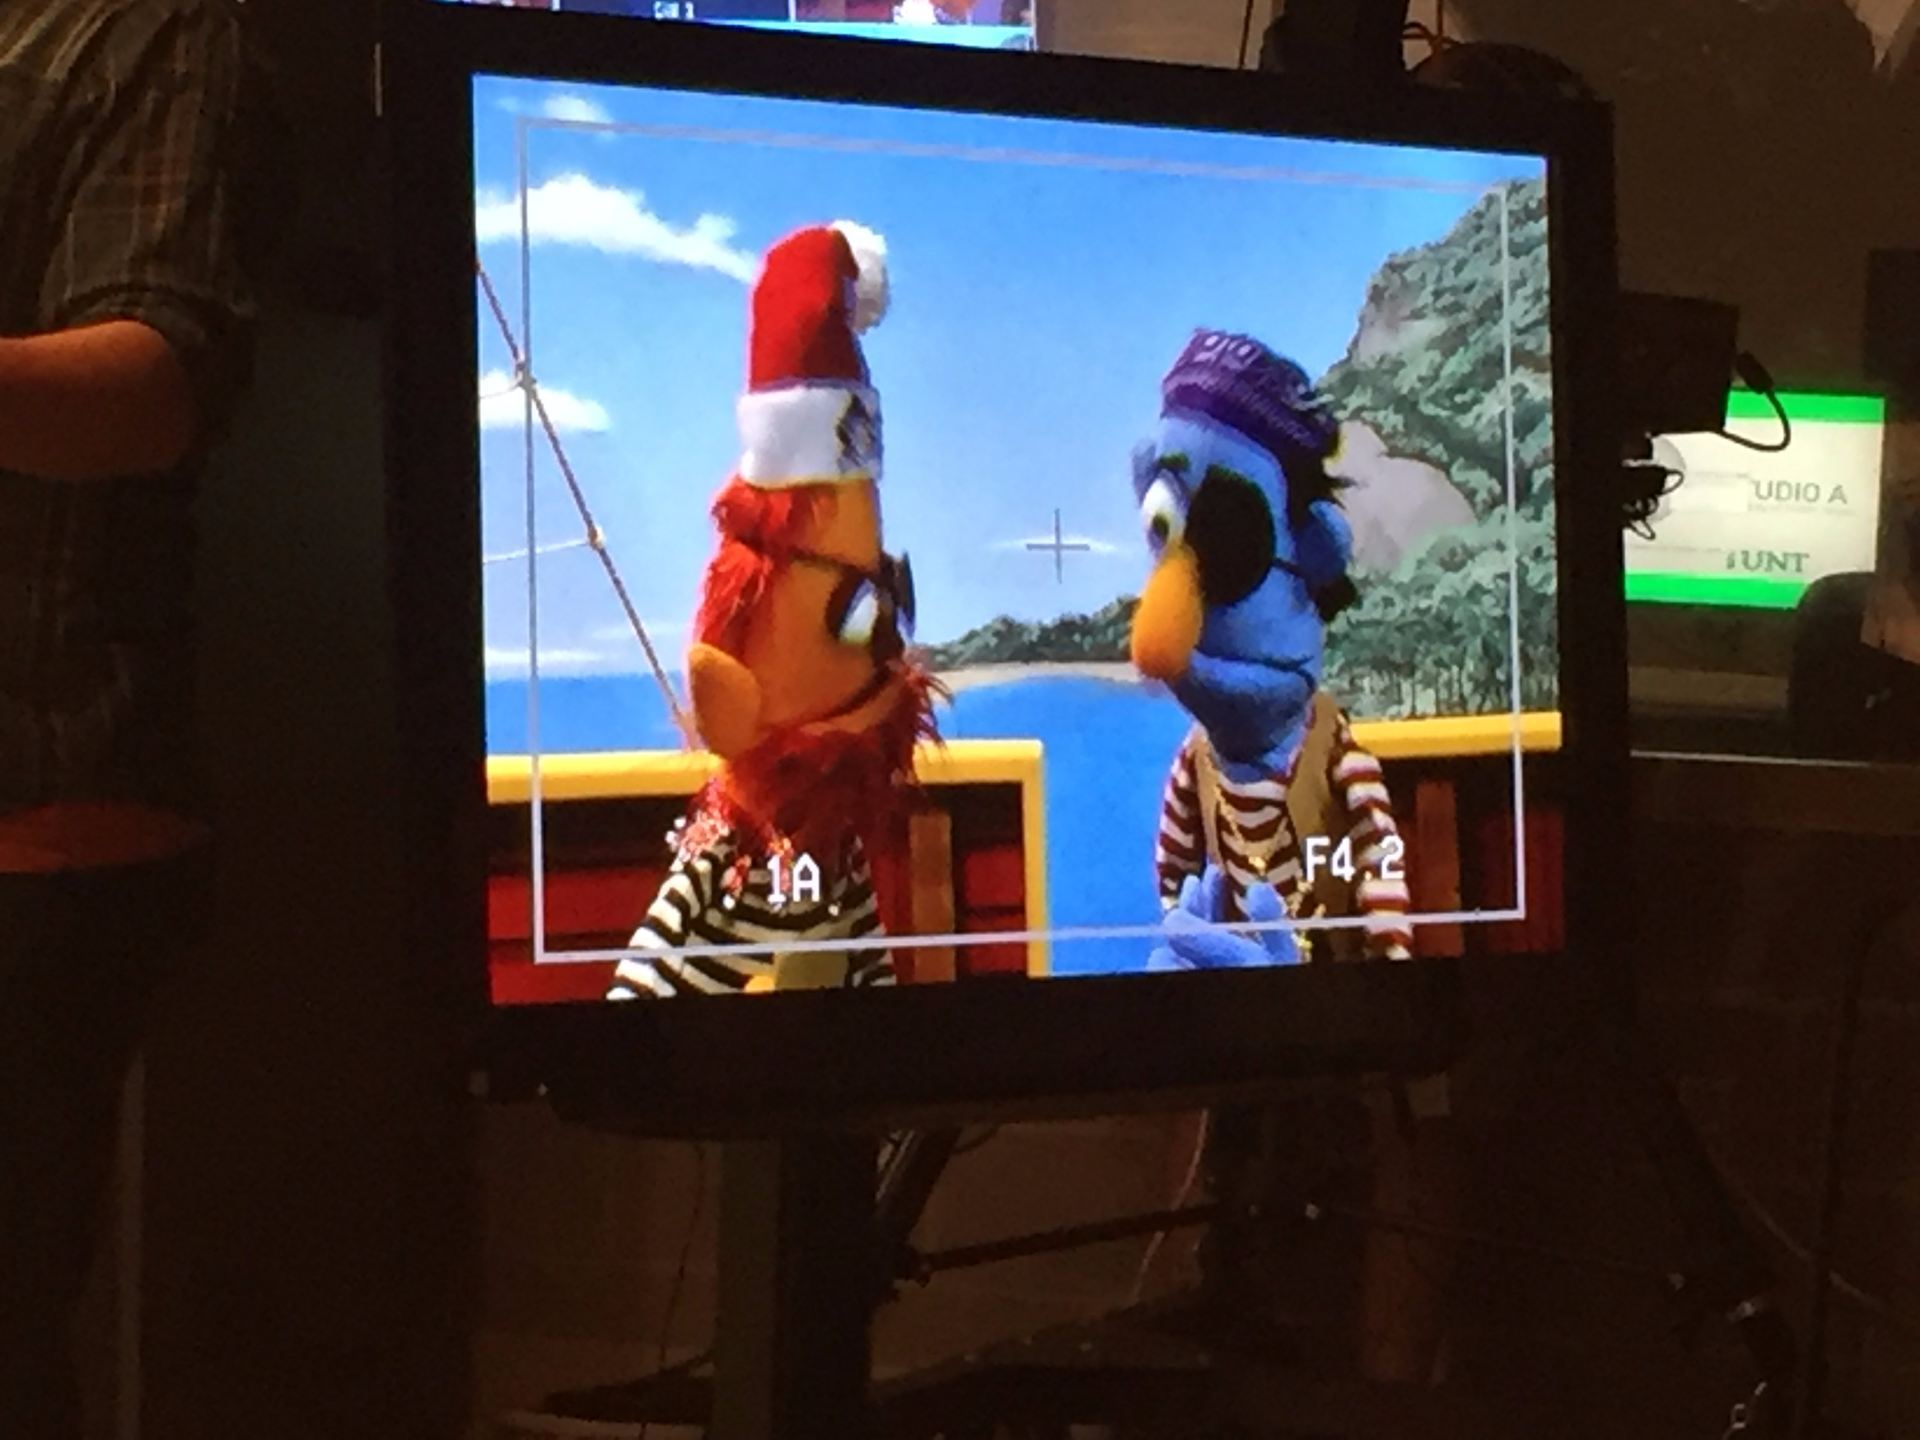
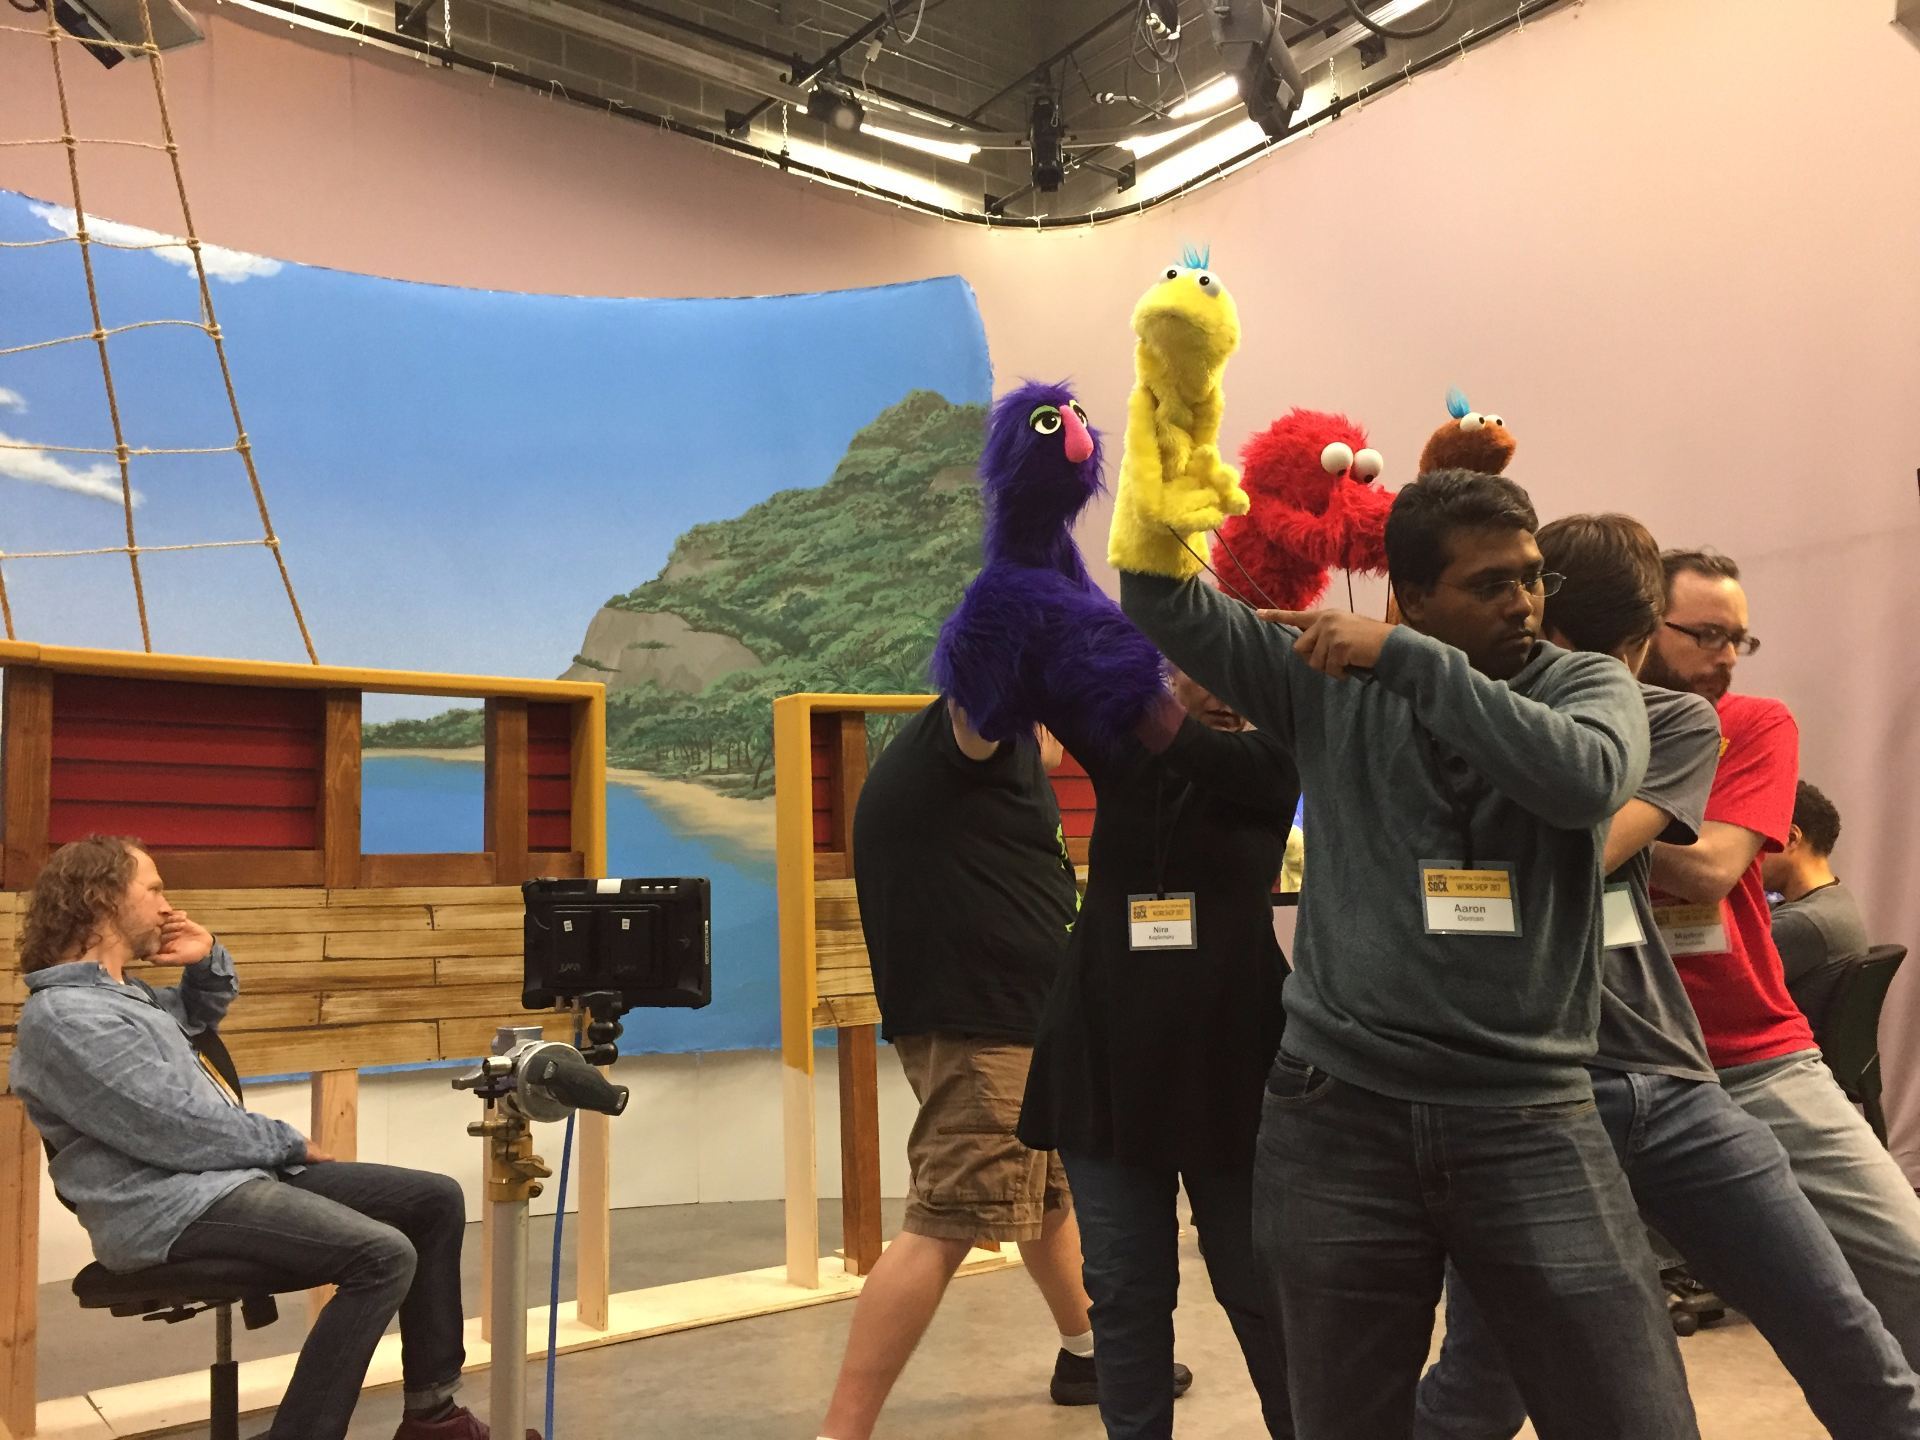
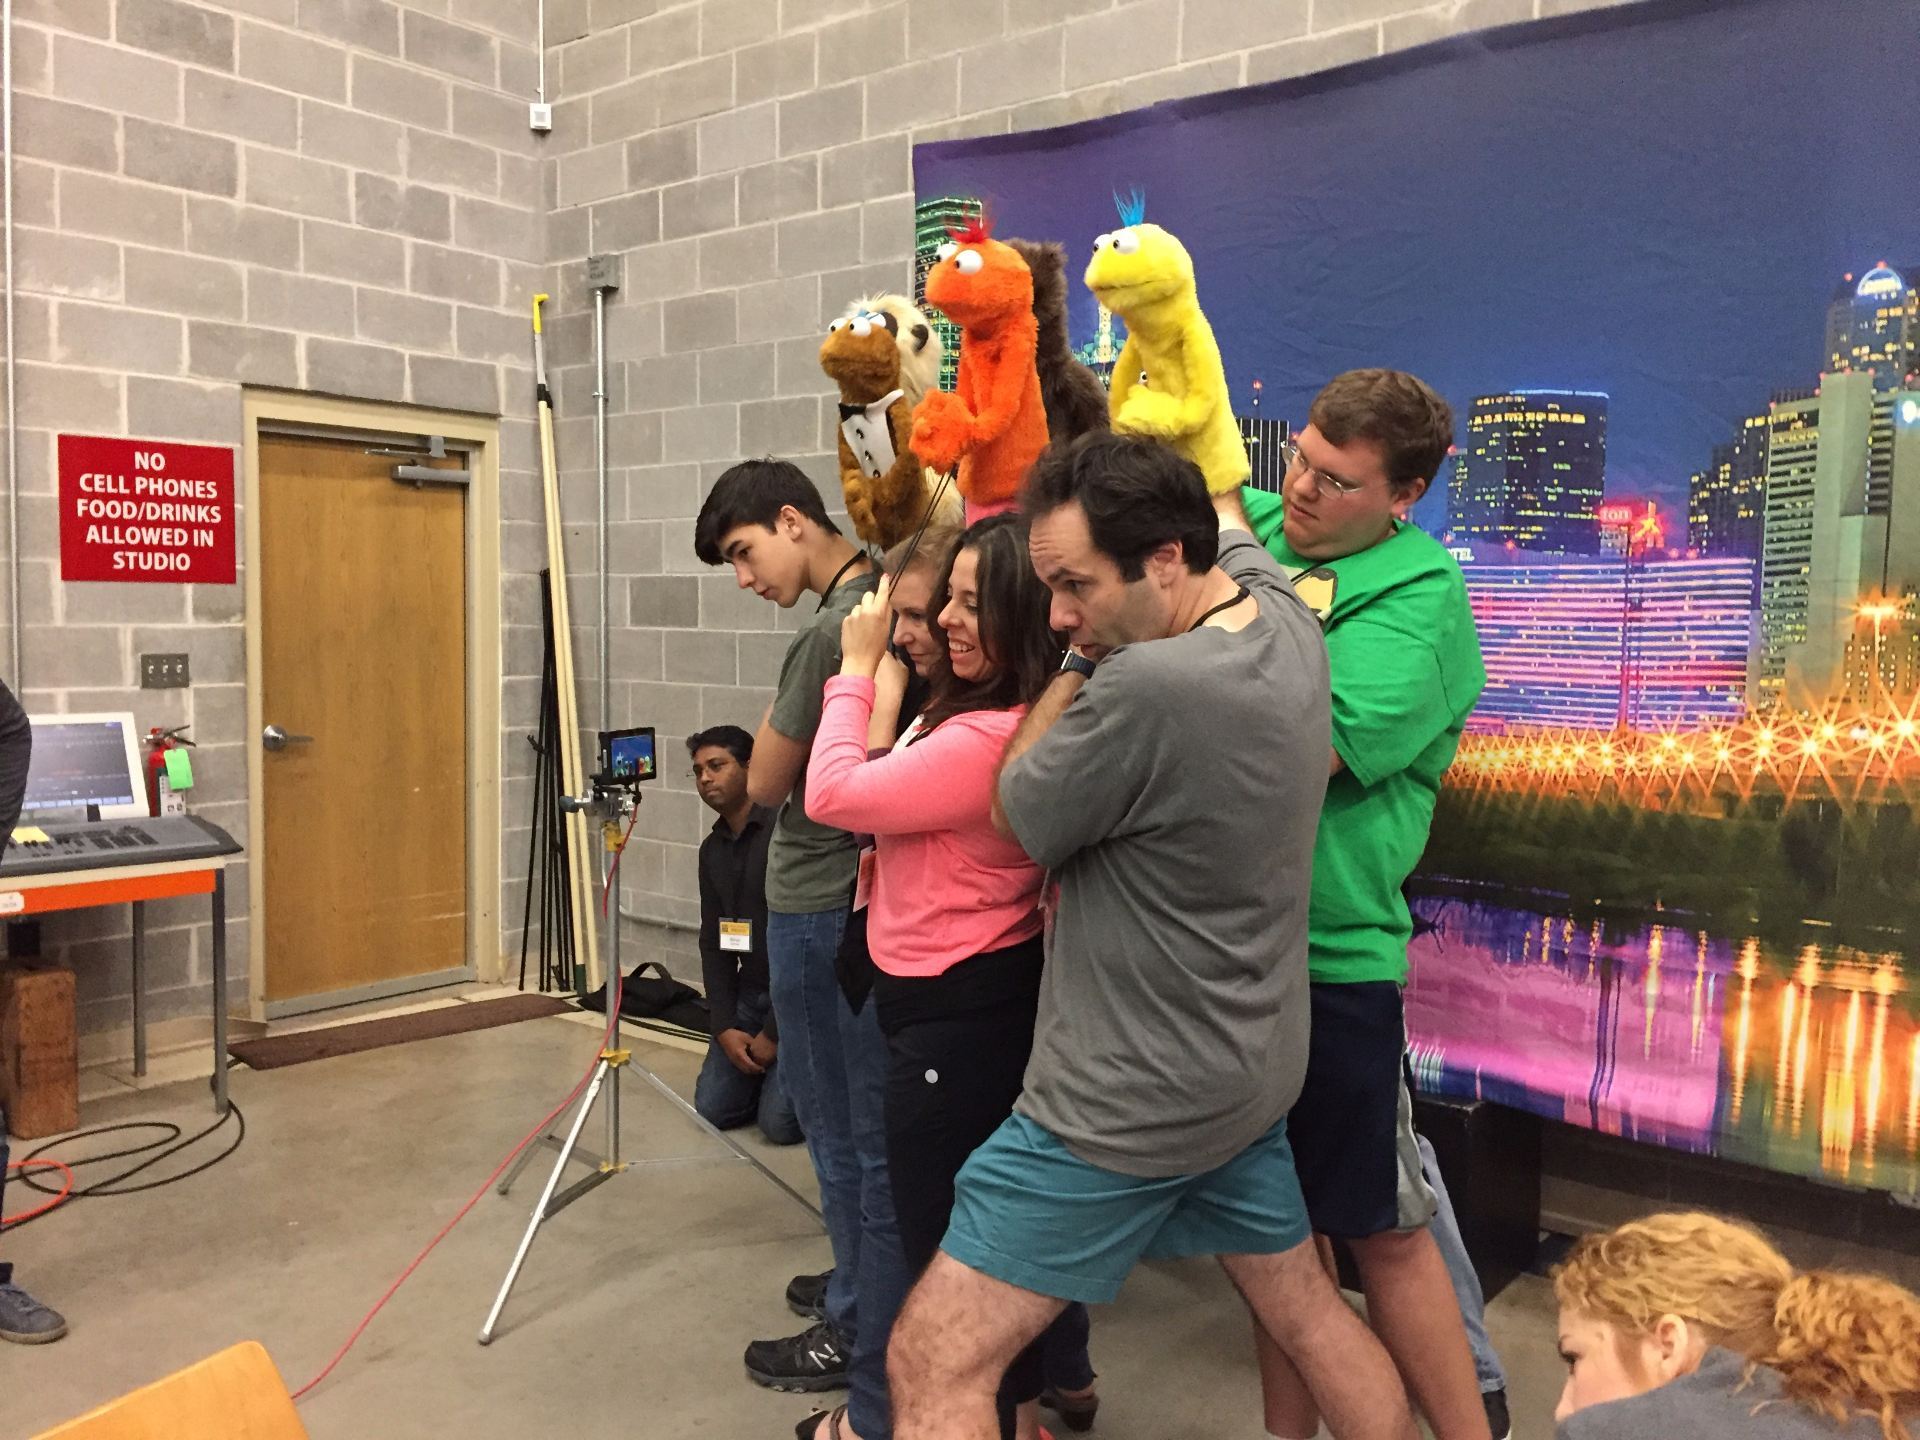
Today the puppeteering class moved to the television studio with real tv cameras!
The first exercise was to practise entering the camera frame, focusing the eyes of the puppet in the camera and having the puppet talk about where it was and where it will be going. This was so everyone could practise what we had learnt yesterday. Today, Molly, my pink travelling companion in the flowery dress, and Coco, the Terry Angus Dog were the puppets Miss Hannaford used the most in class.
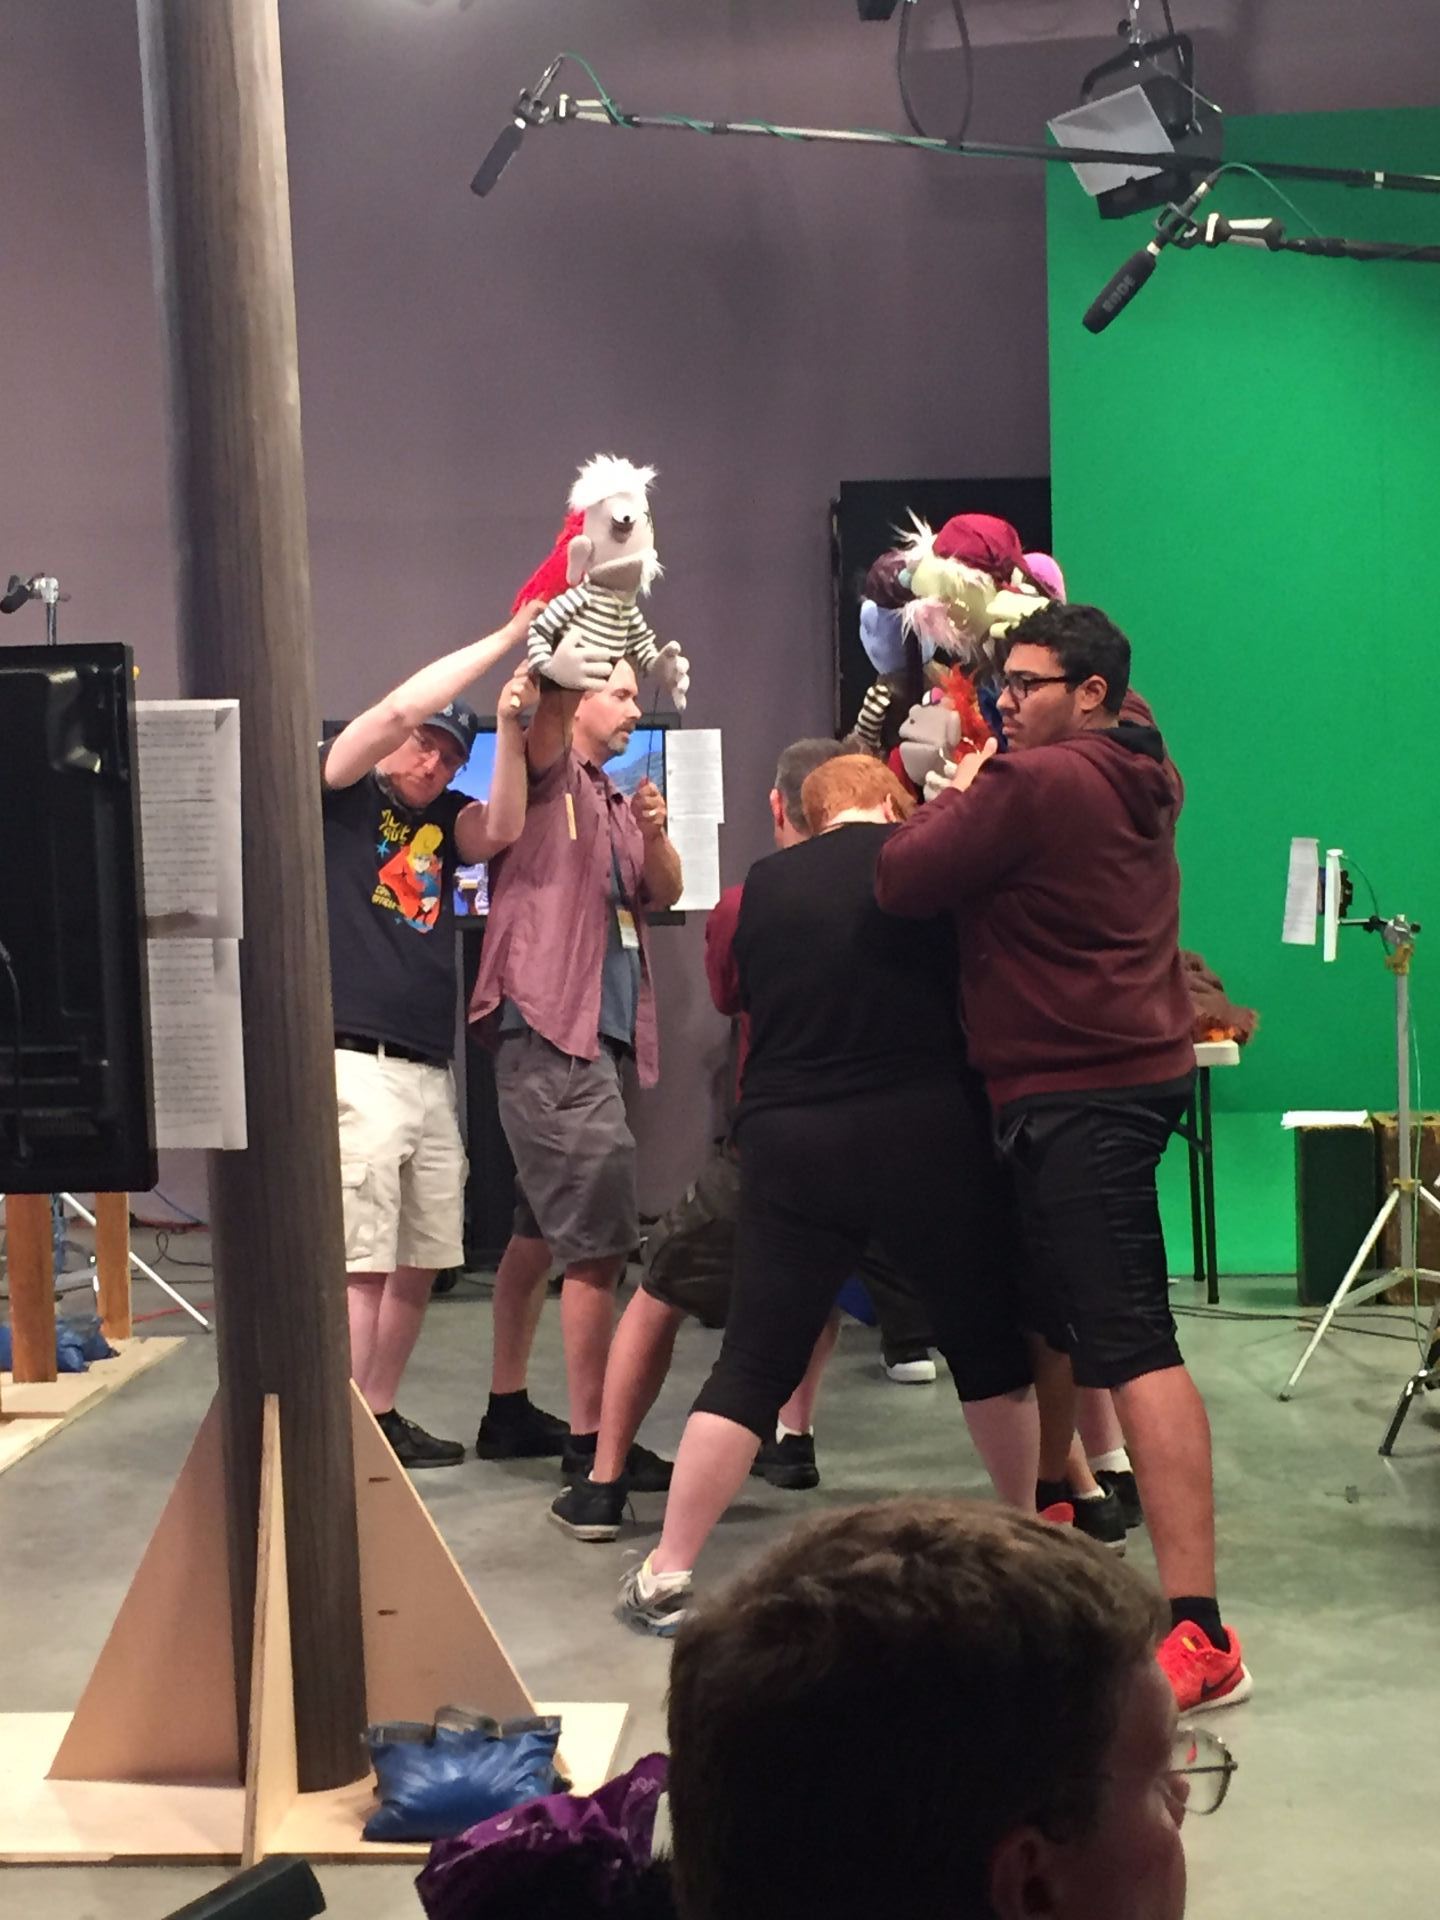
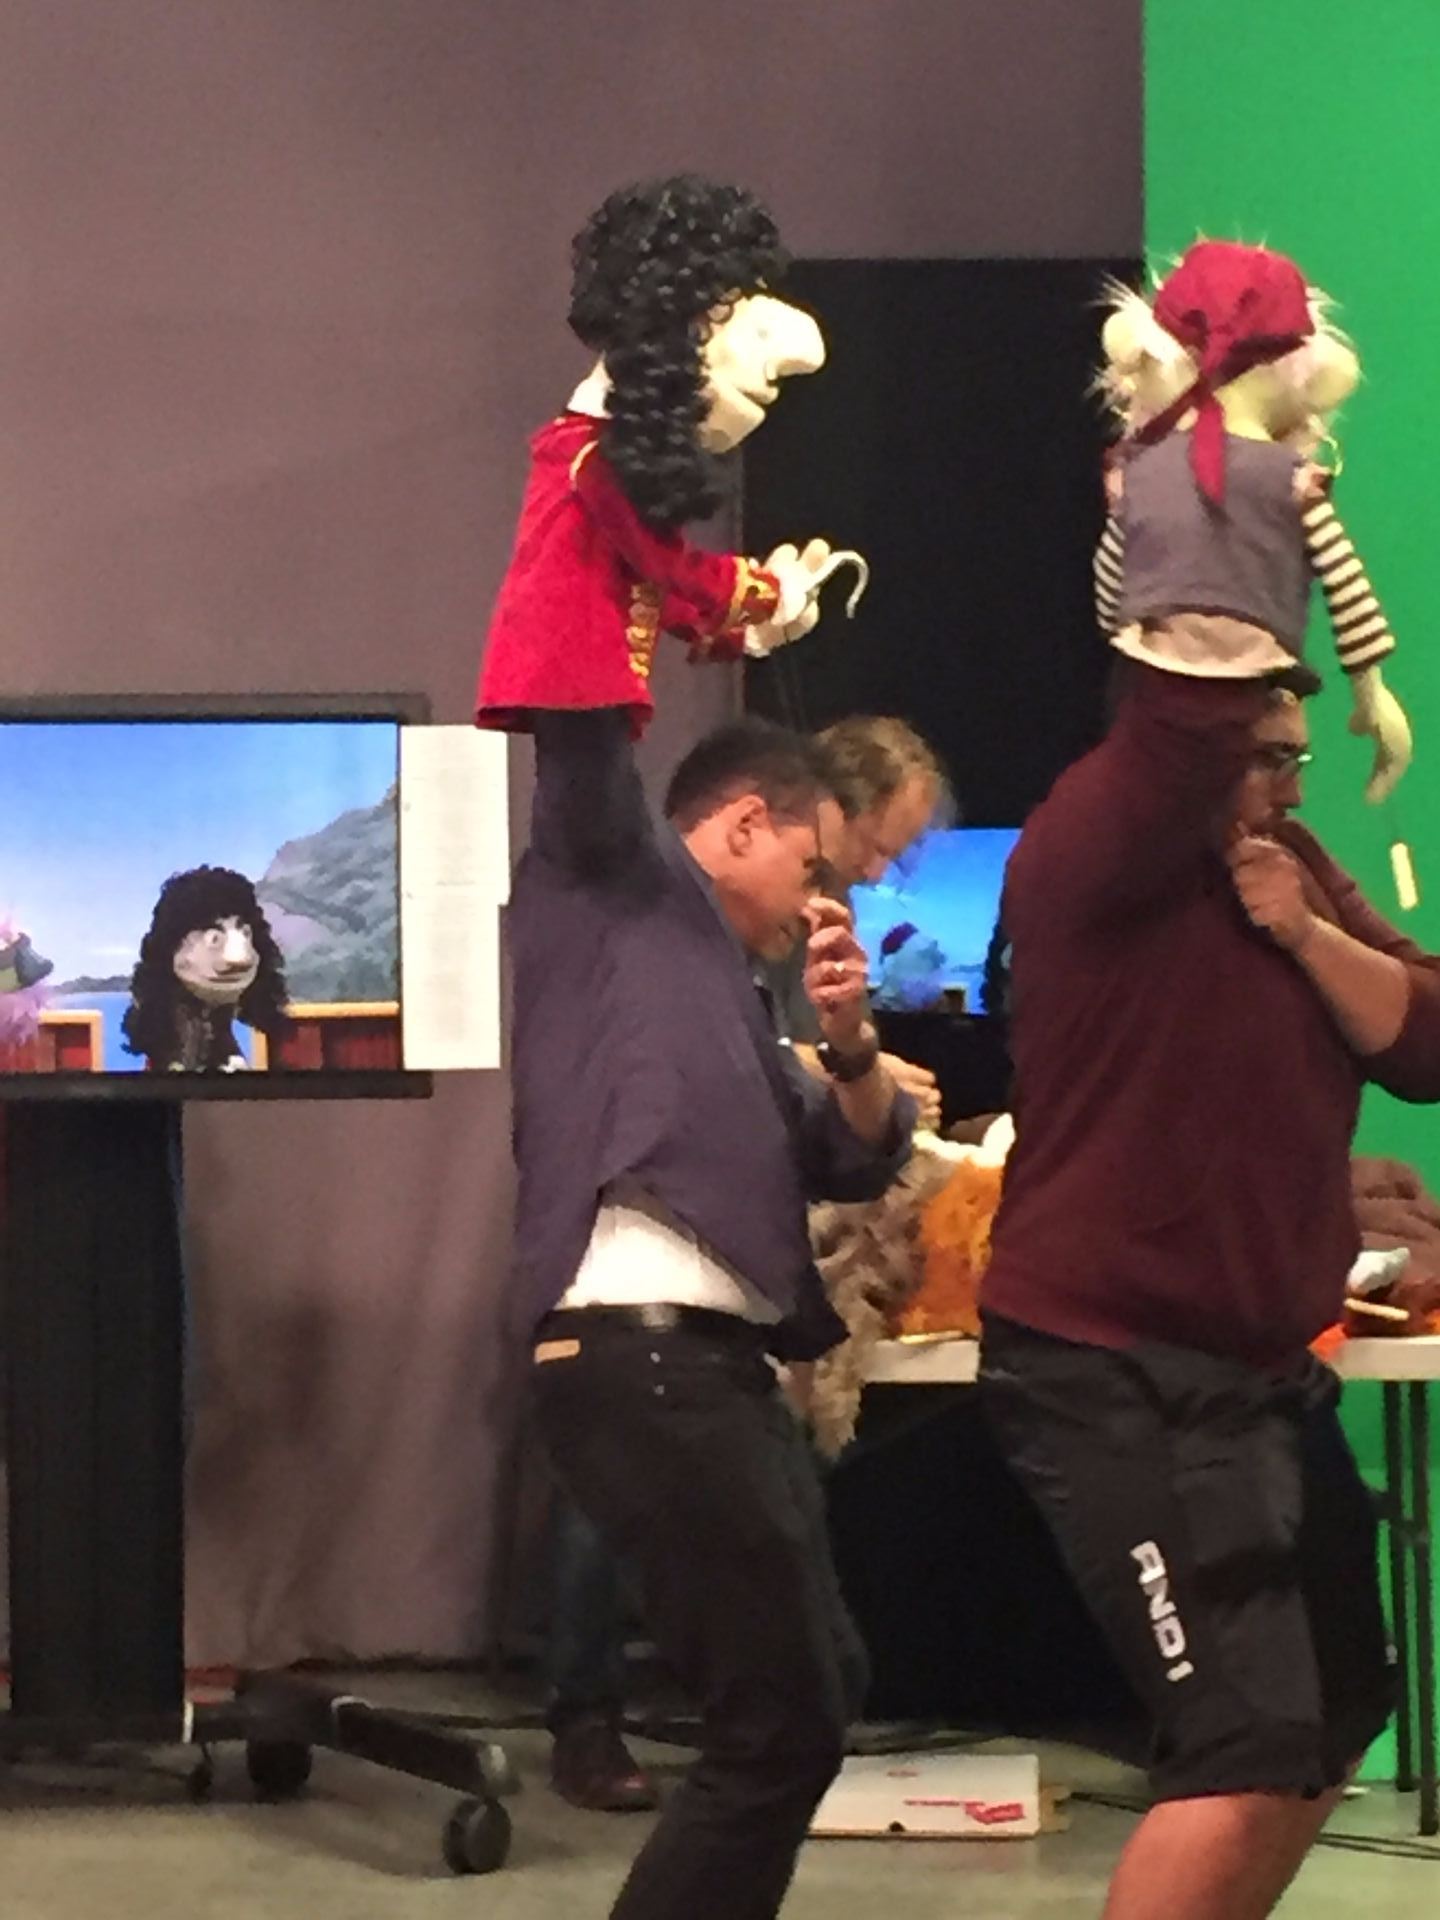
We also worked on sharing the frame with other characters so that the camera shot had a nice composition. It can be really tricky to share the frame with other characters, especially when the puppeteers are different heights. Sometimes our teachers would have to sit on chairs in front of the class to puppeteer as they are much taller than Miss Hannaford and I, but they needed to be in front of the class so that they could lead the activity.
One of the things that Miss Hannaford found difficult was moving a puppet through the depth of field of the camera. We had to start moving the puppet from the back of the set, up to the middle of the frame and then move to the right of the frame, keeping the puppet on camera for as long as possible. It is really hard to do and the only way Miss Hannaford was able to get close, was if her teacher Peter, put a puppet we were calling Coffee Monster at the top corner of the camera so that the puppet Miss Hannaford was using had something real to look at! Using depth of field is something Miss Hannaford needs to really work on improving.
Other fun activities were
Bouncing (introduction to puppet dancing)
Following the ball
Listening
Conveying emotions
After our delicious lunch at a healthy sandwhich shop, it was time for the next puppet building class!
The first thing Miss Hannaford wanted to do, was to have our puppet travelling companion Coco the Terry Angus Dog sit next to Terry, the Terry Angus Dog who belongs to Pasha Romanowski. Terry was the dog from the instructions Miss Hannaford followed to build Coco, so to have the two dogs together in the same place was really special to Miss Hannaford. It was also an opportunity to compare the results of the building side by side!
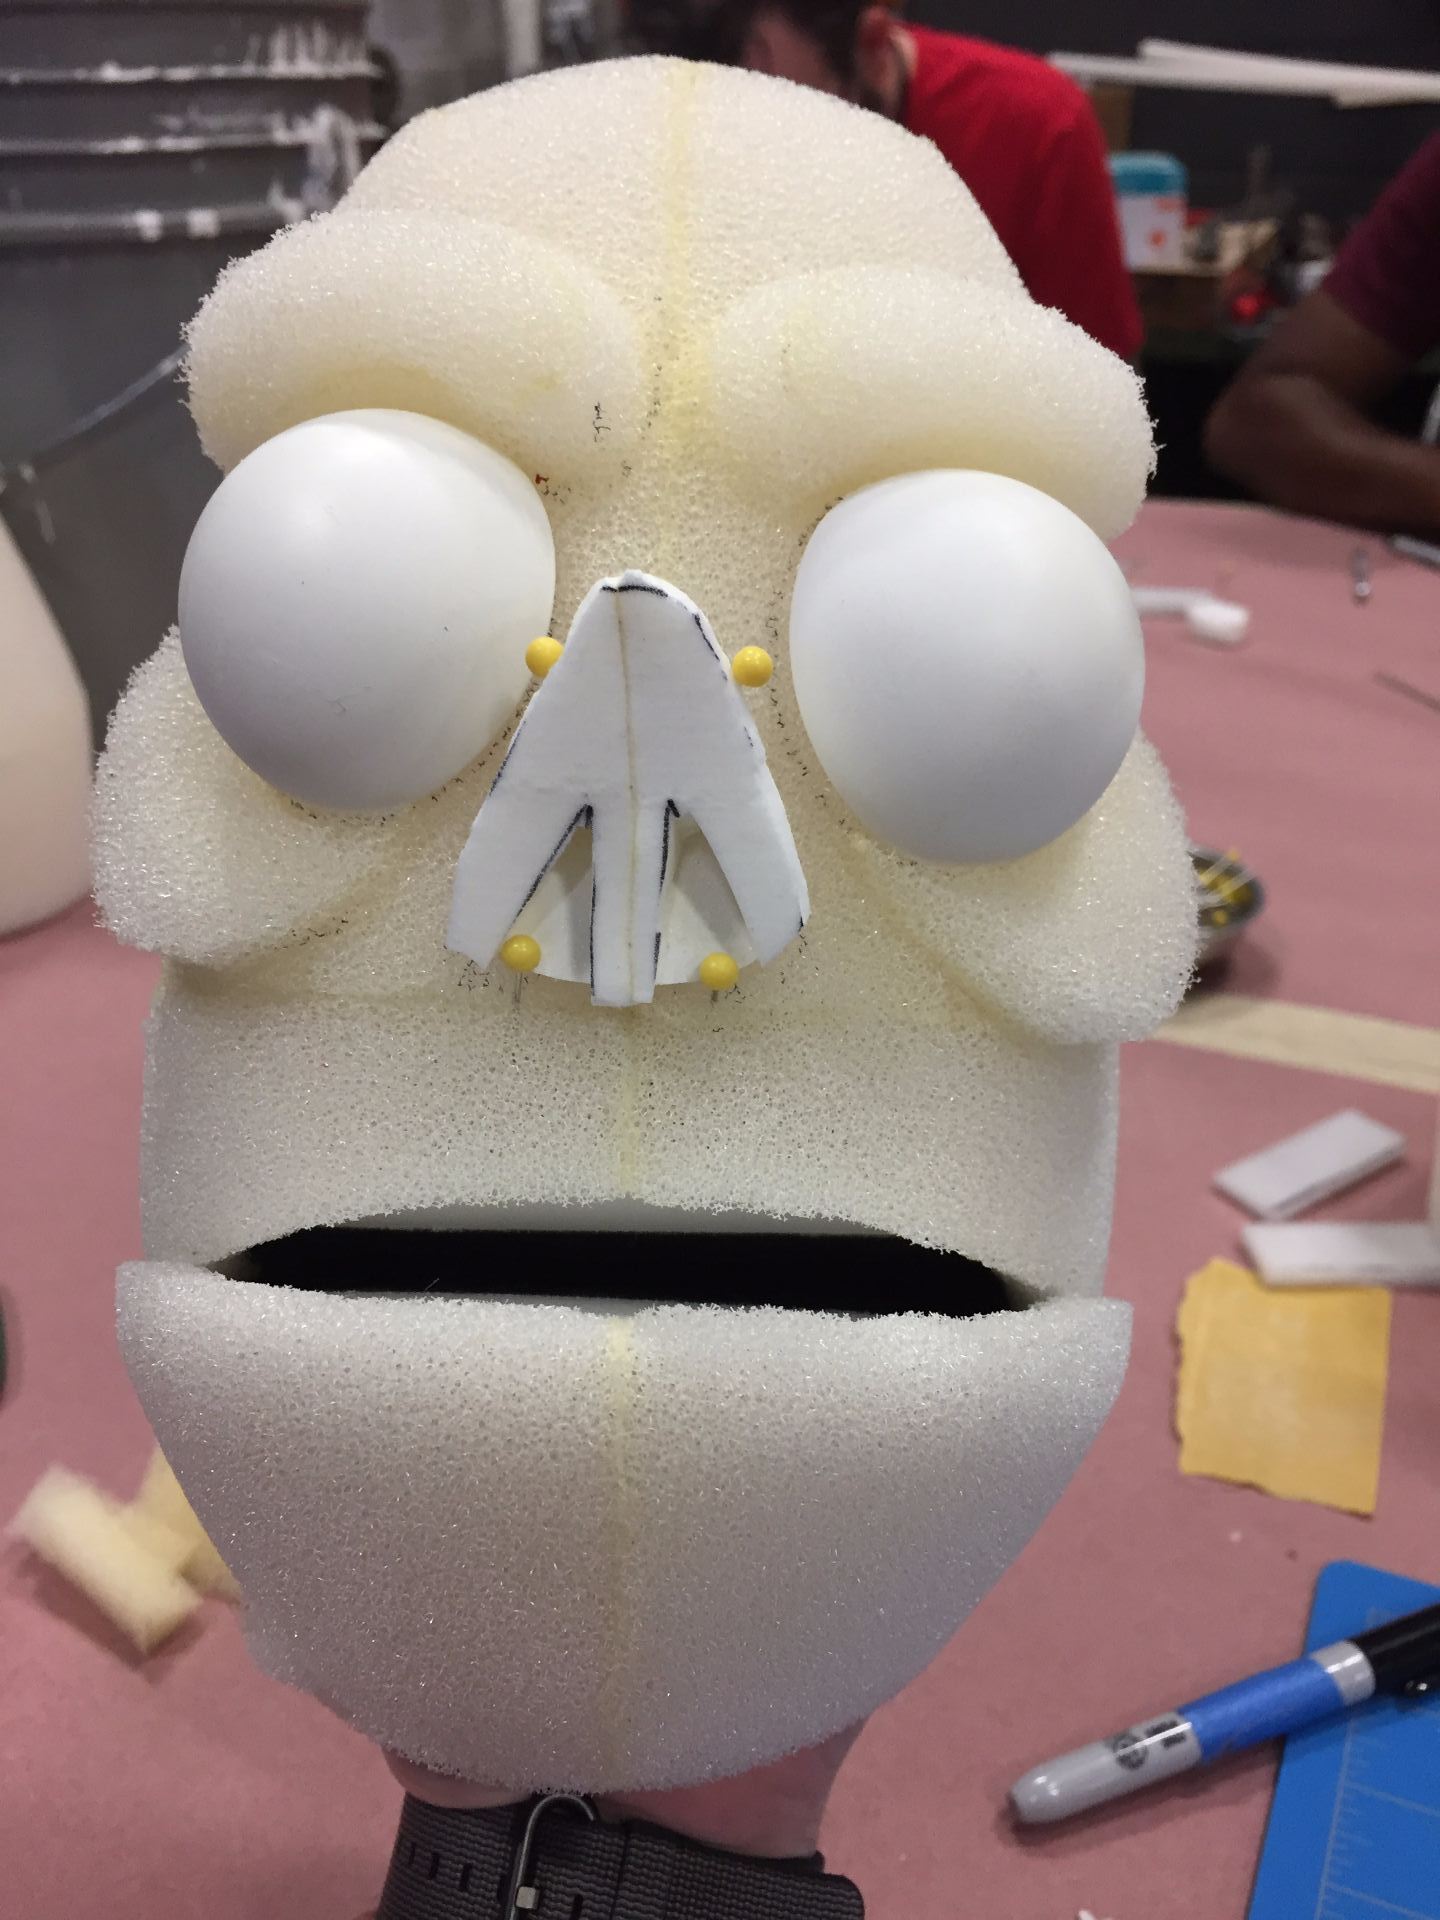
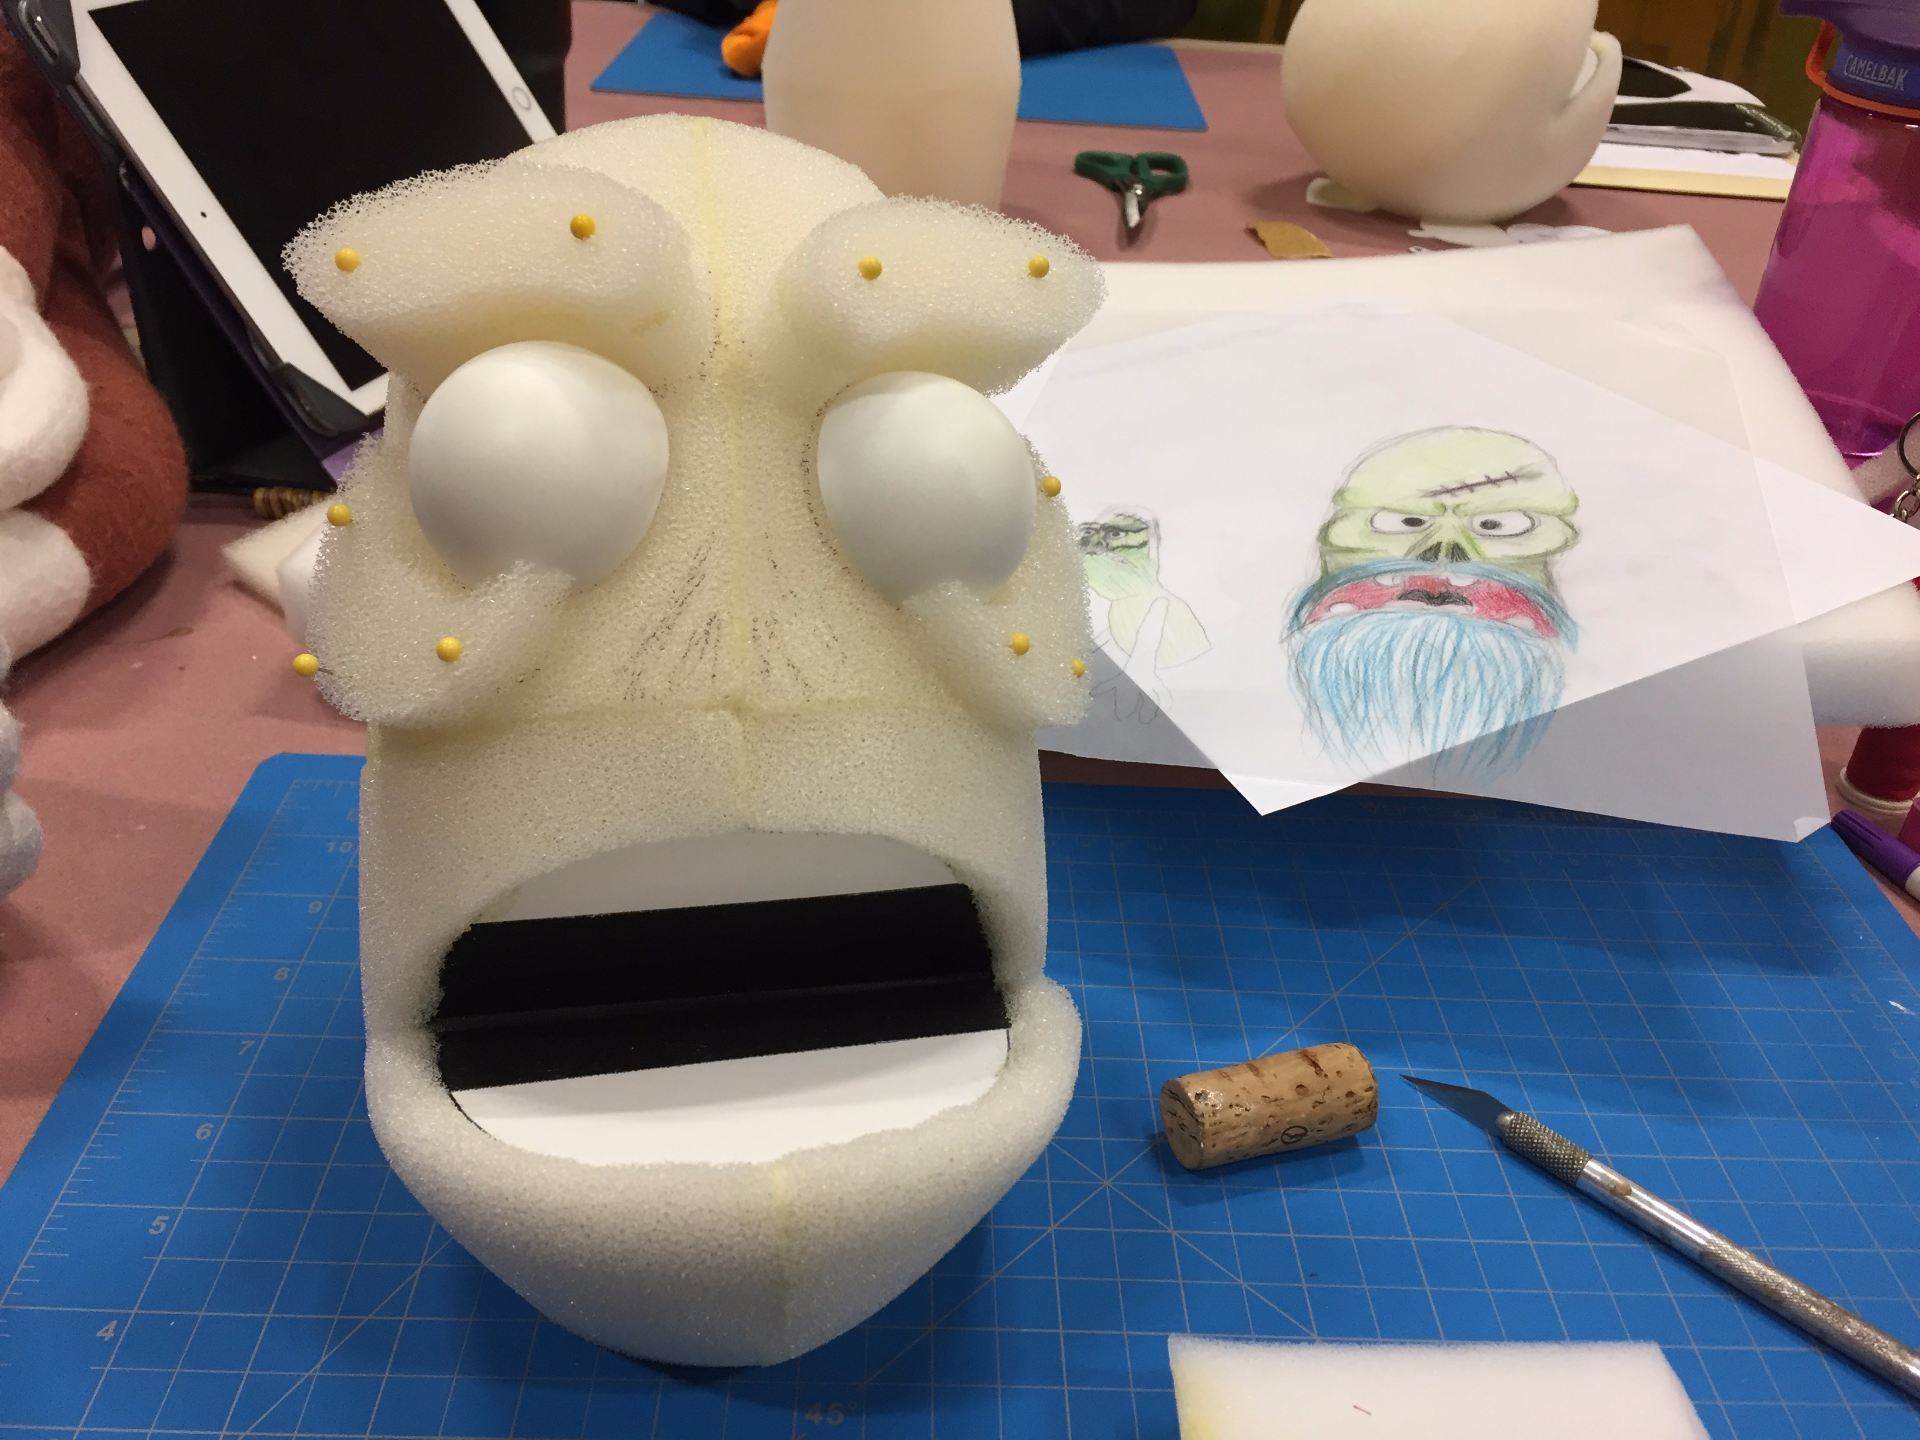
During class, Miss Hannaford started to add the bone structure to the face of her pirate using special curved foam shapes that went around the eyes. The process started by sketching the bone shapes lightly on the foam around the eyes that were going to be used. Then, Miss Hannaford used tracing paper to make paper patterns of the bone shapes on one half of the face. In this photo, the “bones” are just pinned on.
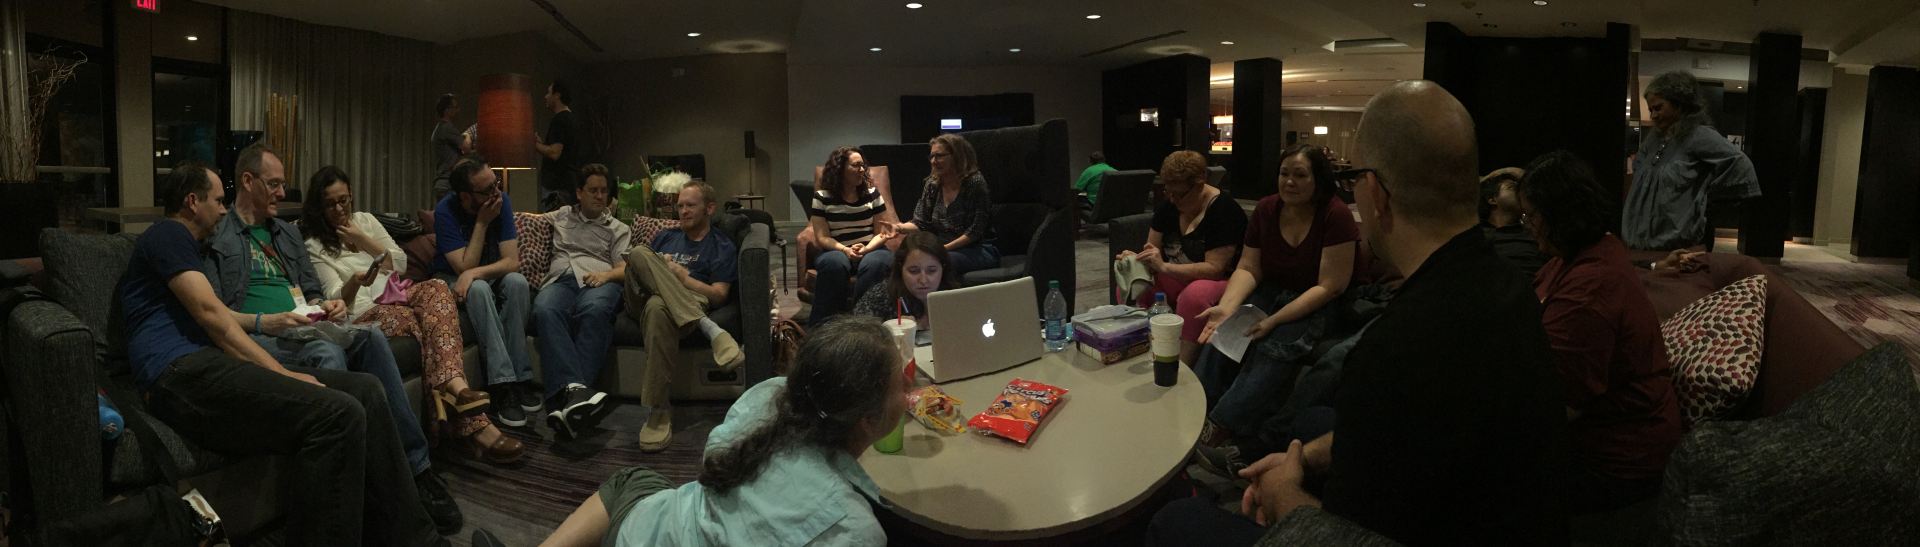
After class, all the students and teachers met after dinner to work on sewing, performance ideas or to just chat.

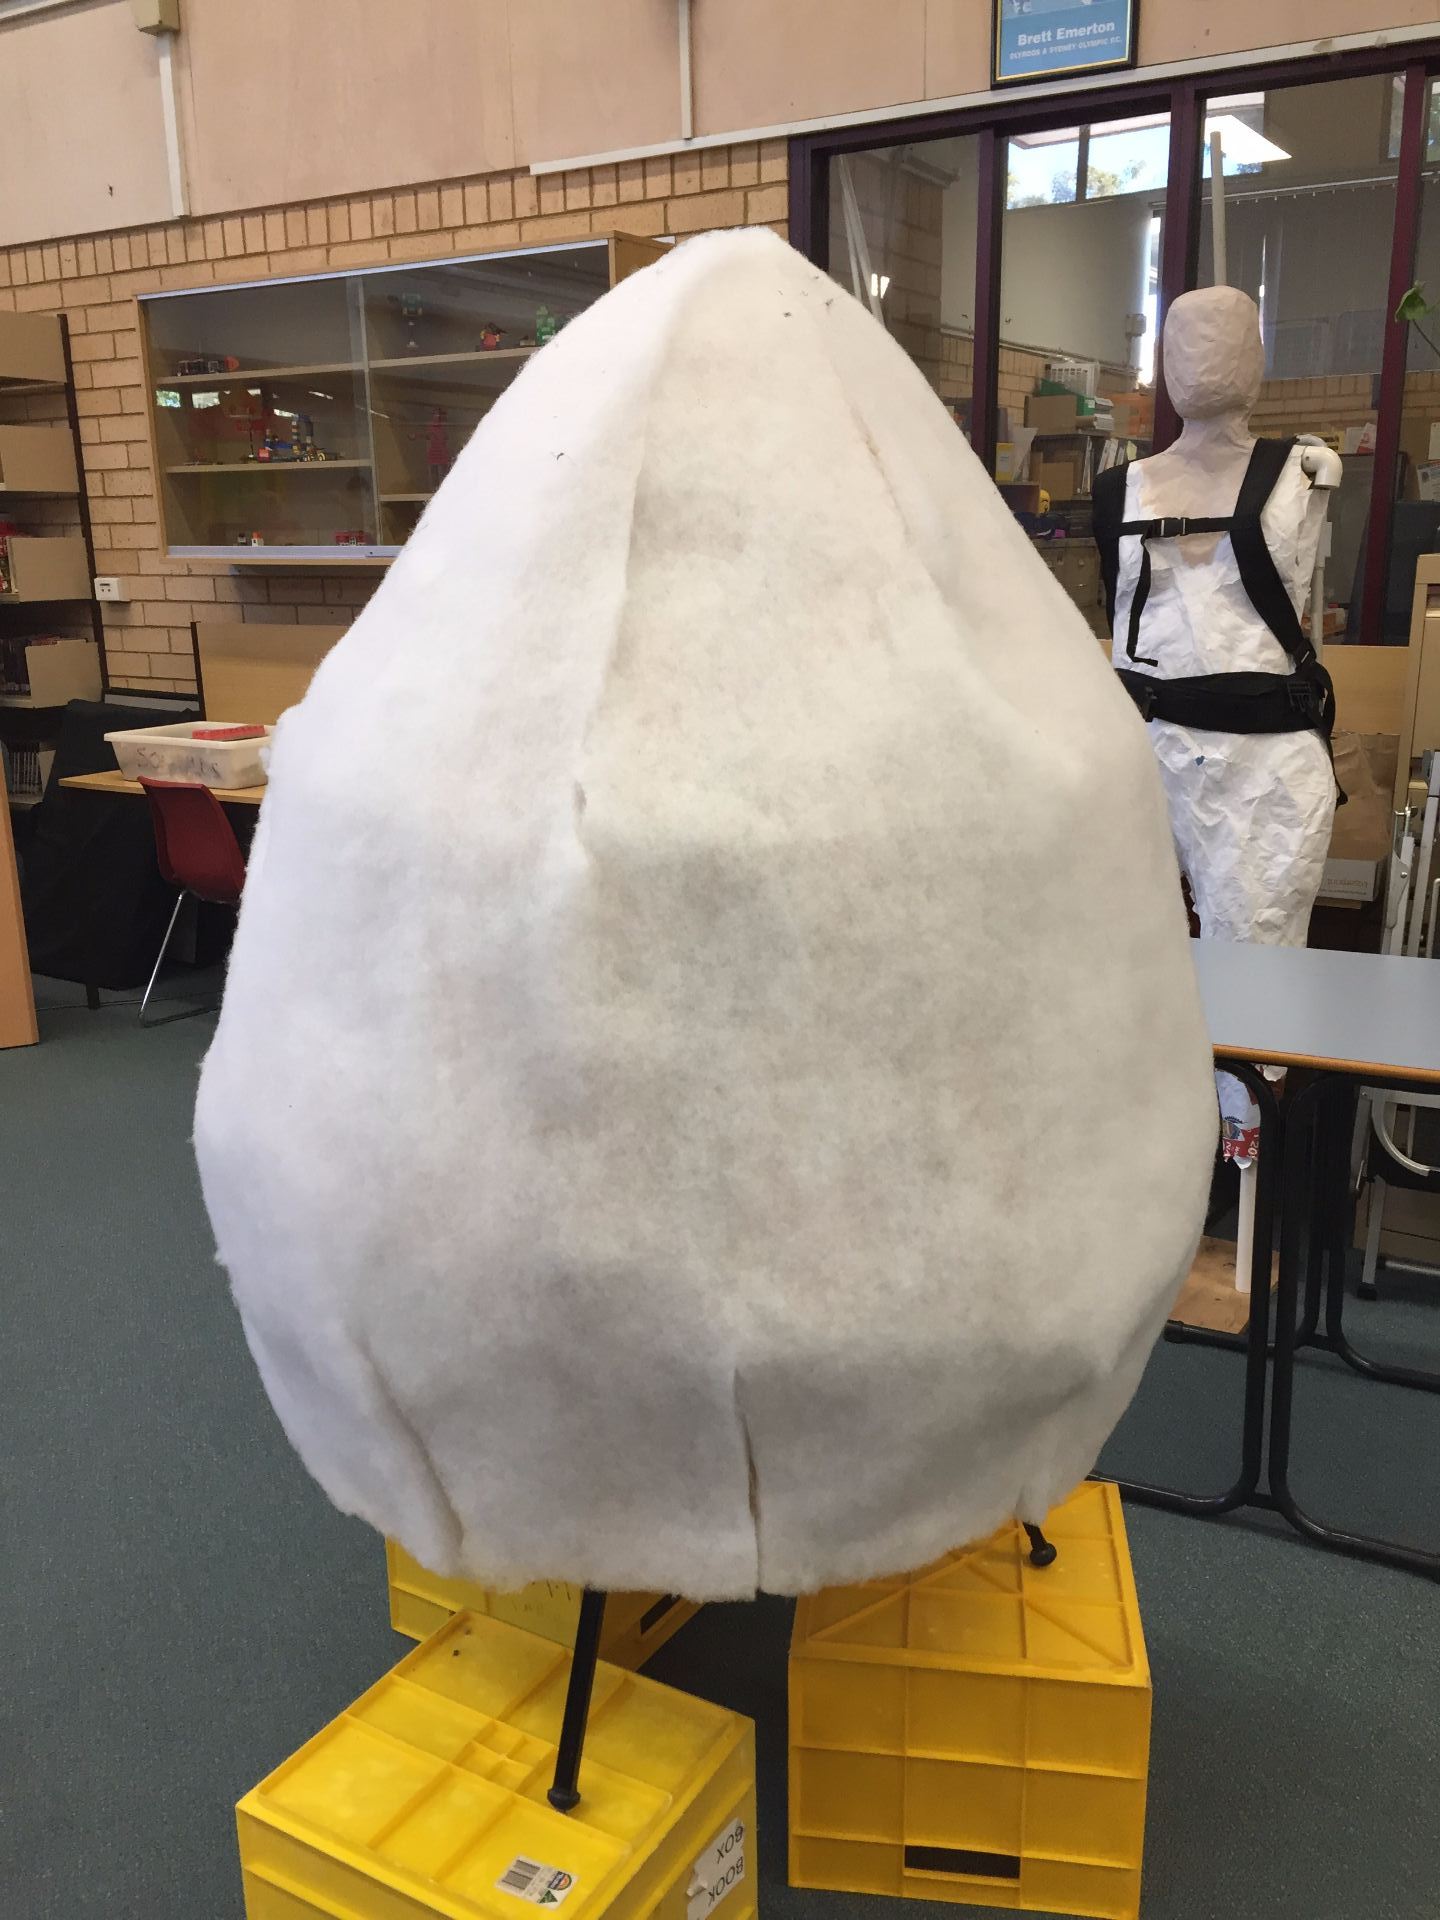 Cotton batting glued onto the fabric underskin.