In learning about how Blender works where the user manipulates individual polygons, I have been looking for examples of artists who work with organic 3D modelling and 3D printing to create works of art.
The first reference I came across since learning about Blender was the Big Blue Bear in Denver Colorado USA. The formal name of the artwork is I see what you mean (2005) by Lawrence Argent. The statue is over 12 metres tall (40 feet). It’s surface is covered in triangular polygons and it is blue because the scuptures maquette was 3D printed in blue plastic instead of the original earth tones to represent Colorado.
Big Blue Bear Statue
I have also been watching how Herschel Shapiro creates wall sculptures using 3D printed parts
I have been 3D modelling and 3D printing for many years, but the main program I use, Autodesk Inventor cannot model organic shapes. Inventor is a parametric modelling software so every shape is very precise which makes it fantastic for mechanical puppet parts. However, for the past three years I have wanted to learn how to digitally sculpt more organic, natural shapes such as horns, eyes, noses that are not perfectly symmetrical.
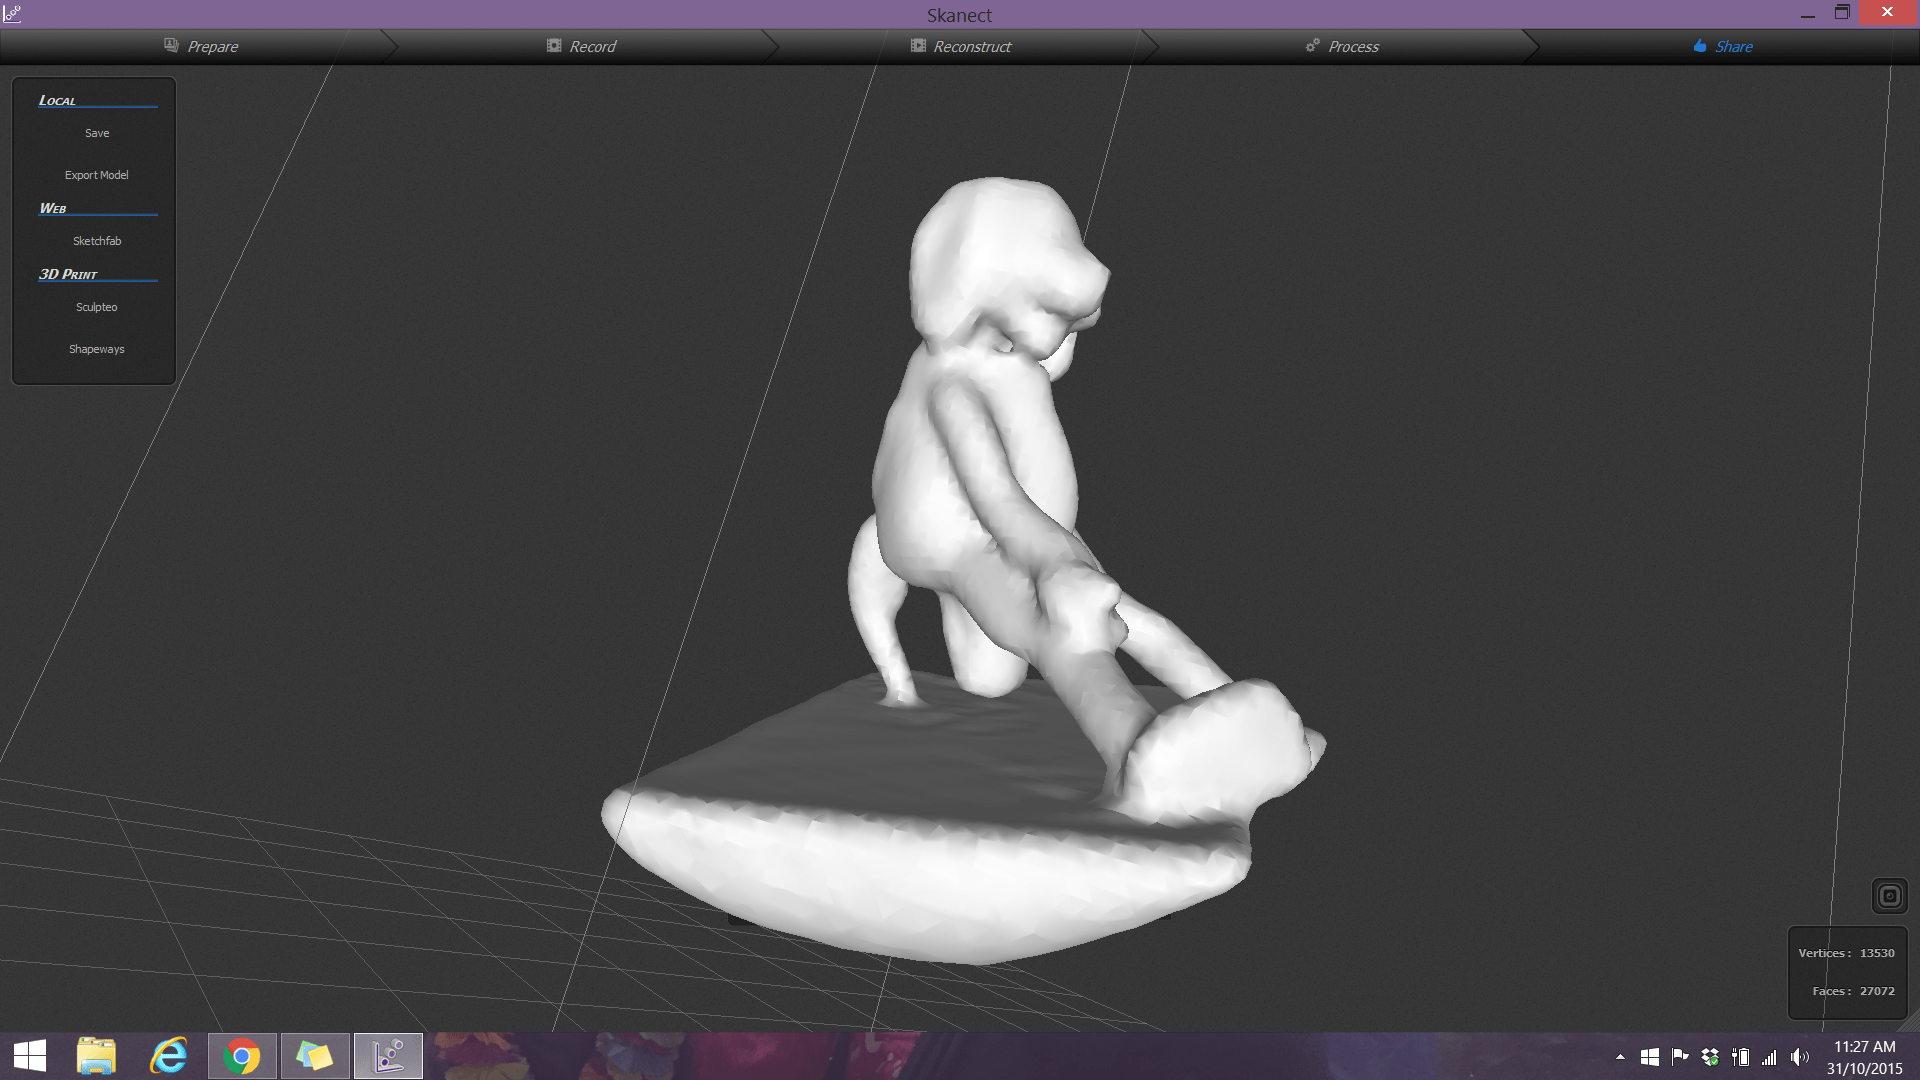
Part of my research has led me to 3D scanning and photogrammetry. Initally, back in 2015 I got to try a handheld 3D scanner that was connected to my laptop by cords called Skanect. The challenge was that there was limited software to edit the scan, and the software that came with the scanner was very difficult to manage.
First attempt at 3D scanning of one of my puppets using a handheld 3D scanner.
In early 2023, I was again exploring new tools for photogrammetry which is a form of 3D scanning using lots of individual photos, and a prop making channel I follow, gave a demonstration of a mobile app they used to make a space helmet. The demonstration they gave led me to trying the Polycam app for iPhone.
I tried the app and the paid version worked great for a small puppet part that I needed. The trick with this app is that you need to walk around the object, so it is important to place the item being scanned on a stool or stand that you can walk around.
My next step was to find a software package that I could edit the scan in. In 2021, I tried Z Brush, but I found that software package was very expensive and difficult to navigate as a first time user. It is also a software package that was not available at school- so if I learned the software, I could not share it with students. Since I have access to the Autodesk suite of products, fast forward to 2022, I started to explore Autodesk 3DS Max. Working through the training from Linkedin Learning, my experience was this software was more focused on building environments rather than characters.
Now in 2023, I have just attended a workshop called Digtal Tools for Analogue Makers taught by Philip Millar (@puppetryschool) at the Melbourne Festival of Puppetry on July 1, 2023. In the pre-workshop reading, Philip not only recommended Polycam as one of many 3D scanning tools, but also Blender as the modeling software. Blender is a free, open source program that is very similar to ZBrush in it’s capabilities, and it is available for the computers at school! I found an incredible YouTube video on how to use Blender with a drawing tablet to help me learn the program very quickly.
Early stage sculpting of a UV sphere in Blender
Late stage sculpting of a head following the YouTube tutorial
Polycam scan result
Importing the Polycam scan into Blender.
Final sculpt in Blender side by side with the original sample.
3D printed version from Blender next to the original puppet nose
One of the most challenging steps was removing the background surface from the scan result without damaging the scanned part I required. Each polygon had to be individually deleted.
The resulting mesh was only the surface of the puppet nose- there was no thickness that would support a 3D print. I had to learn how to add the back by closing the mesh, then began a process of refining the mesh and smoothing the polygons. I completed the process by adding a rectangular prism to the mesh and aligning it to flatten the back. It meant I had to install an add on called Booltools.
I have curated a playlist of YouTube videos and websites I found helpful in the past week as I have been trying ideas to achieve my goals.
I really struggled with orienting the mesh so that I could use the grab and smooth tools symmetrically. It is something I still have to learn more about. In all, I am really excited by what I can now do with Blender.
Over the last few weeks, I have been involved in many video conferencing calls for both my teaching world and my puppetry world. When I have used Zoom, I have used their virtual background feature, and it works really well to a point. The tricky part is if I want to show the other people in the call an object, or even play with a puppet, the virtual background without the green screen option cannot include the object beside me such as a puppet on my arm.
My first thought was, can I use a substitute fabric as a green screen/ chroma key background? I wanted to focus on using the materials I had at home that are a solid colour. I started out exploring bed sheets since they are light to hang up. I had one that is a blue grey colour, and the other was a pale green. While setting up for filming, my new woven polyproplene green screen that I had purchased on Amazon arrived, so now I could compare the effects.
Phone filming setup with zoom running on the computer in the background
Blue bed sheet covering my book case
Green bed sheet covering the book case
Stylus tipped pen to control my watch
Apple Watch app controlling the phone camera
Results from the experiment
In Zoom, I got best results from using the green bed sheet and the commercial green screen without any additional lighting apart from the ceiling downlights.
In editing using Adobe Premiere Pro- I got the cleanest background removal results from the professional green screen.
If I was to do the experiment again, I want to see what would happen if I added lights to the sheet/ screen only to even out the colour difference across the surface. I would also iron or smooth out the surface to see if the background removal was more successful.
A frog once said in a TEDx Talk, “If necessity is mother of invention, then creativity is the father”. Given the whole world has been isolated by the COVID 19 pandemic, puppeteers are trying to find ways to reach their audiences remotely. There is a lot of discussion in the puppetry community about how to adapt video conferencing and streaming technology to puppetry.
Over the last 5 years, I have been learning the art of television and film puppetry from 2 amazing gentlemen who I am honoured to call my mentors- Noel MacNeal and Peter Linz. One of the challenges I have faced practising my puppetry skills at home, is recording video of my puppets being puppets. I started out using my webcamera, but it could not record what the puppet was doing. If I use my phone or iPad as the camera, either the image on the screen looks like a mirror, or I can’t see the image on screen. In both of those situations, I don’t know if the puppet looks right for the audience.
I have assembled my own monitor puppetry kit over the last 5 years with a Sony Handycam, a small flat screen tv which has evolved into a professional 7 inch field monitor as my puppetry monitor, tripod and cables. Even though this setup is in an old suitcase with wheels. it’s very difficult to move around, and I have to download and edit the footage afterwards. This means that the puppet cannot interact live with an audience, or another puppet that is not in the same room. I haven’t been able to acquire the equipment required to live stream from the Handycam to any of the streaming platforms like Facebook live or Zoom yet.
Monitor Puppetry kit with tripod, screen, camera, cables, HDMI Splitter
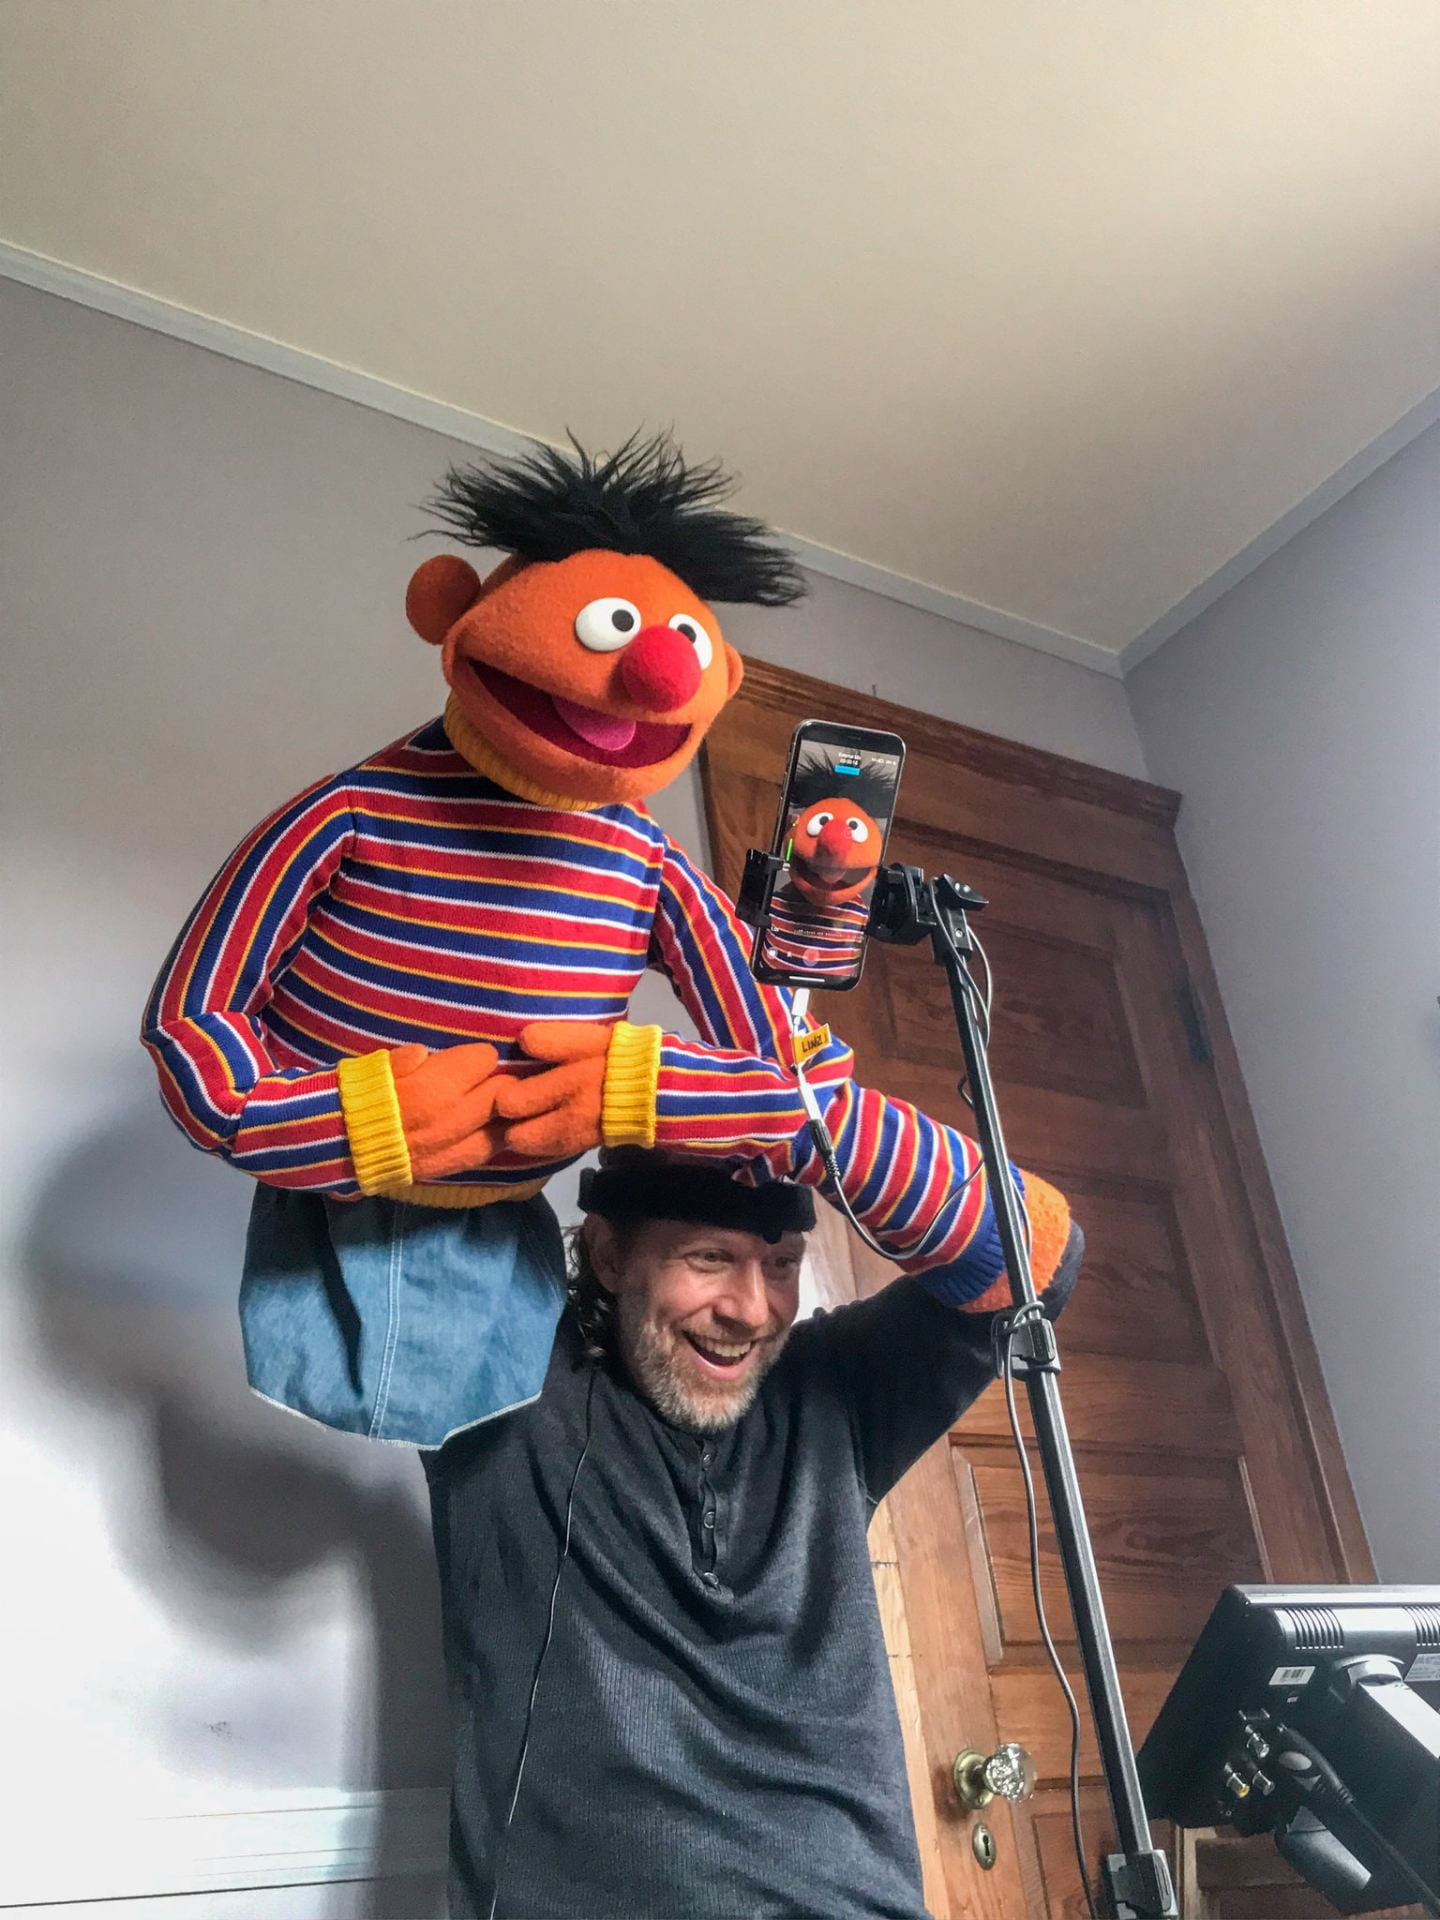
However, on April 14, 2020, my puppetry mentor Peter Linz, shared this photo and a New York Times article on how Elmo’s Playdate was filmed on his Instagram account. I looked at the equipment he was using. It was his mobile phone, linked to his field monitor. The phone was recording the performance, yet he could see what his character Ernie was doing on the monitor. By looking at the cables coming out of the phone in the photo, I immediately worked out I could adapt the equipment I have at home! It was such a creative, innovative solution to the problem!
Peter Linz performing Ernie for Elmo’s Playdate. Photo Credit Aria Linz
So this is how I have been able to reverse engineer the setup. Please note that this setup is for iPhone (I have a standard iPhone 11).
Arduino is not only a fabulous circuit board, but it is also it’s own language with its own grammar and syntax rules. Using the Arduino basics course from Stan Winston School of Character Arts, I was able to program my Arduino Uno board to do some very simple functions.
Such as:
Programming a buzzer to make sound,
https://www.instagram.com/p/Bc2wpS1DkmI/
Programming a servo to move,
https://www.instagram.com/p/Bc2zdigDI8r/
Making my first code!
https://www.instagram.com/p/Bc5f4qmjA_9/
Which has all lead towards me assembling my first actual robot!
I am calling my robot Rosie after the robot in the Jetsons. There are not enough female robots in popular culture and my long term goal is to eventually have Rosie talking like Rosie from the Jetsons! My Rosie is a 2 wheel drive platform from Jaycar, with an ultra-sonic sensor on the front so that she avoids obstacles. Assembling just the platform was tricky as the instructions were hard to find and not linked in the assembly instructions for the whole robot!
The first modification I want to make to the robot is to add a switch so I can turn her on or off. At the moment, I can only turn her off my removing a battery from the battery holder. I also want to experiment with the robot on different surfaces. I was noticing during the first drive that, the wheels got stuck on the thick nylon carpet in my house. I want to compare how Rosie runs on low pile carpet, tiles, and concrete.
What I haven’t been able to achieve yet is to take the Uno board and several other components and write custom code for it yet. So far, I am relying on code that is available in the Arduino Library or on project sheets. My next experiment for Rosie is to add a line trace module to Rosie’s base chassis and see if she can follow a line. My next experiment in coding is to see if I can combine a button press input to a potentiometer and make a joystick work.
In 2018, I will be teaching stand alone STEM classes instead of puppetry. First thing I want to say is I don’t like the acronym STEM which stands for Science Technology Engineering and Mathematics. I prefer STEAM with the A standing for the Arts. Creativity is a very important component when solving real world problems, and in STEAM, creativity is included under A for Arts. For the purposes of this blog, I will refer to the new course as STEAM. So, if you prefer to leave the A out, that’s fine, but I will be all inclusive and call it STEAM.
I have never taught STEAM as a subject before. I have taught many students and colleagues a great deal about using technology to solve problems in teaching and learning but not within the framework of STEAM. I have also used a great many principals of STEAM within my puppet building, through project based learning, iterations and 3D printing. I will be teaching stage 4, which so far, has no program or resources that I am aware of, that can guide my preparation over summer. My school does have access to the amazing iSTEM Syllabus and online resources but the course I am teaching cannot overlap that sensational course.
So what am I doing to prepare myself for an unknown course?
I am creating a STEAM pinterest board of activities and classroom organisation which might help me in the year ahead.
I bought an Arduino starter kit from Jaycar Electronics to start learning how to code my own robots. The best part is I can apply this learning to my puppetry to make my first animatronics move using coding!!!!!!
My Arduino Learning kit with everything to create my first robots!
I am using the Stan Winston School of Character Arts course on Arduino Programming Basics to help me understand the potential that is within this kit.
I have completed my first little project of making an on-board LED light turn on and off by pressing a button! Here are the instructions from Arduino’s website!
Over the last ten weeks, I have been teaching green screen filming to a wide range of faculties at my school. We have had multiple classes in English, Sport, Commerce, and Geography come through and use the green screen. Originally, this started when faculties kept borrowing my green fleece fabric for puppet making to use as a green screen with limited success. Fortunately, I found in a resource catalogue a proper green screen kit with 4 soft box lights which I purchased for my school.
I also purchased a new camera kit for the filming that we are doing at the school for the various projects the school is involved in regarding Teacher Professional development and student teacher experiences. The camera kit contains a XA35 Canon professional camera, a boom microphone, a camera mounted microphone and lapel microphone. Combining the two kits, also gives students an opportunity to use professional equipment, and for me, the opportunity to use professional grade equipment to continue practising my monitor Puppetry skills.
When all the equipment arrived, and I started setting it up, the first thing I needed to learn was how to light the green screen properly. I found a wonderful Lynda.com course that helped me understand how to light the screen properly.
Given the number of students who wanted to film using wide shots, it became necessary to purchase a matching additional green screen from Fotogenic to use as a green floor mat.
I was very surprised that the green screen kit bags did not have built in storage space for the actual screen. I feel that it is very important to keep both of the green screens clean and store it tidly with its frame. I ended up purchasing a Gurli cushion cover from Ikea. It is a perfect size for storing both of the screens folded neatly. It’s also bright green, making it very easy to spot in the storeroom.
The scariest thing about the green screen setup is how easily the lights can fall over and the globes inside smash. When the globe smashed, I was worried that the large 125W globe would be very expensive to replace. I was pleasantly surprised when the replacement globes from Fotogenic were less than $40. To prevent the light stands falling over in the future, I will be purchasing the appropriate sandbags for the lights so they are less likely to tip over when knocked.
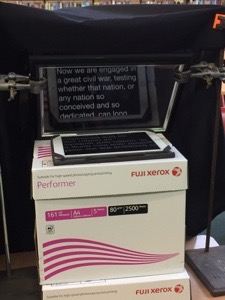
The next amazing thing I learnt while creating the green screen filming kit was how using a teleprompter really helped improve student focus and performance while on camera. The idea for adding a teleprompter came from observing the performance of a year 8 student who is a public speaker and debater. His group was creating a mock- news report, and this student was the news anchor. He delivered all of his lines off the cuff, with enormous confidence, almost directly into the camera. If we had a teleprompter, his performance would have shifted his eye focus directly into the camera, making it professional.
Given in this day and age of ask google and learn from YouTube, I found a number of tutorials online that allowed us to use a school iPad as the prompter display, an old picture frame, 2 science retort stands, a paper box with lids and some black fabric.
The teleprompter apps we have been using is called Teleprompt+3 which is a paid app that works with Apple Watch. This app is great because it links directly to Dropbox and Google Drive, so students could share their script with me and I could bring it up on the iPad with very little delay. The other app we have been using is Parrot Teleprompter which is a free app. Parrot works very well, and I copy the scripts using email or the google drive app and paste the contents into the app. Both apps are easy to use, the speed of the prompter can be changed for the student, as well as the colour and size of the text. In class, we used both an iPad Air2 and a IPad Pro. The most challenging part of the teleprompter setup we were using, was that we could not change the height of the prompter easily. The deputy principal was really excited at how I had created my own prompter, that he wants me to purchase a professional prompter for the school filming kit on an adjustable stand!
Here are some examples of the fun I have had filming with the students at my school:
https://www.facebook.com/MacquarieFieldsHS/posts/1951851818203471
https://www.facebook.com/MacquarieFieldsHS/posts/1915277931860860
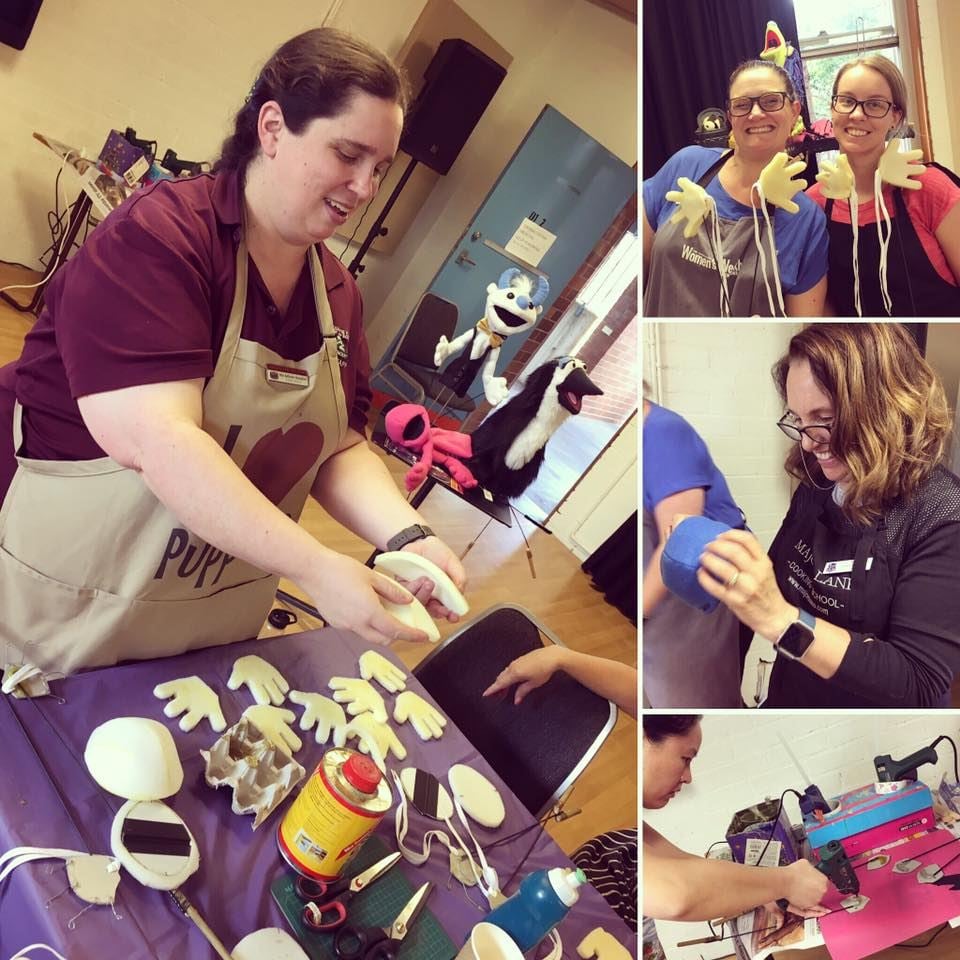
Over 2 days, I had the opportunity to co-lead a Puppetry workshop for Drama Teachers at the Arts Unit NSW. The aim of the workshop was to give Drama Teachers from Primary, Seconday and Special Education settings the opportunity to make a mouth puppet (aka “Muppet” Style) and experience different strategies of teaching puppet performance in the classroom. The Arts Unit is part of the New South Wales Department of Education, and they promote and support all of the Creative and Performing Arts in NSW Public Schools. For me, this was an opportunity to show leadership skills, share how I use Puppetry daily in my school library, as well as showcase my school’s Puppetry class.
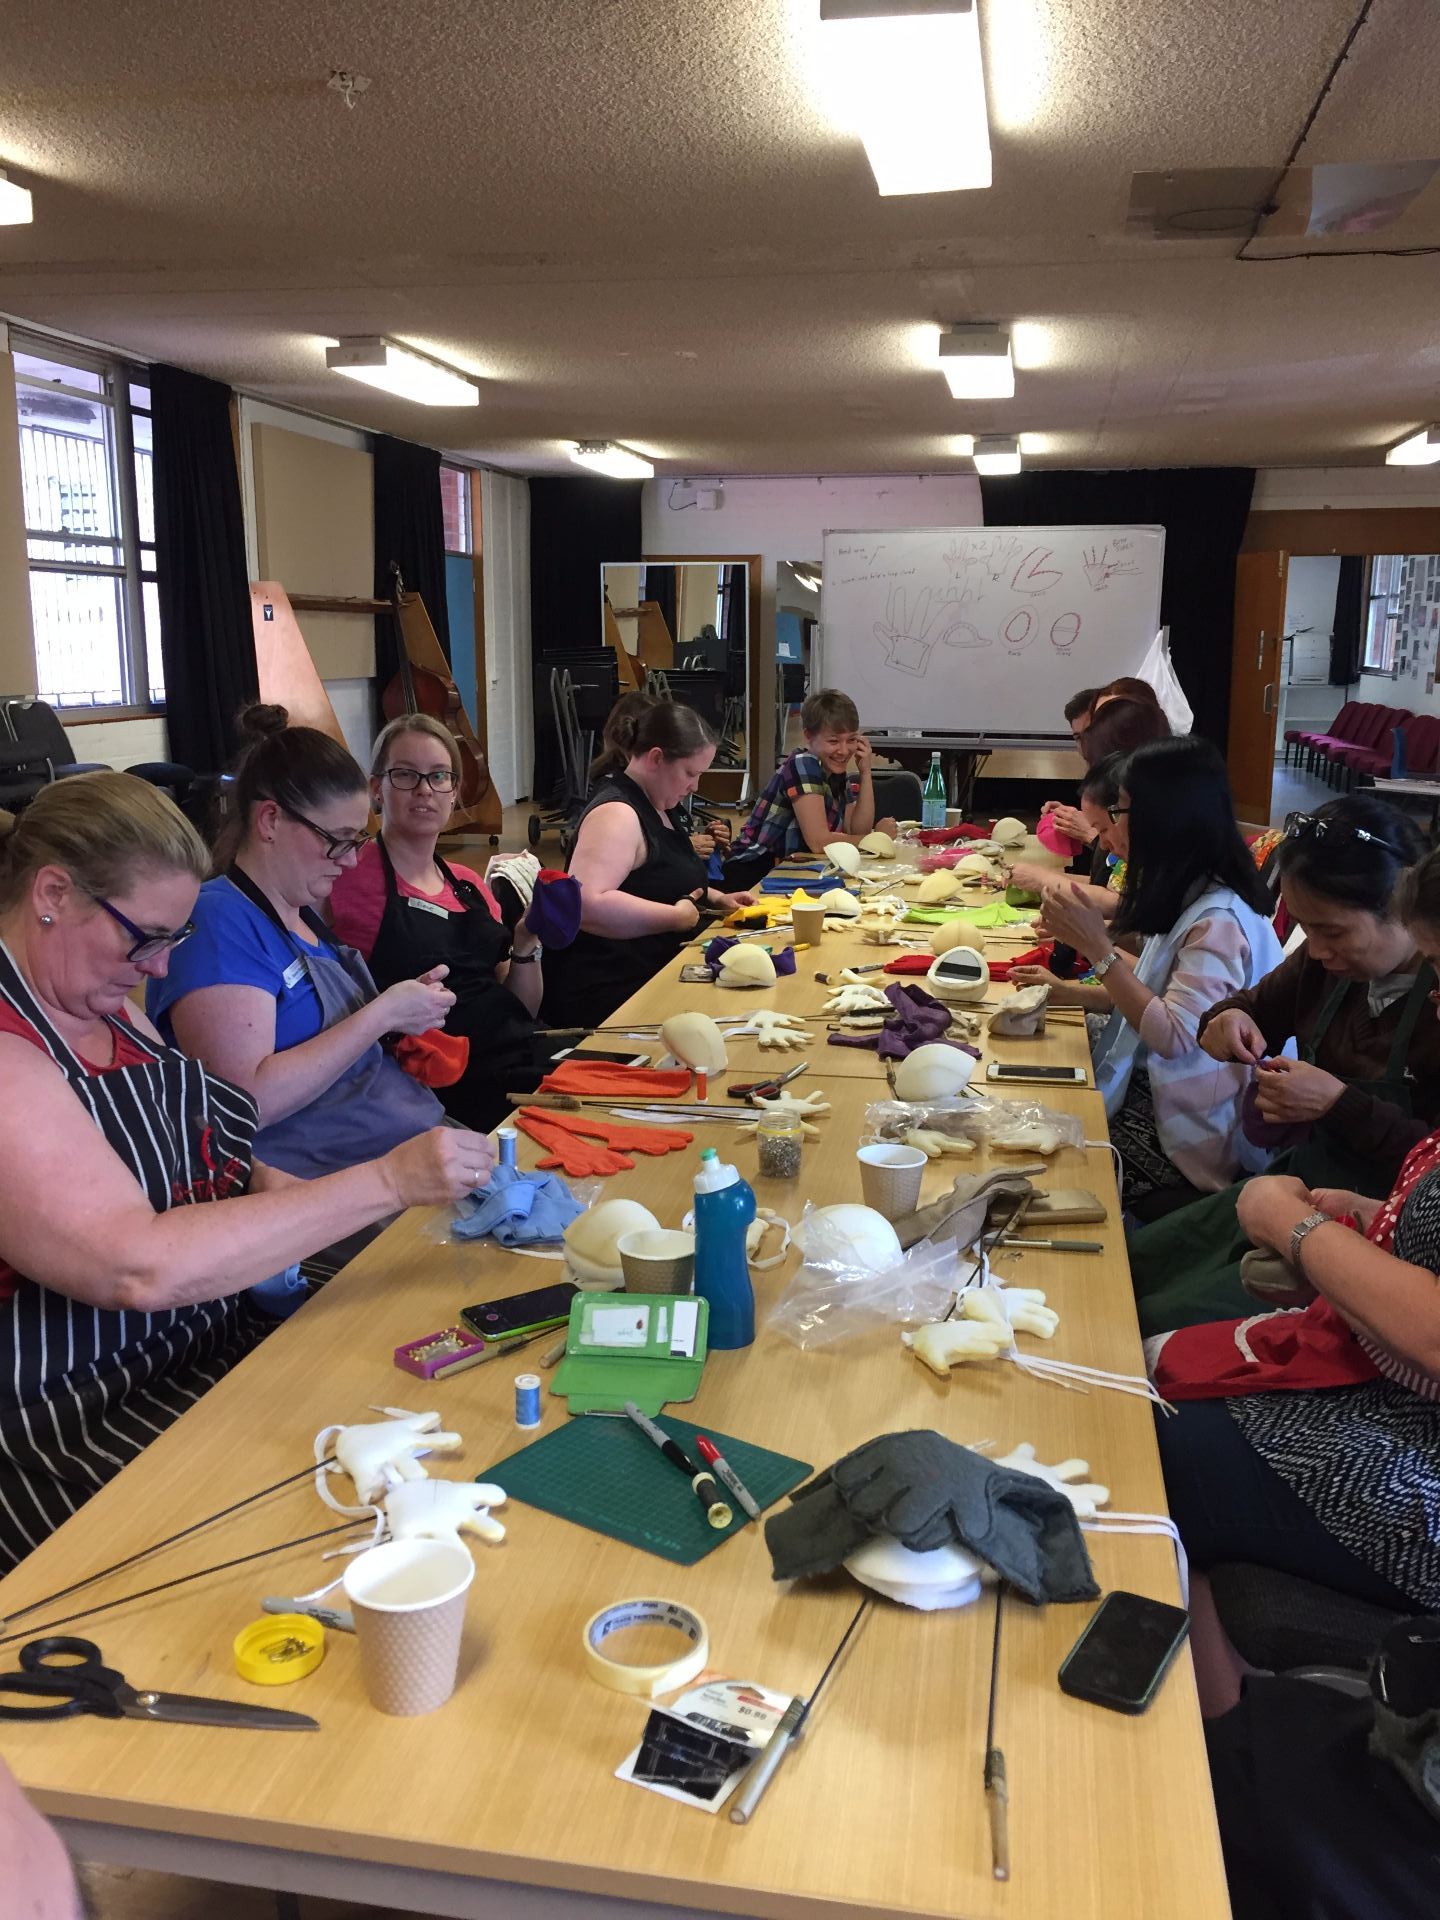
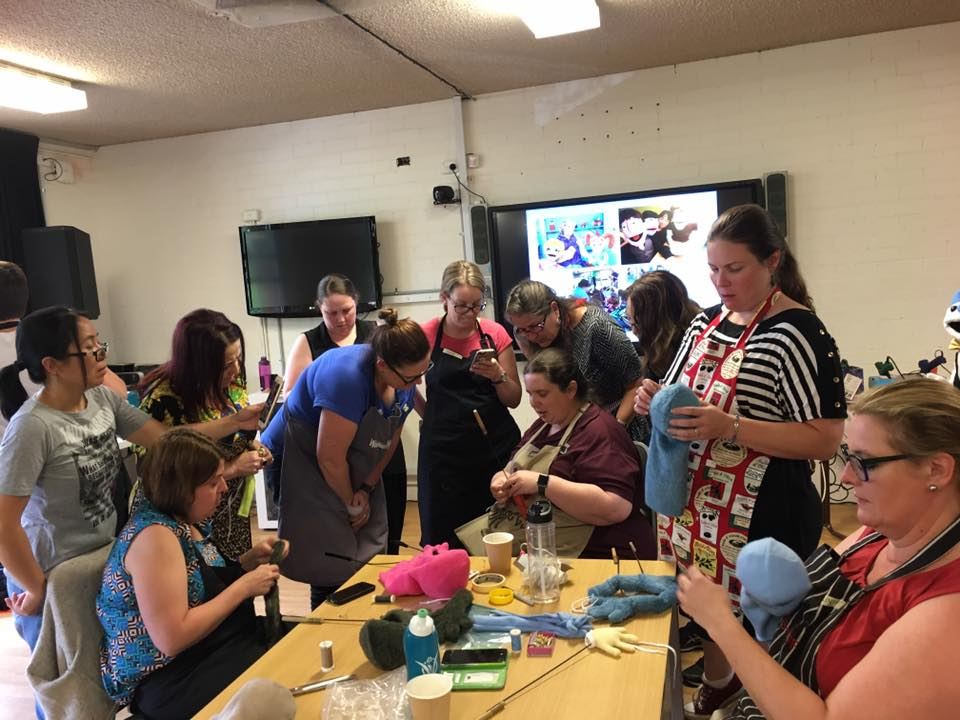
There were 15 participants in the workshop from a wide range of primary schools, high schools and special education settings. My role in the workshop was to teach the puppet building part of the workshop, and share the learning I have been doing in monitor puppetry over the last 3 years at Beyond the Sock. One really interesting thing I noticed about how 21st Century Teachers take notes. I cannpot recall any of the teachers taking written notes. Most of the teachers wanted to film my explanations on their phone or tablet. I had to remember to allow a few moments for the teachers to get into a good position to film the explanation.
What went well:
All the participants had fun! We could not get them to go home at the end of the first day, and the participants arrived at the workshop early on day 2. All the puppets were unique and special!
Having all the kits pre-cut and pre-sewn did save a lot of time and hassle. However, some teachers indicated on their feedback forms that they wanted to see the whole process from the beginning including cutting out the foam and fabric using the patterns. Perhaps I can accommodate that part with a video showing how to cut out the foam and fabric.
Using the dome eyes from Out of the Box Puppets worked really well over the traditional Spoon eyes. It does mean that in potential future workshops, I don’t need to take my whole folding crate of eyes.
Everyone used my 3D printed nose forms, as well as my plastic easter eggs. A few people also used the small dome eyes as nose forms. The participants also enjoyed using my box of precious Antron Fleece scraps to make the eyelids and noses for their puppet.
During the performance side of the workshop, doing a conga line to practise sharing the frame was a great deal of fun. It meant that the participants did not have to worry about their puppet standing straight and maintaining eye focus into the camera. The participants could just have fun with the frame.
What could be improved next time:
Give the participants 2 pieces of wire each and use florist wire instead of galvanised wire. Florist wire is easier for inexperienced puppet builders to bend, but the fingers of the puppet will not be as strong.
Need to have at least one pair of pliers per person as it was too difficult to have just 5 pairs of pliers for 15 people. Many participants had to wait a long time between steps because there were not enough pliers.
Have just the instruction portion only of the pattern from Project Puppet on the Smart TV/ or as printouts for participants to follow
if they are running behind the rest of the workshop,
didn’t listen to the verbal instructions or missed the demonstration.
It would also be helpful for people who have a gift for building to move ahead of the group.
The puppets to only have one arm rod. The other hand could be safety pinned/ stitched to the body of the puppet. It would make manipulation easier for beginner puppeteers
The neck and body join could be pre-sewn. It would save time during the workshop. It would mean that the only sewing for participants would be the mouth felt and the hand slits.
Drama Teachers hand sewing parts of their puppet's "Skin".
Collection of photos of the drama teachers making their puppets and me demonstrating the steps.
Me demonstrating how to do the ladder stitch to close the arm rod slit in the hand of the puppet.
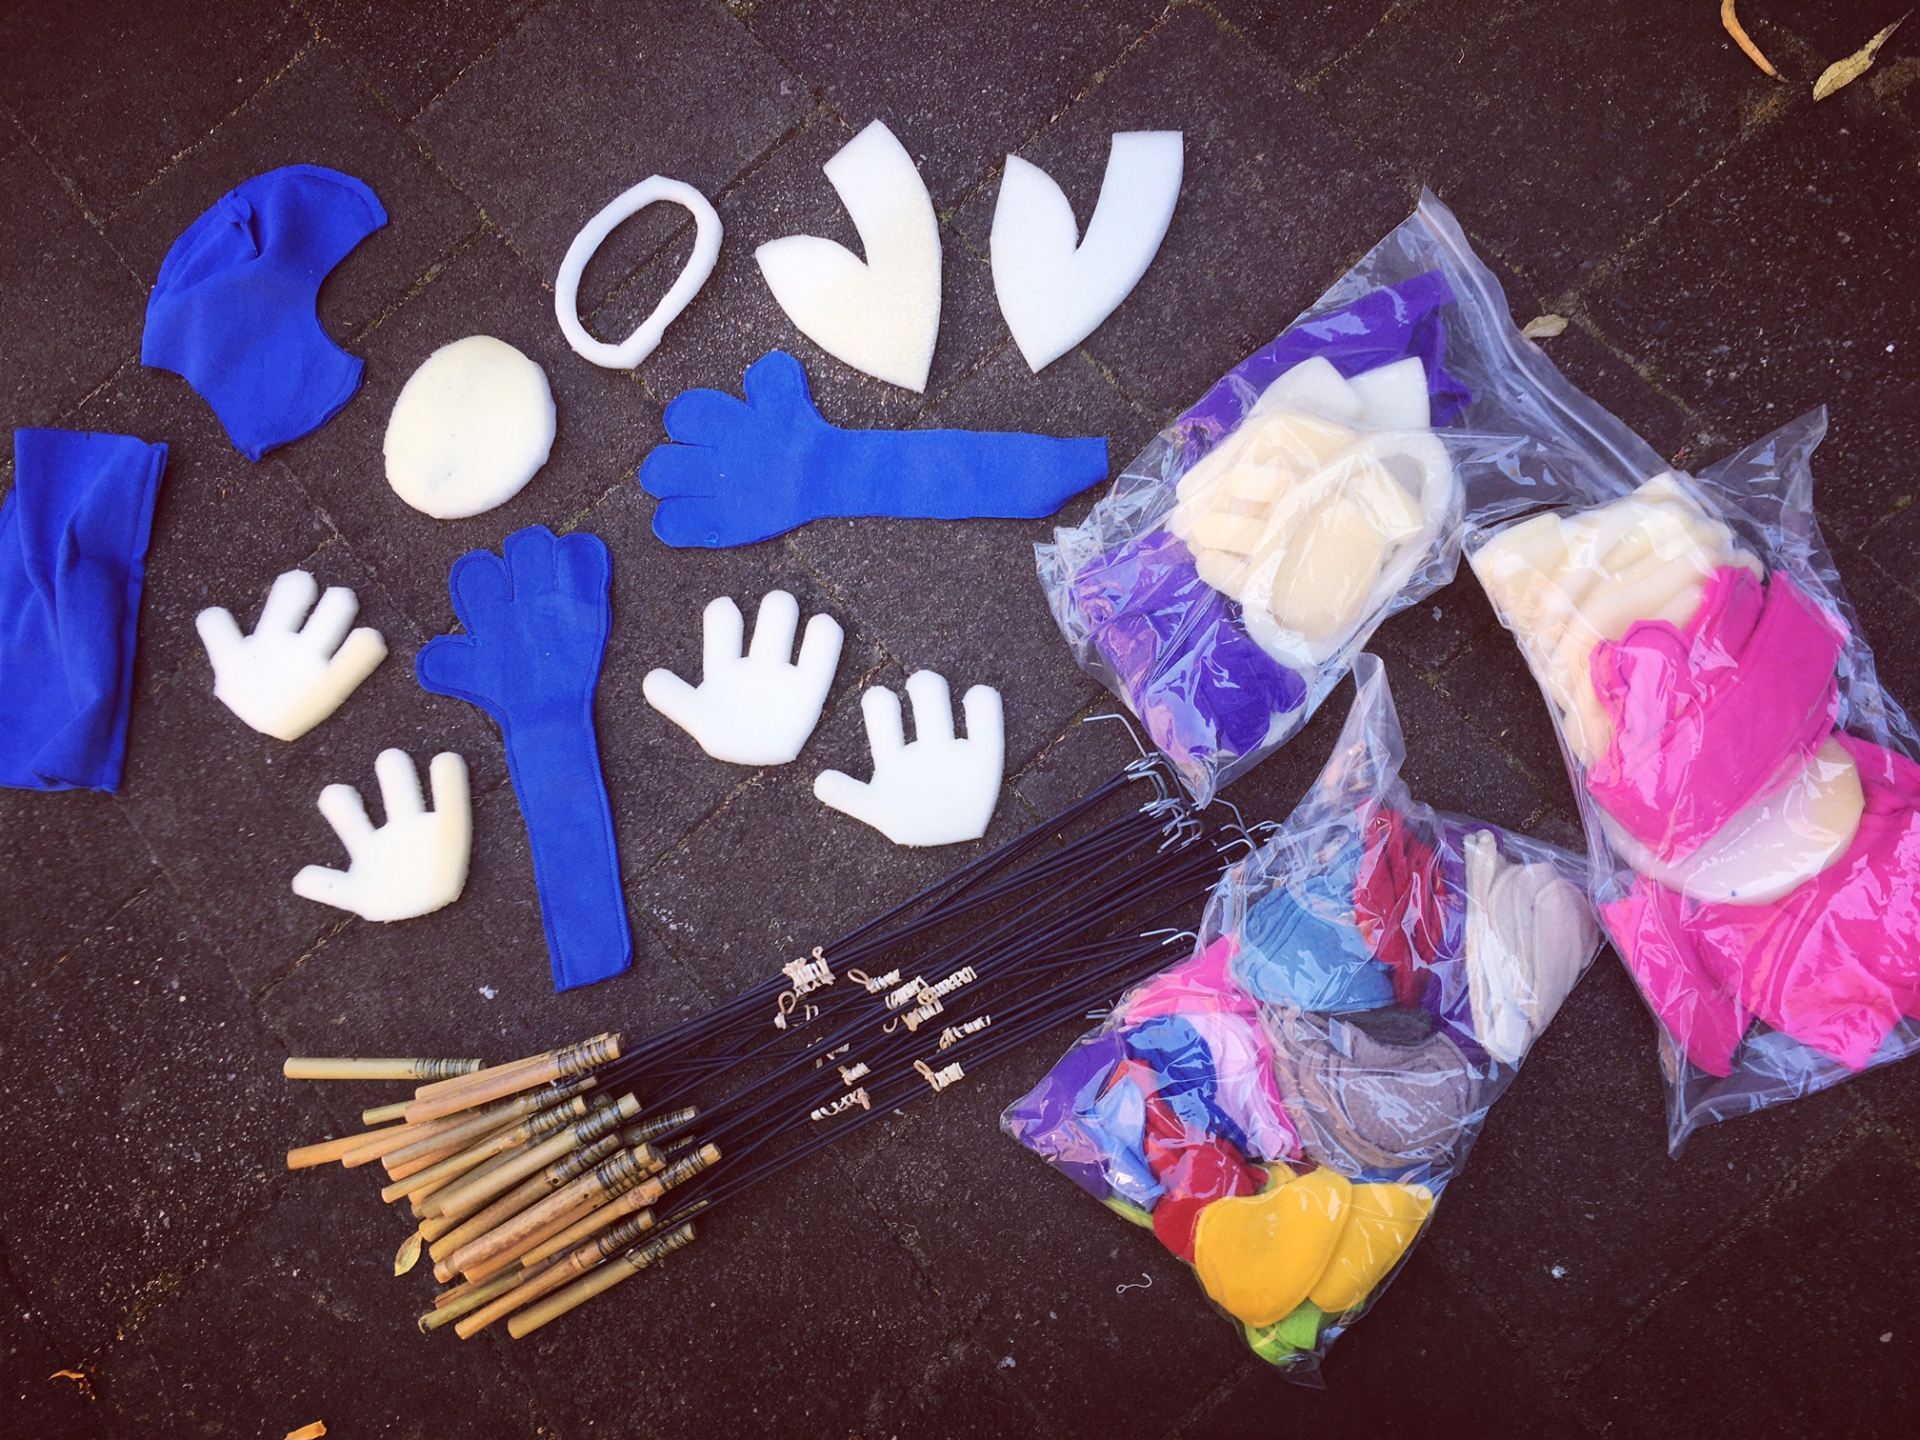
Overview of the puppet kits that were pre-made for each participant.
Today is Celebration Day! All the work over the last 2 months on Totoro came together today!
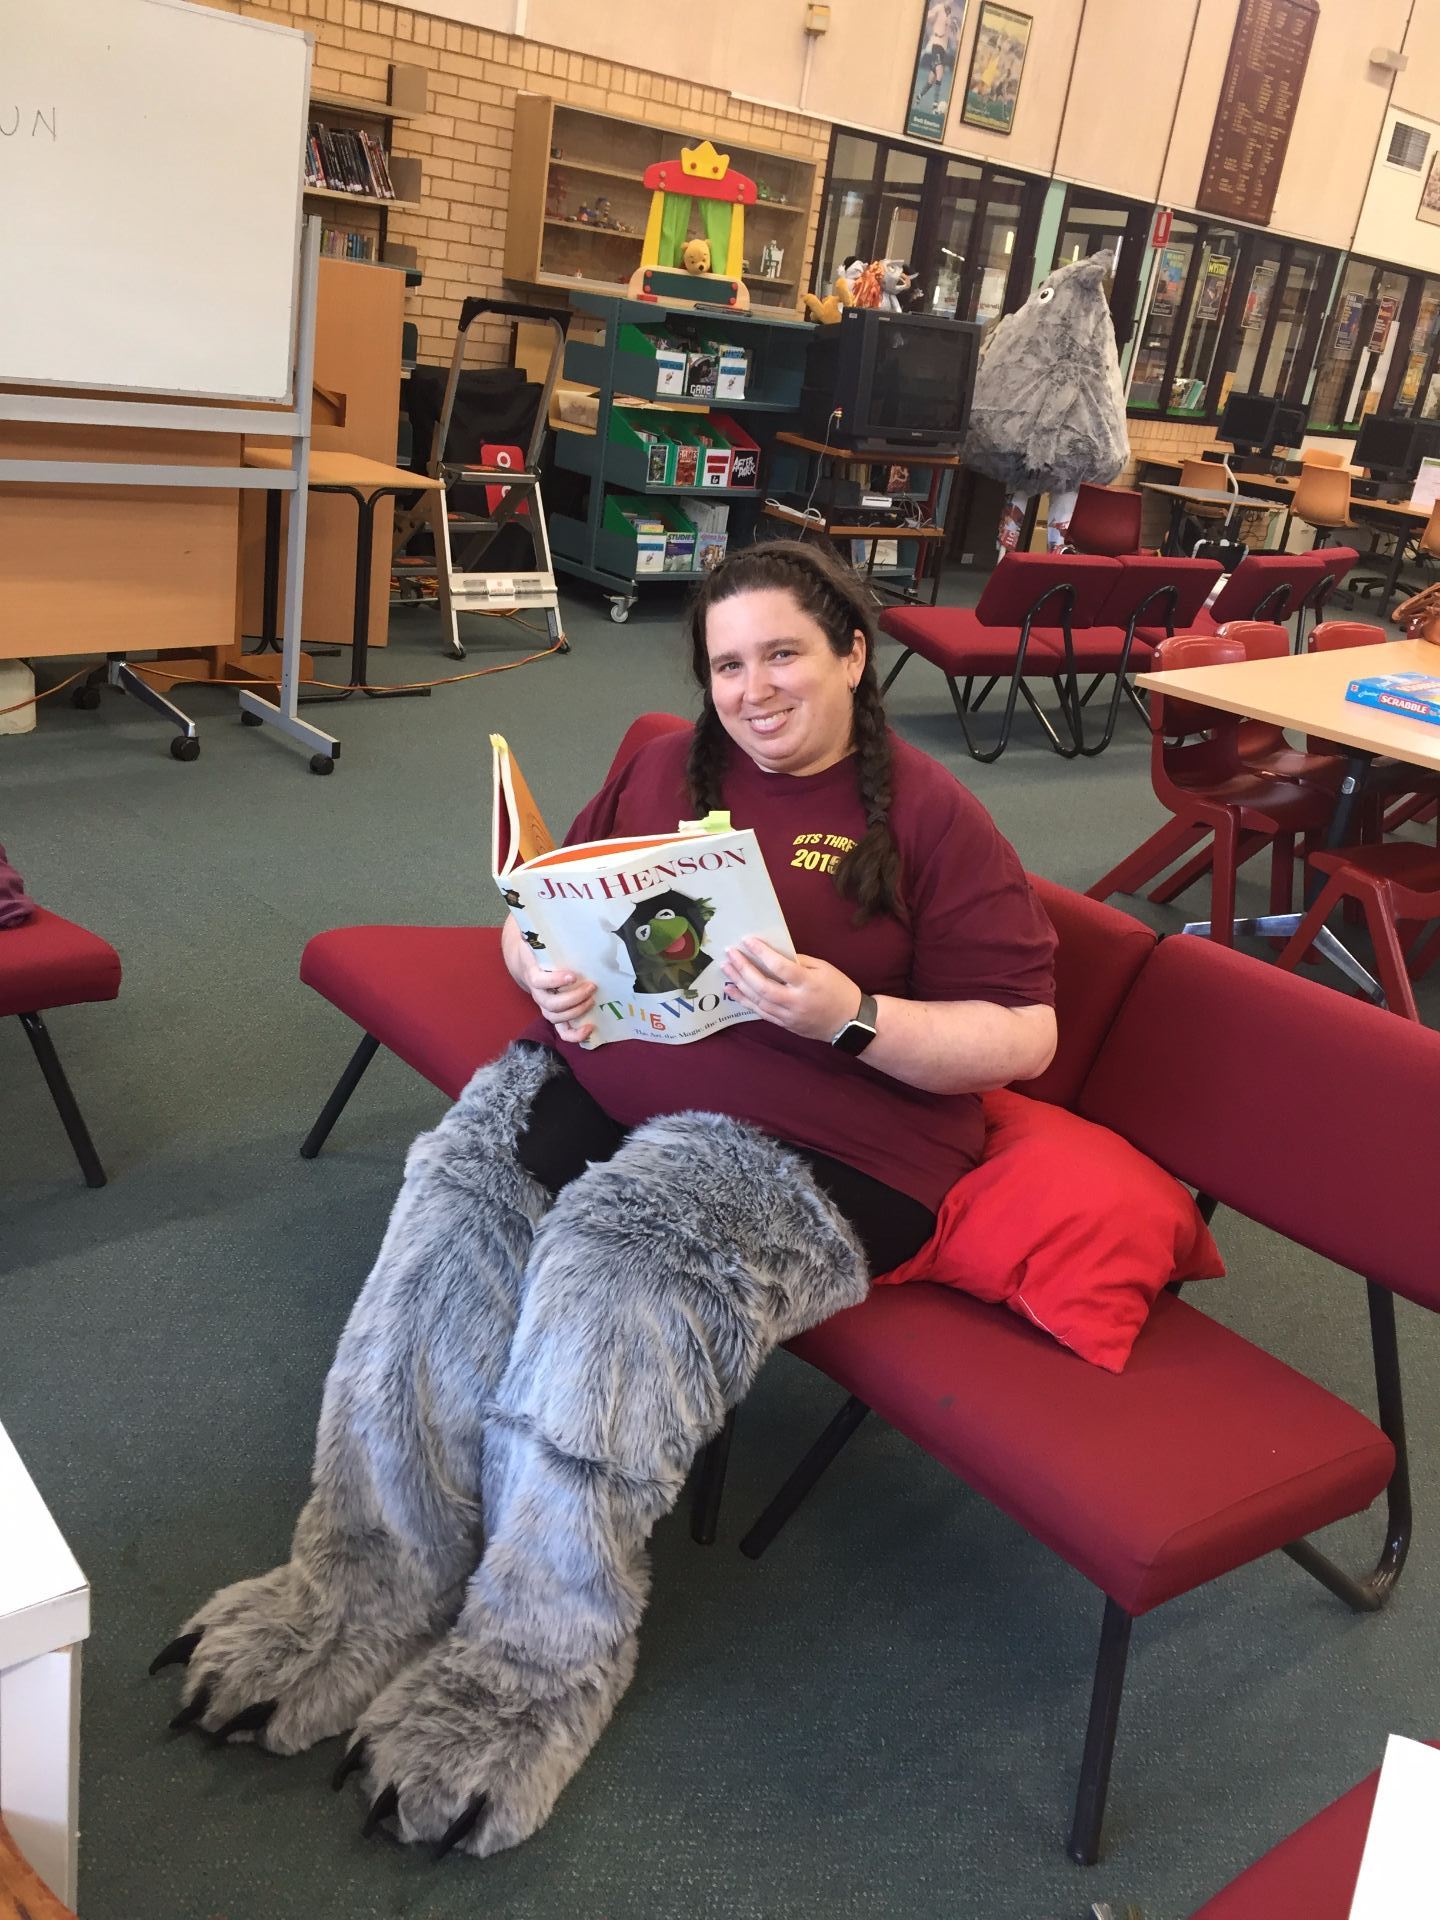
The day started by putting on the legs of Totoro. I then had an hour to wait until the opening ceremony of Celebration Day so I read my favourite book- Jim Henson The Works. My colleagues took a photo of me reading because they know that one of my favourite Muppet pictures is of Richard Hunt reading the newspaper while wearing the legs of Sweetums.
Getting ready to be Totoro- reading my favourite book.
I had entered my Totoro puppet in the Costume Parade. We had to wait 30 minutes in the school hall for the parade to start. While waiting, and shortly before the parade was to start, I was showing the students how the whole costume comes together. As soon as the backpack took the full weight of the puppet- a section in the middle broke- one of the struts had come out of the t-joint, and the puppet fell onto me. I could not fix the backpack in the hall, so I had to leave it behind and hold up the whole costume with my left arm during the costume parade.
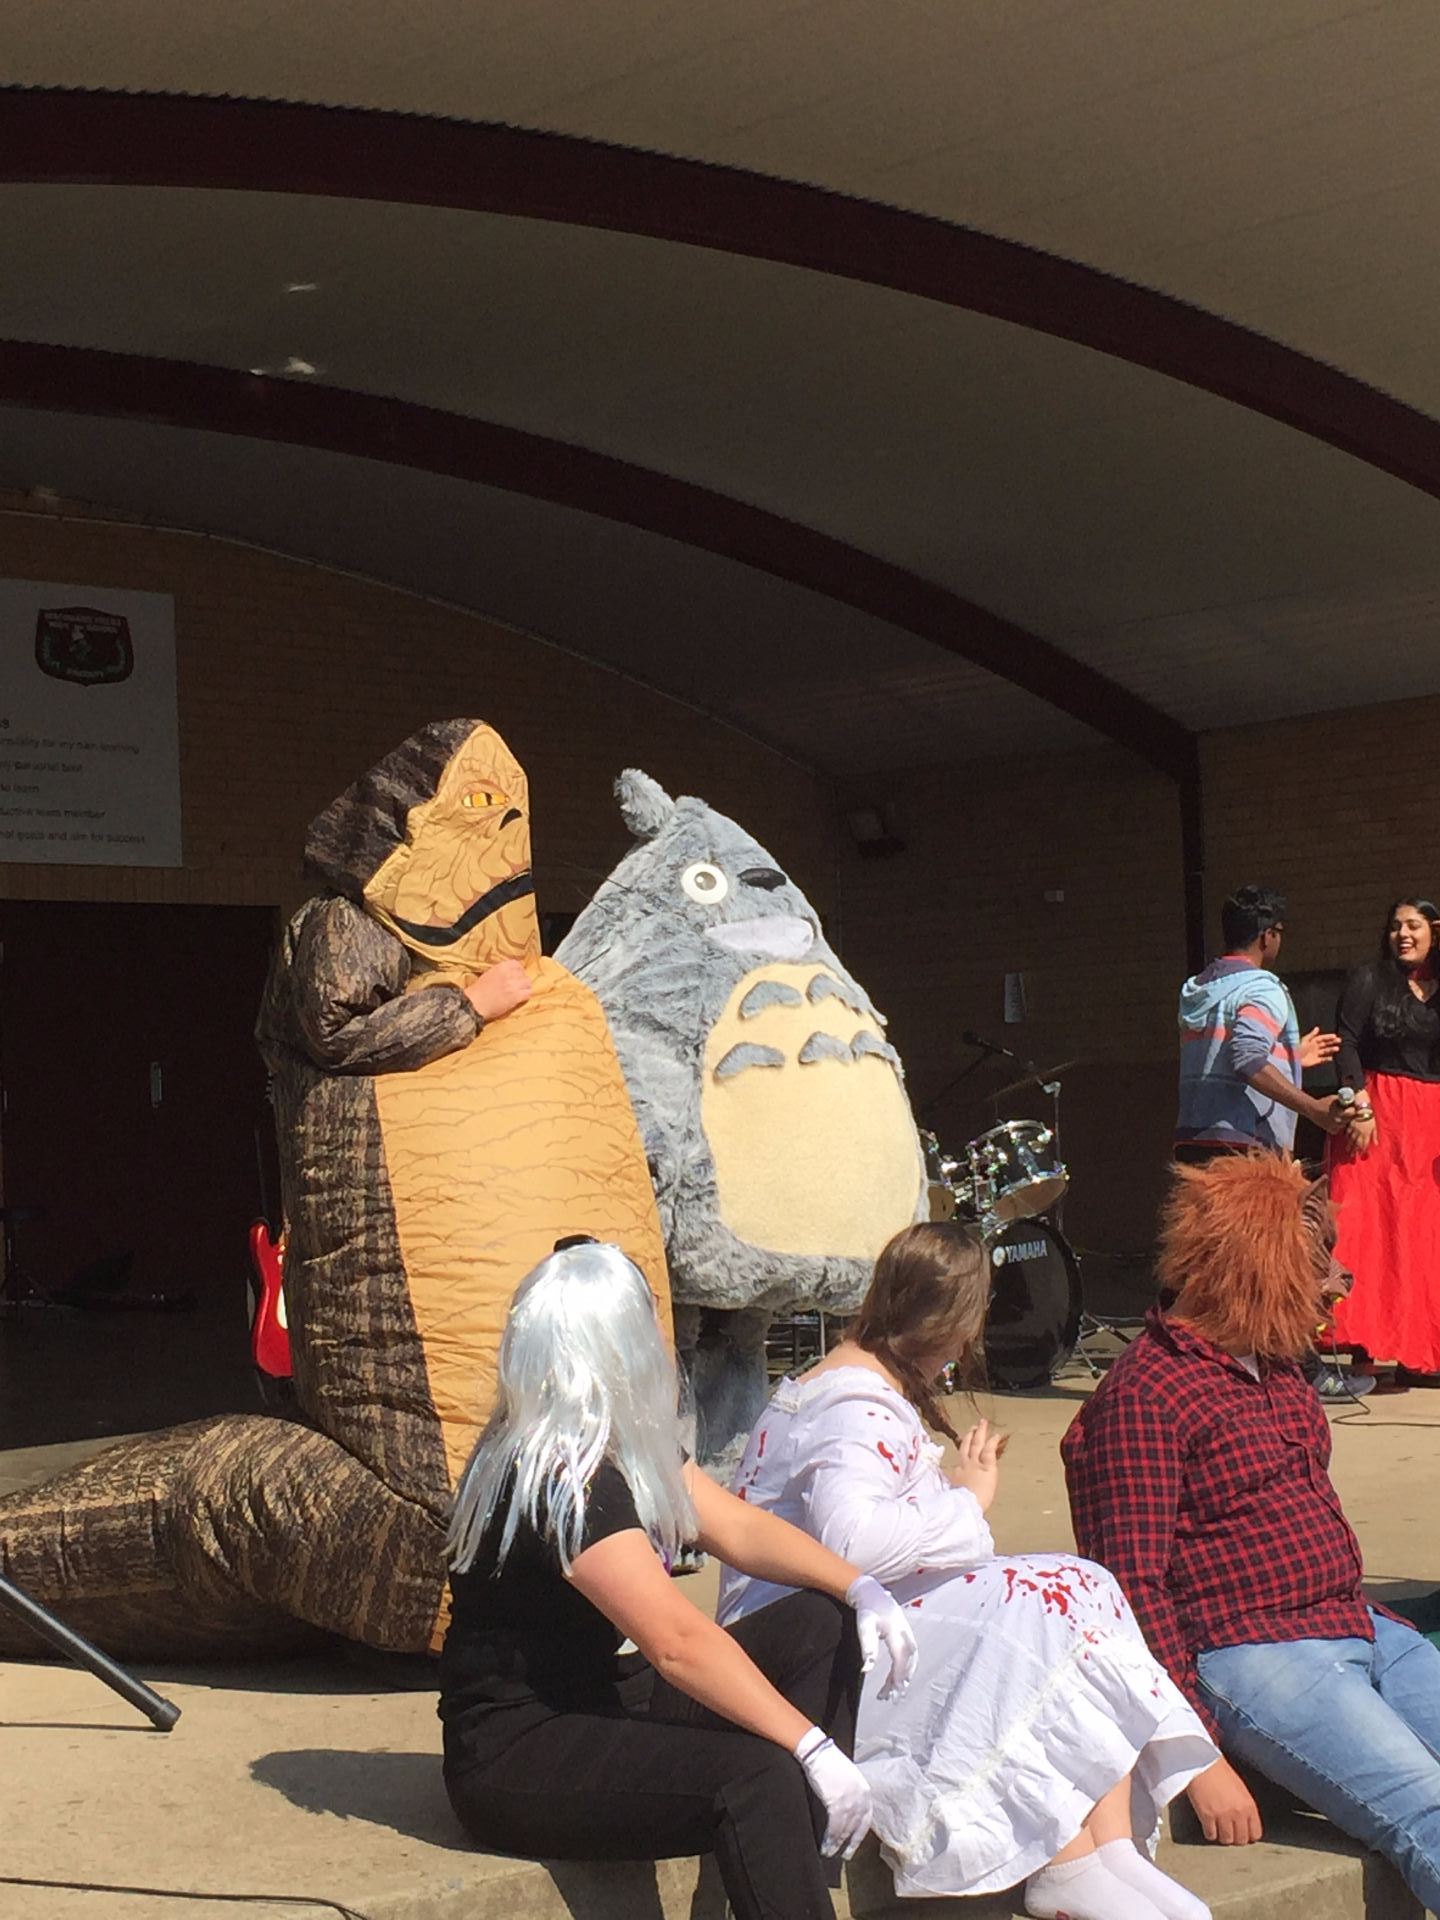
Walking out of the hall during the costume parade was an amazing experience. As soon as Totoro appeared, the whole school roared and cheered for him! Because the hall door and back part of the stage was in shadow, it was quite easy to see where I was going. As soon as the sunlight hit the mouth, I could barely see where I was going. Fortunately, I did not run into any of the obstacles on stage, or run into the students who were at the front of the stage as part of the parade. A colleague of mine, standing next to me, was dressed as an inflatable Jabba the Hutt. We made a very funny pair.
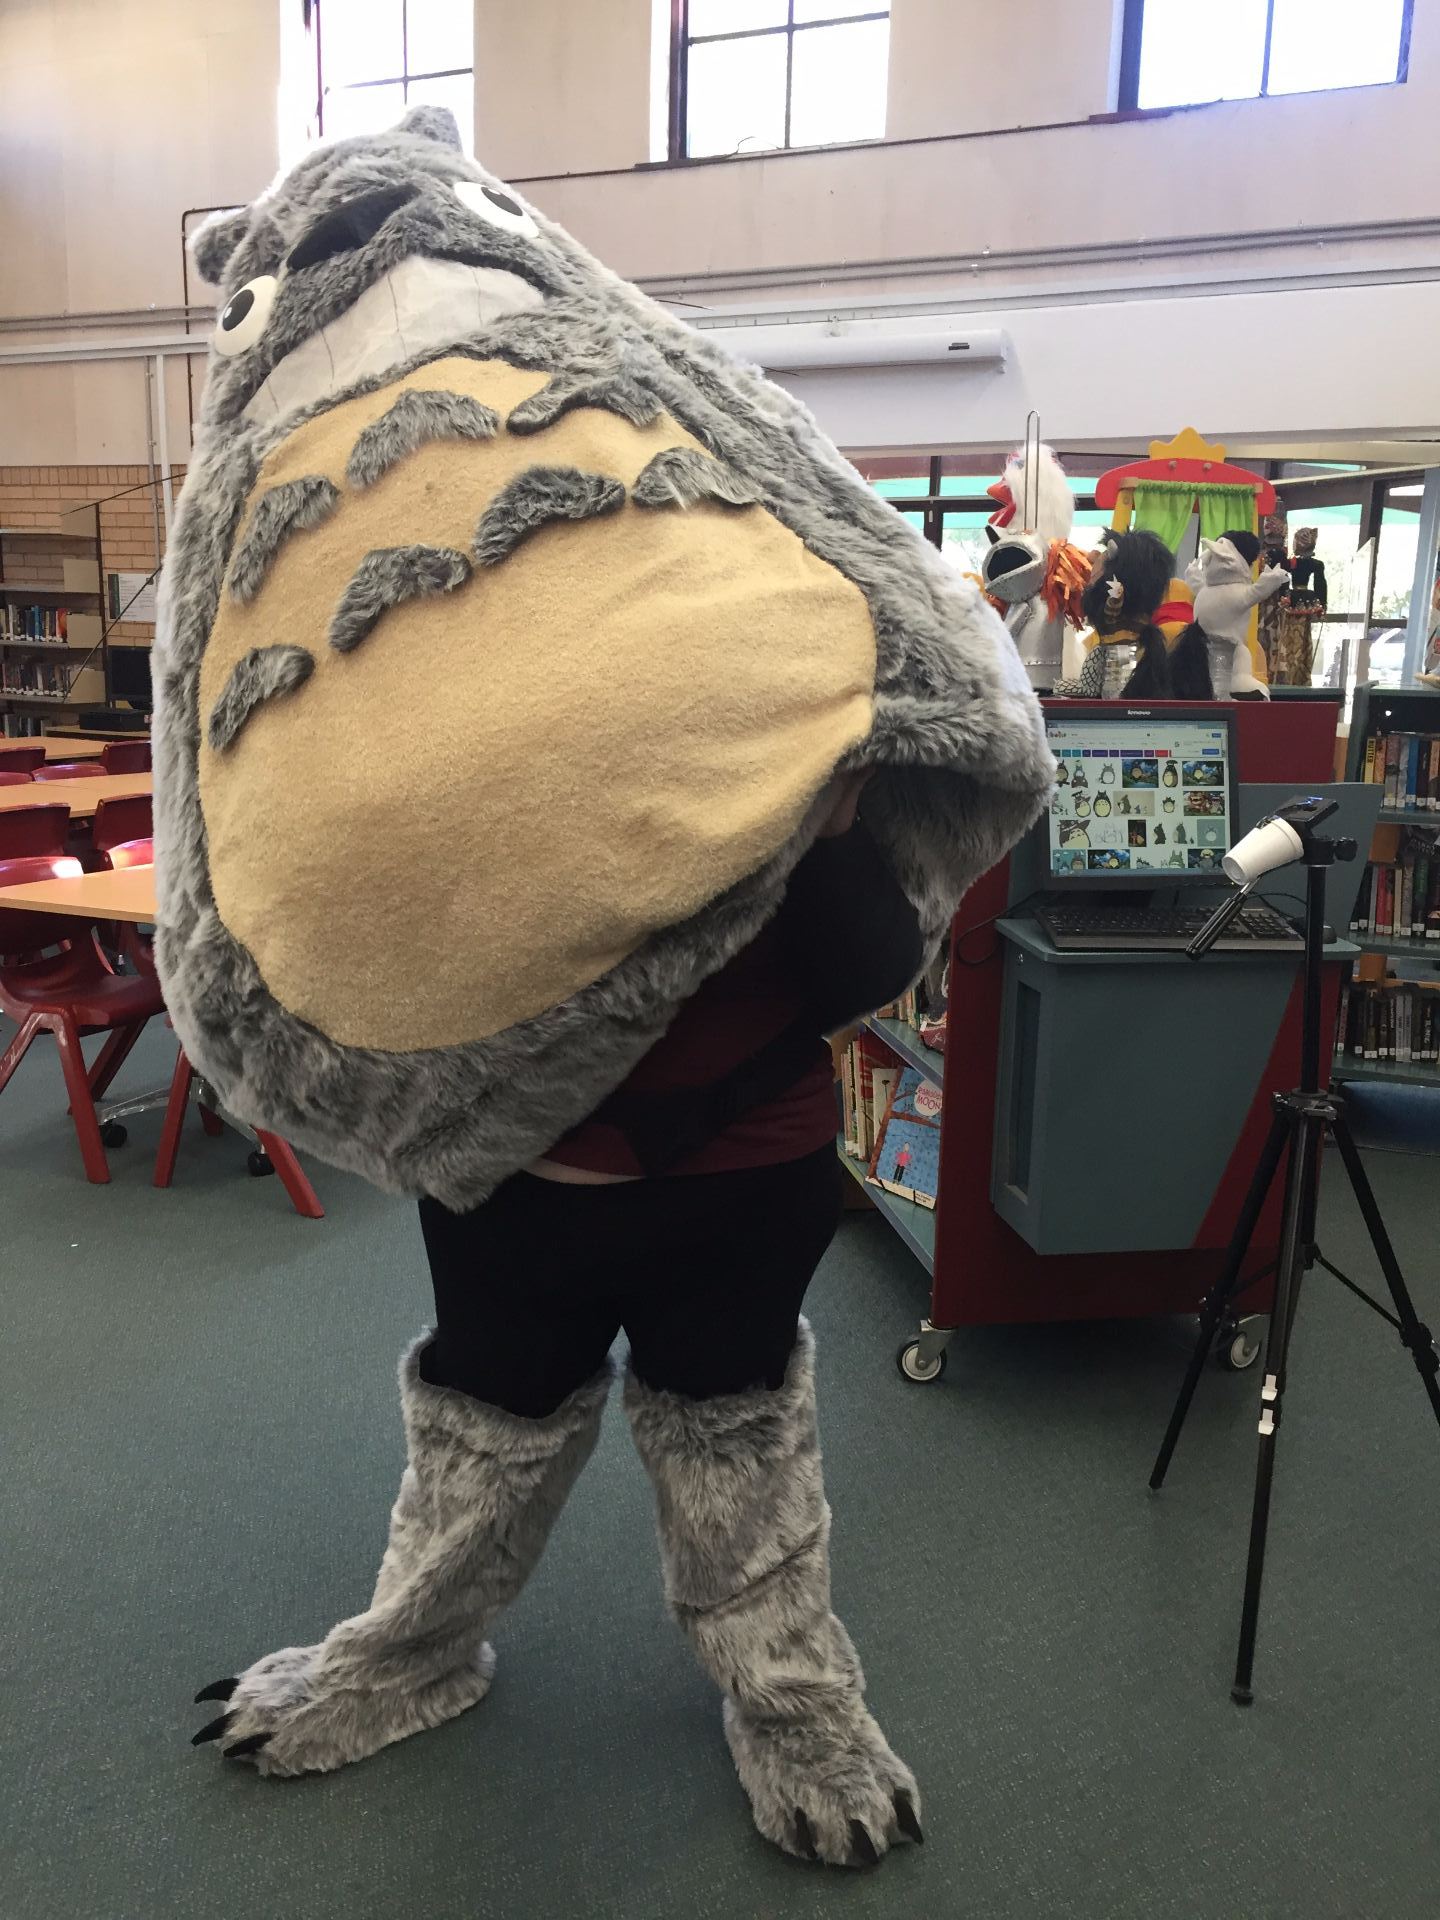
After the costume parade was over- I walked back into the hall and took Totoro’s top half off. I had been holding him up for 15 minutes. After the Opening ceremony was over, I put Totoro back on for 10 minutes so that the students could get selfies and hugs from Totoro, and so I could take him over to the Photo Booth to take a few silly pictures. Afterwards, I completely changed out of Totoro so I could run the puppet table during the day. All up, I was in Totoro for 2 hours. It gave me a new understanding and appreciation for what my puppetry teachers go through when they perform costume characters.
Builiding Totoro has been an amaxing experience. I have learnt a great deal about making big puppets, but I still have a lot to learn about joing PVC conduit. Thanks go to my amazing Library assistants who helped with many sections of the build, and thanks are also due to Adam Savage for sharing his build methodology in the original inspirational video. I could not have done it without that original video.
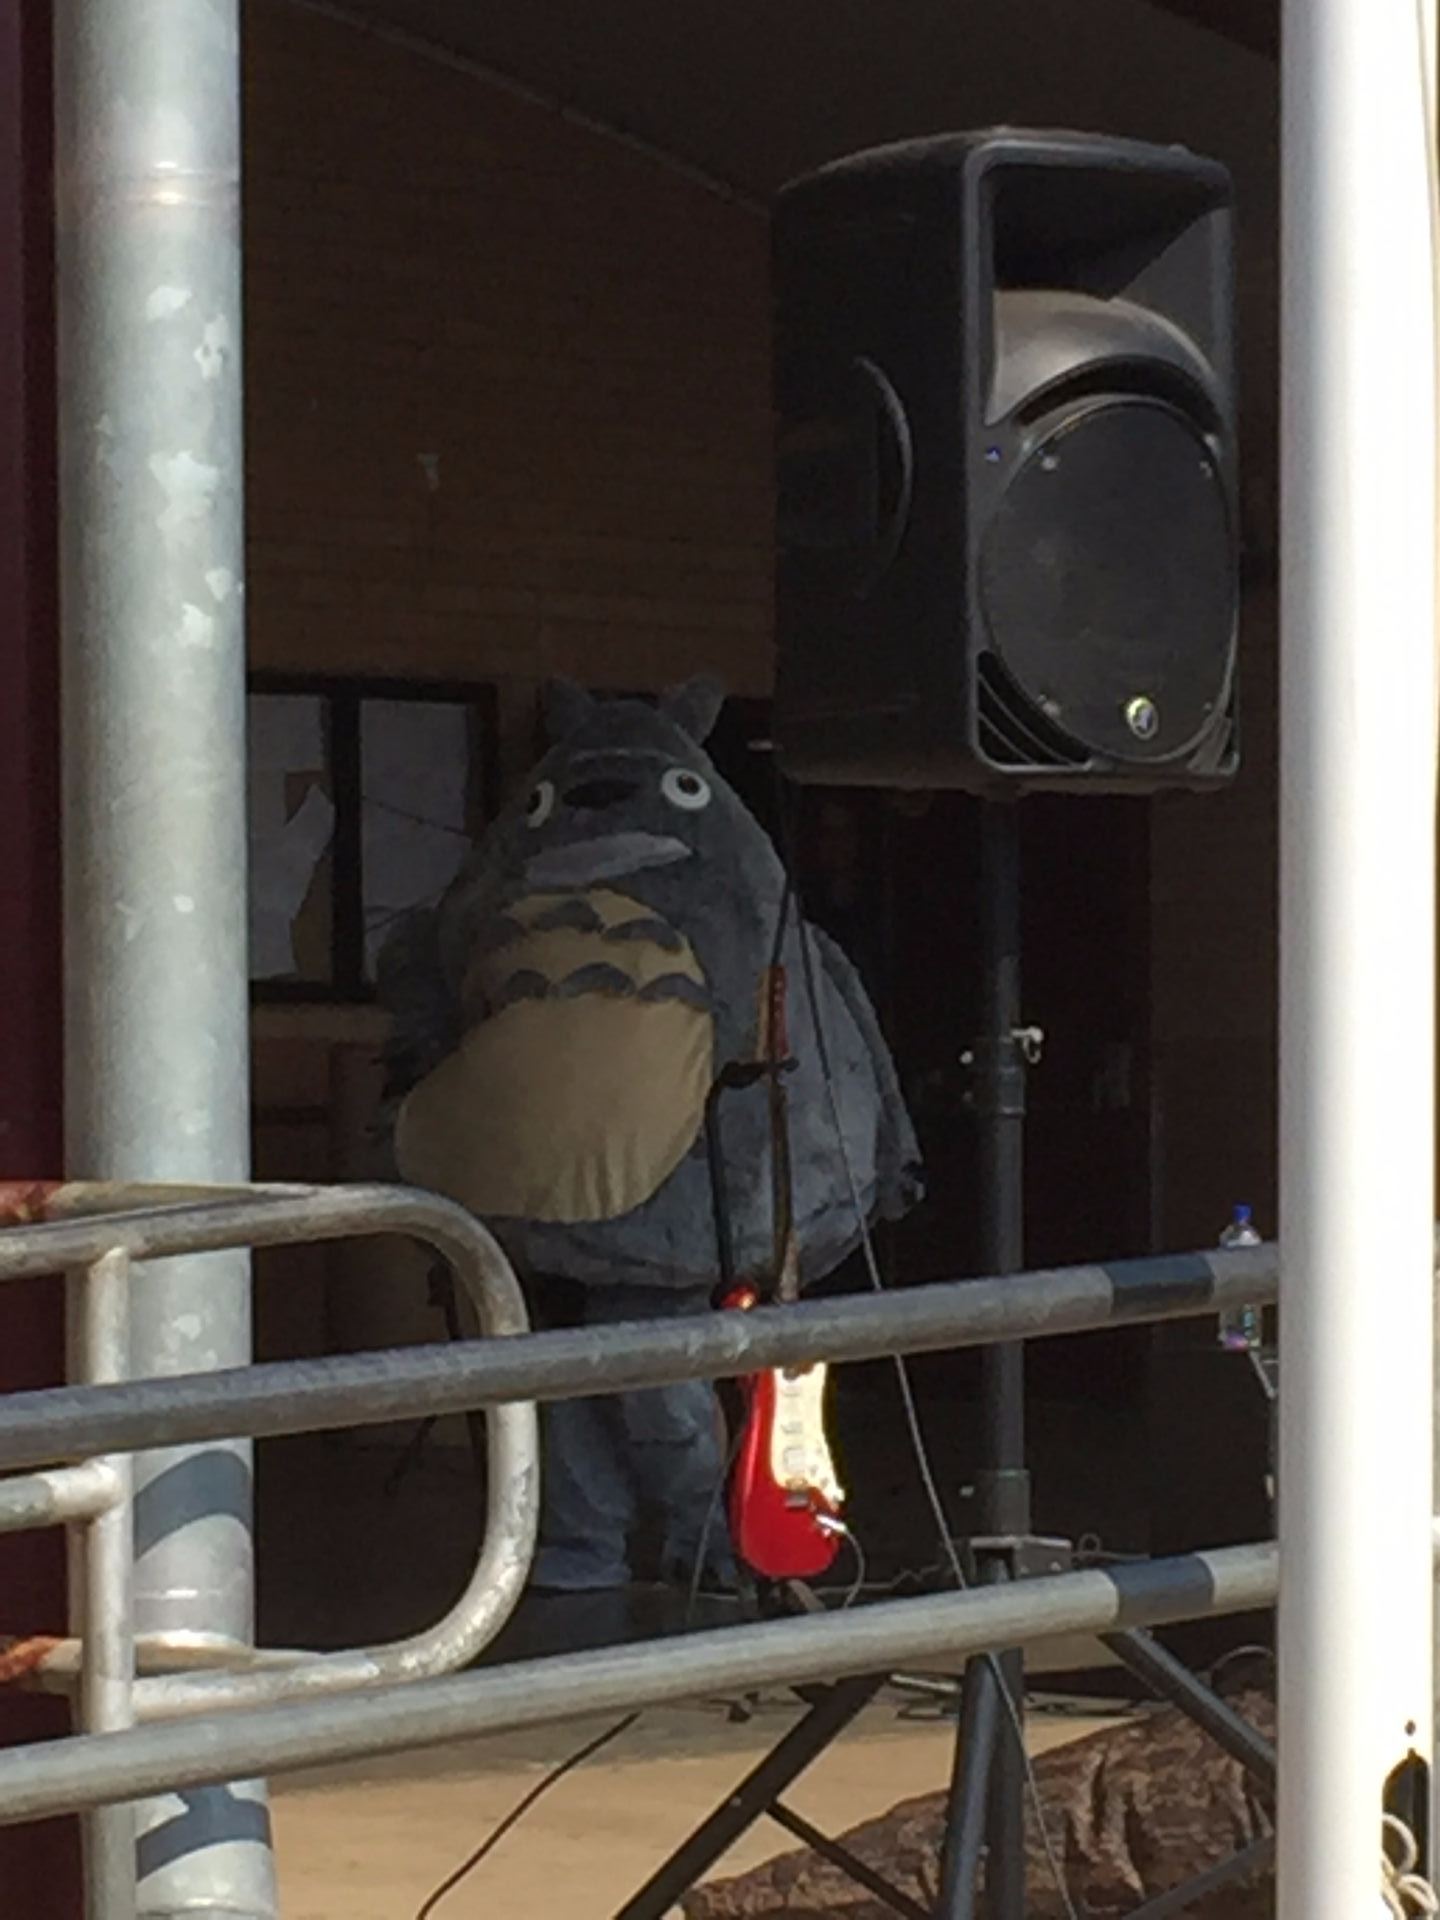
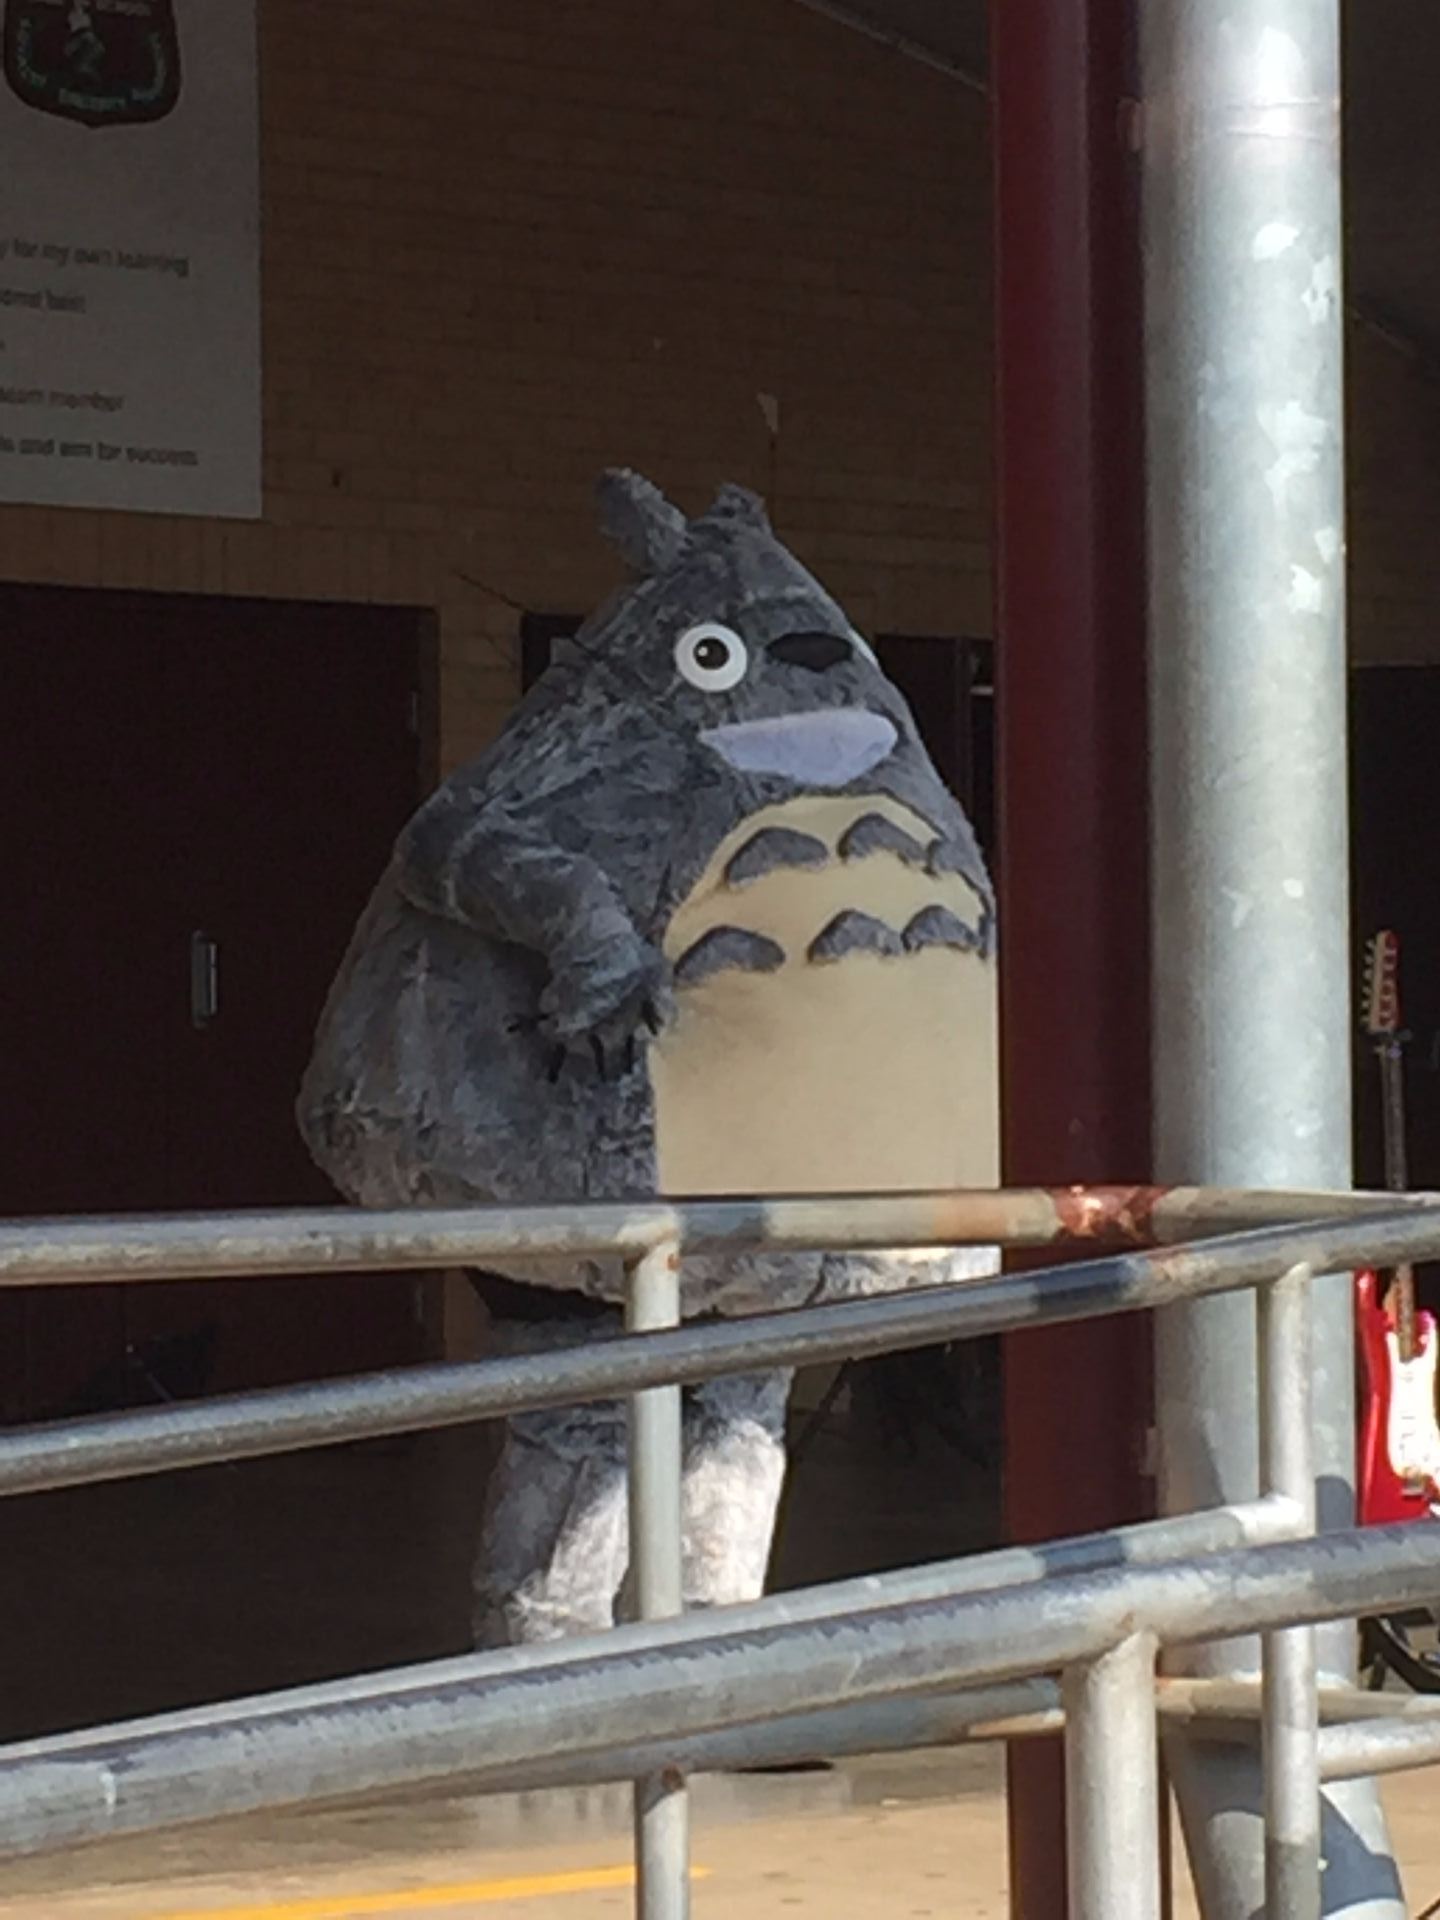
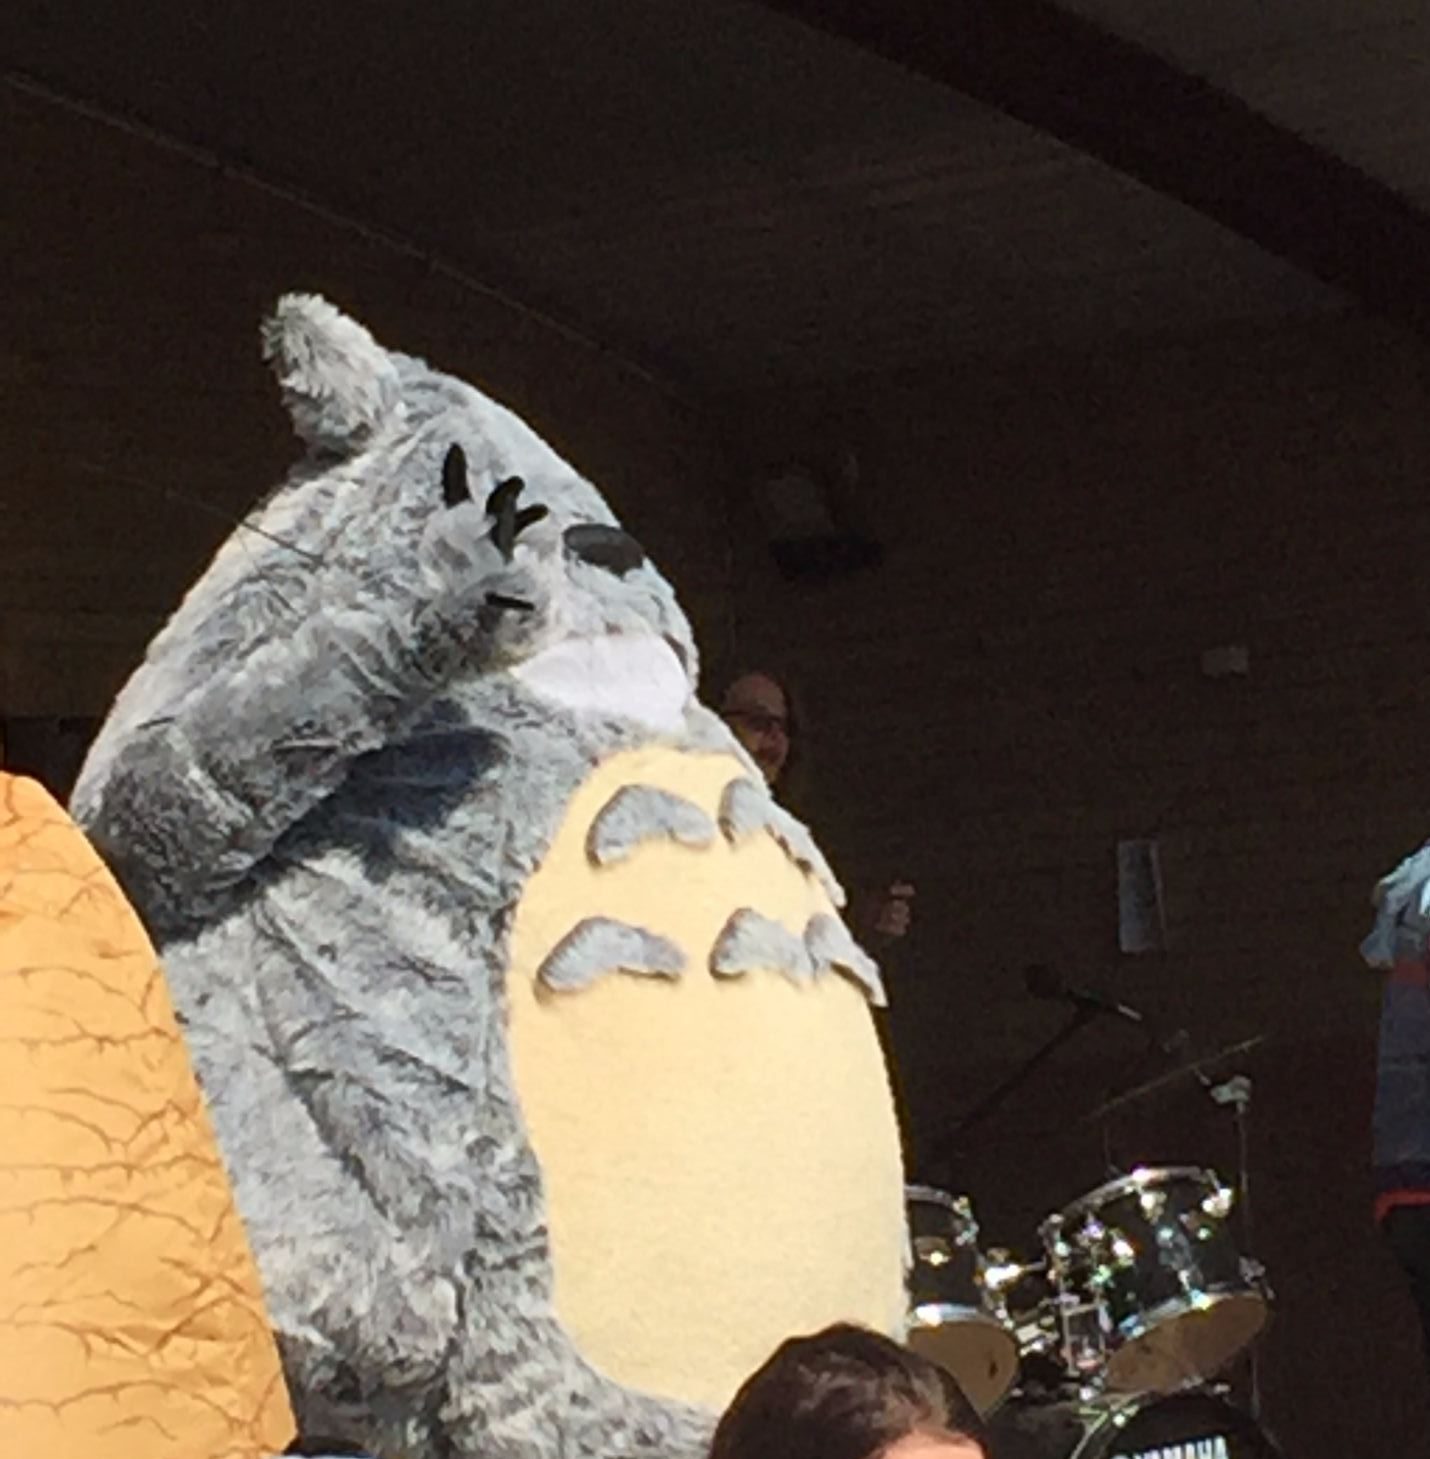
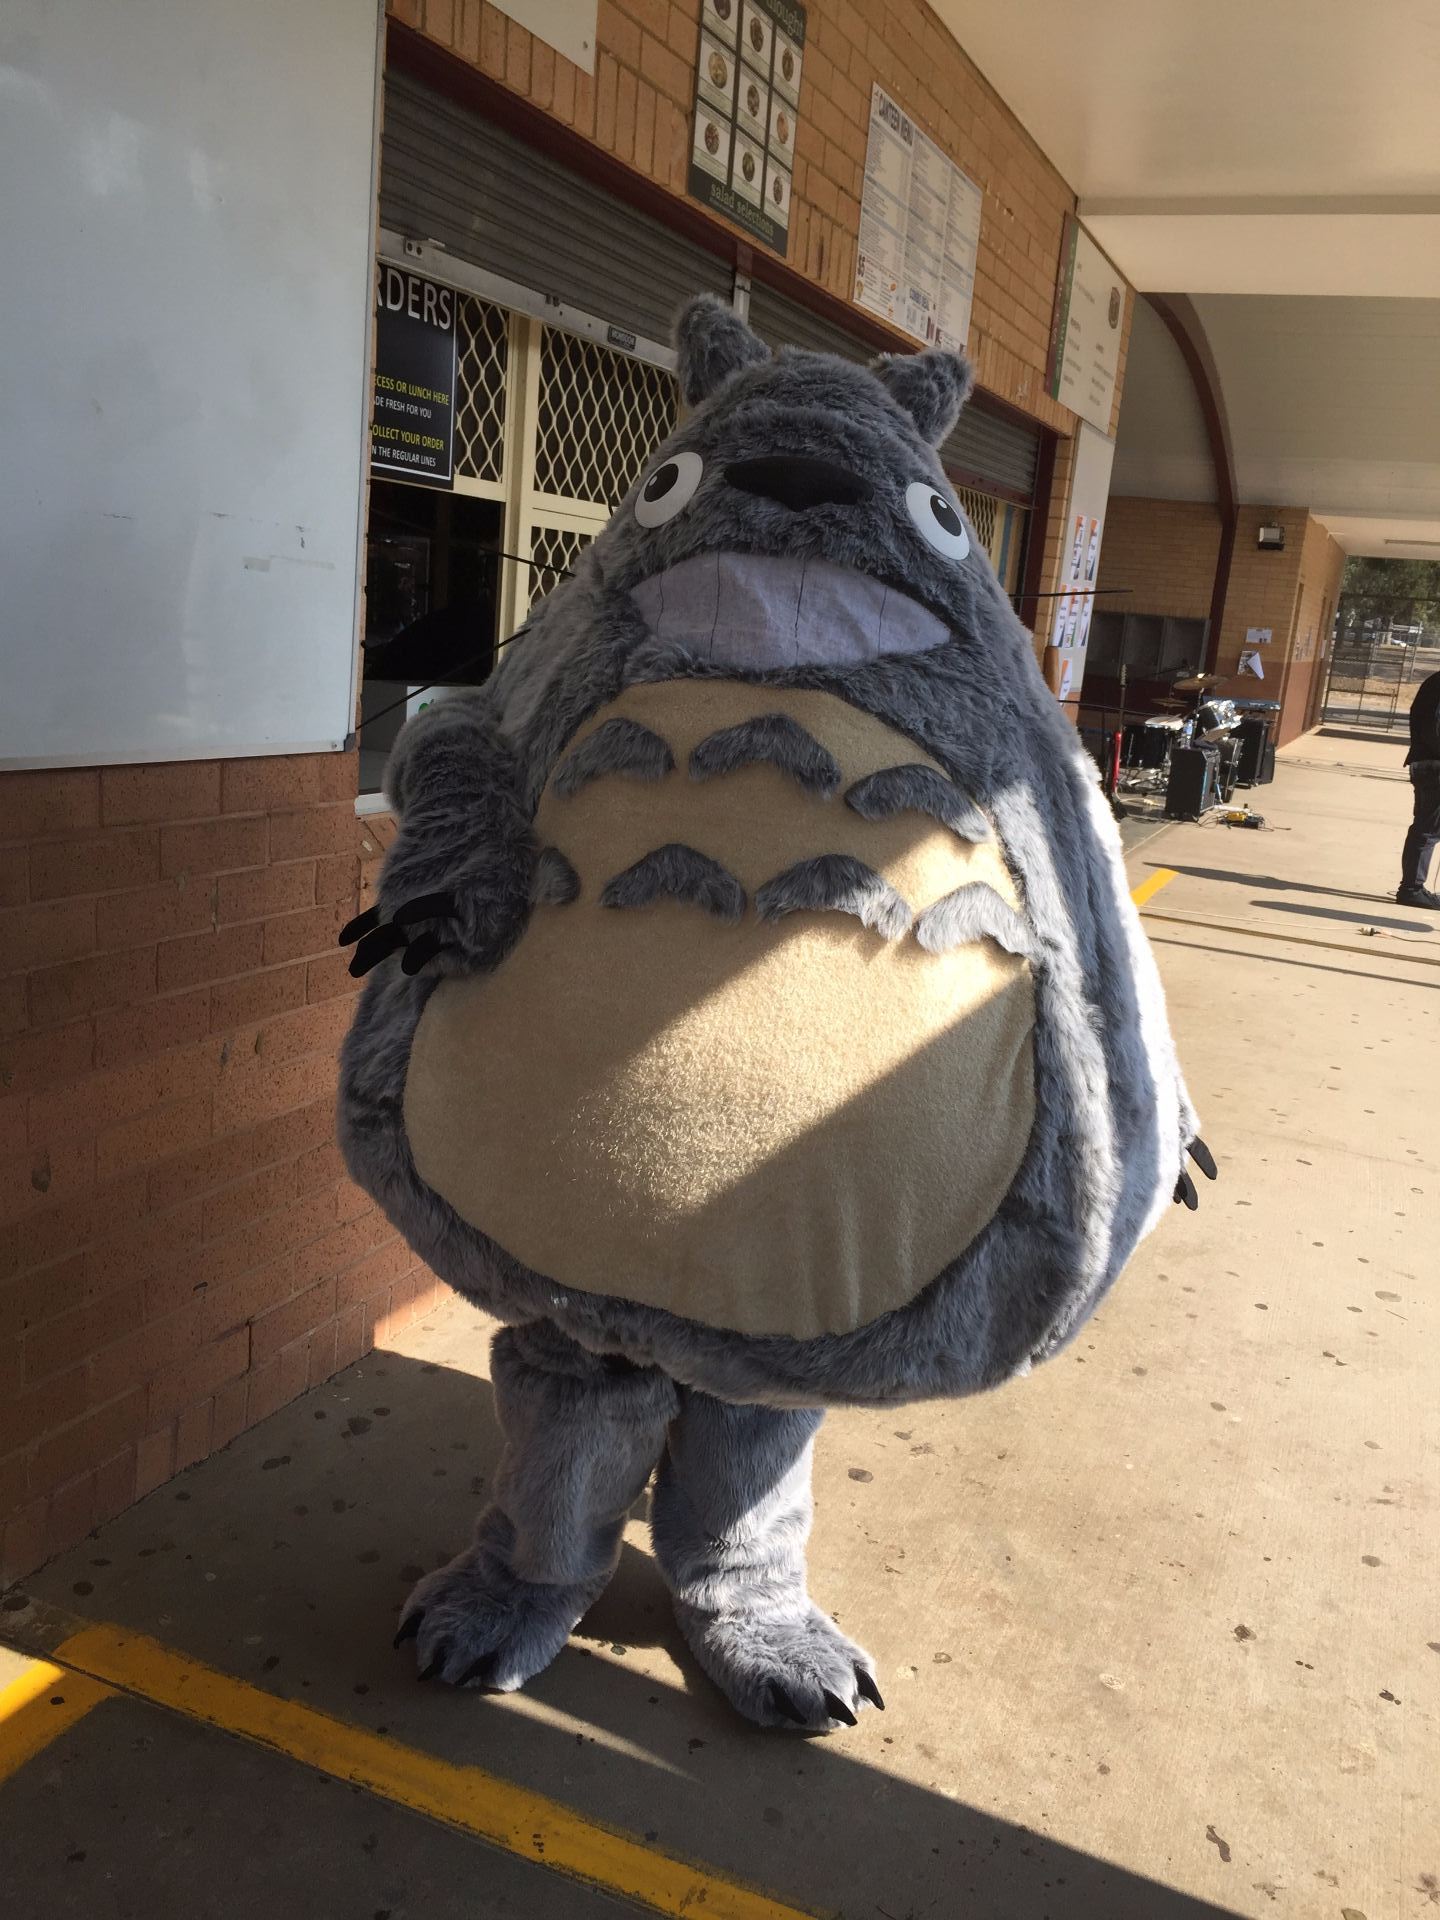
Totoro comes out to a roar from the whole school.
Totoro is happy to see the school!
Totoro waving to the students.
Totoro next to Jabba the Hutt in the Costume Parade.
It’s one day left until Celebration day! Today I was able to finish the feet and legs, attach the arms and try on the top half of the character to see how easy/ difficult it was to see and move inside the puppet.
To finish the legs, I made tubes of fur, sewed the bottom to the fur covering the feet and sewed the top of the tube to the top of a pair of leggings. I discovered one benefit of attaching the legs to just the fur of the feet, it gave me room to be able to get the real shoe inside the foot onto my foot more easily! I did cut the fur tubes 10cm too short because when I tried the whole puppet out, the top of the leggings could be seen, so I stitched on extra pieces of fur.
Legs and feet of Totoro
The arms were made the same way as in Adam Savage’s Totoro video. I used my own arm as a template with a mitten for the hand. All of the claws on my Totoro are made from box cardboard covered in black spandex. The claws were attached by cutting a slit through the fur, then fixed in place using hot glue.
Totoro has arms!
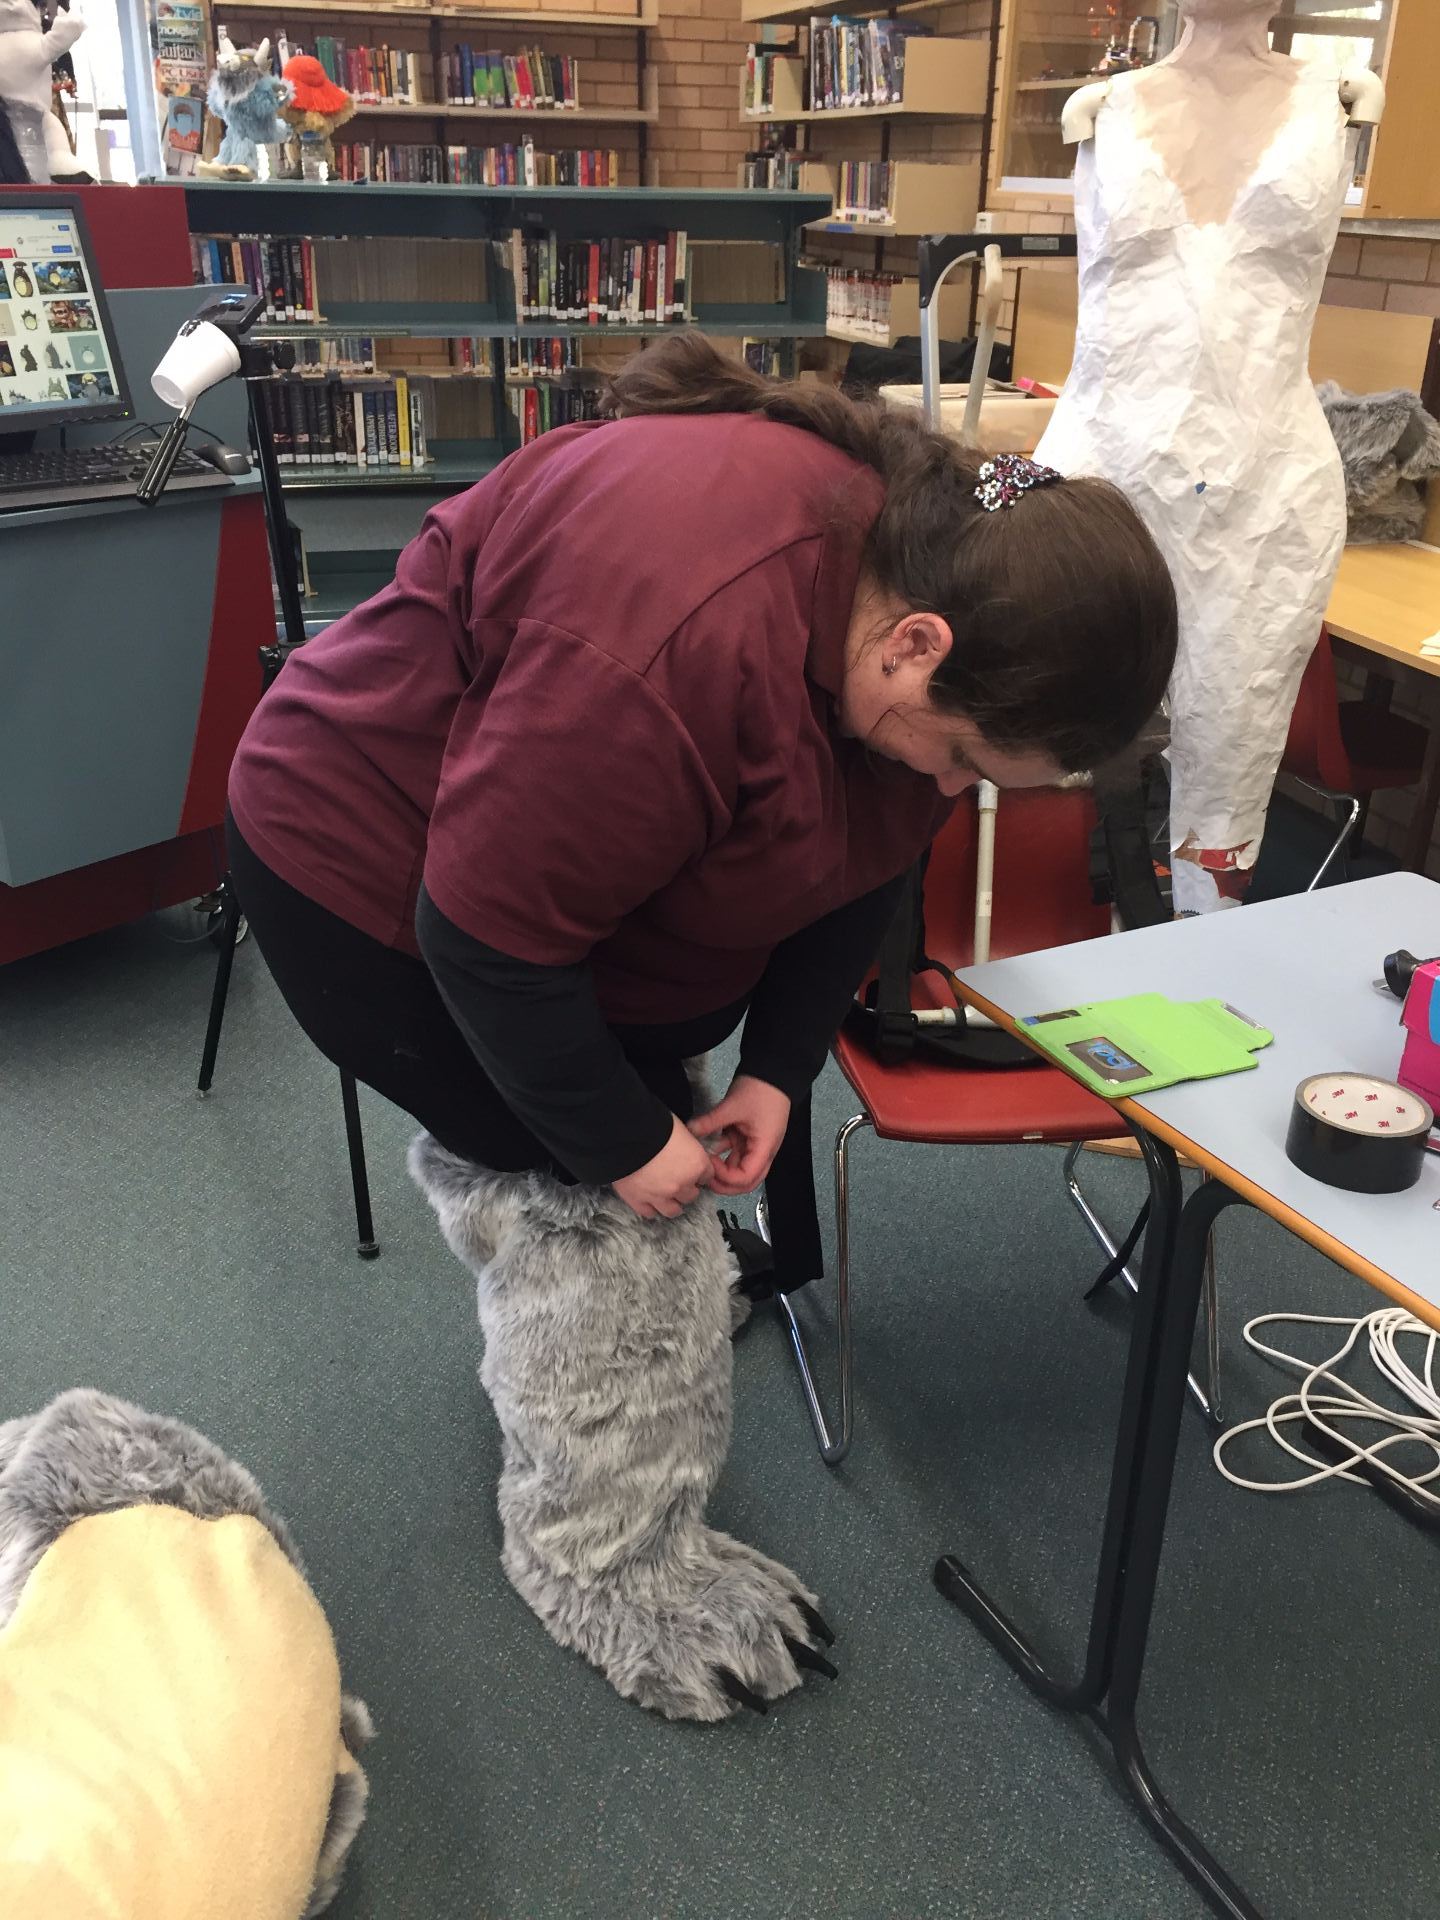
I tried on the top half of the costume with the backpack frame. The mast on the frame was still loose so I could make adjustments, but it rotated too far and the puppet was not being supported properly. It has turned into an overnight or first thing in the morning fix for me.
Adjusting the legs of Totoro
Getting into Totoro
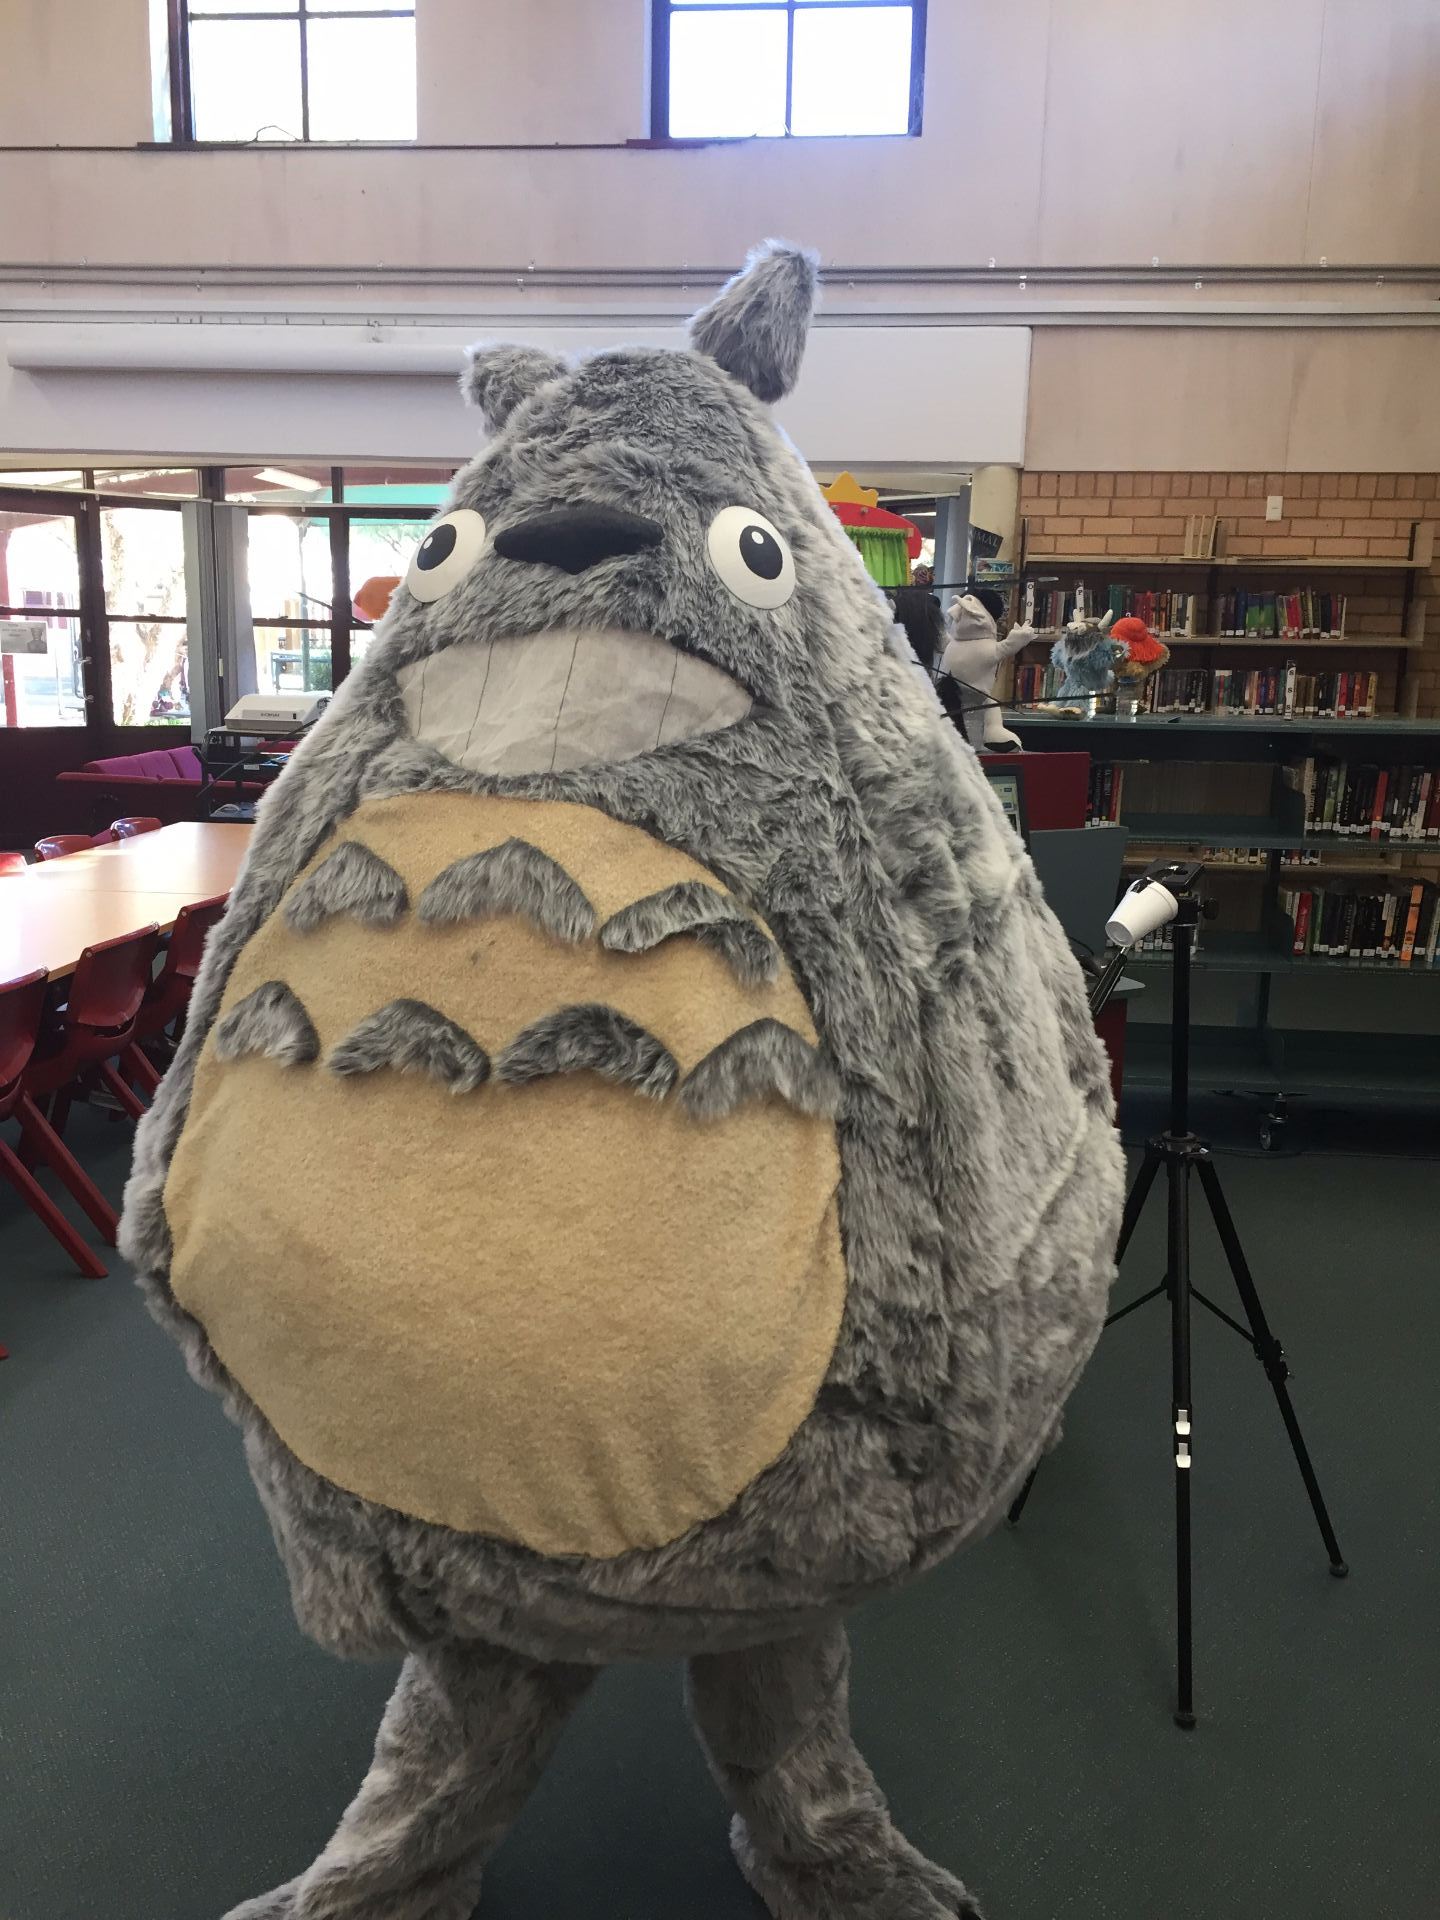
Totoro all together!
While I was in the costume, a student teacher saw me and wanted a selfie with Totoro! He already has fans! Tomorrow is going to be interesting!